Epson 680Pro Service Manual - Page 95
Remove the Front paper guide,
 |
UPC - 010343832138
View all Epson 680Pro manuals
Add to My Manuals
Save this manual to your list of manuals |
Page 95 highlights
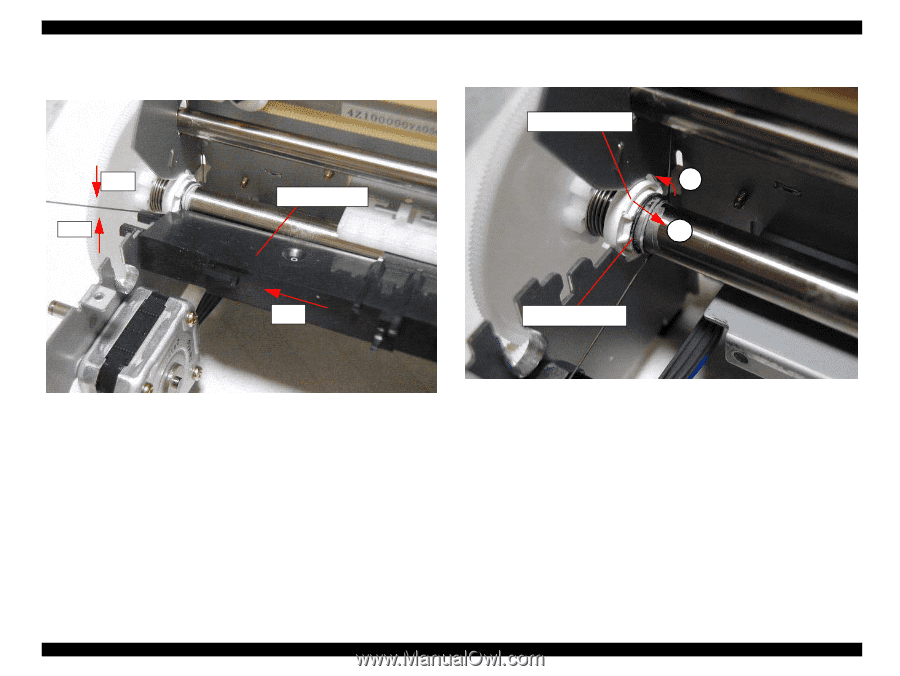
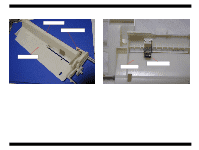
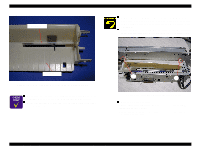
EPSON Stylus COLOR 680/777/777i Revision B 6. Lift up the left edge of the Front paper guide while slanting the Front paper guide by pulling up its front edge, and then slide the Front paper guide to the left side after releasing the right hook on the Front paper guide. 7. Fit the protrusions of the Left PF roller bushing to the notches in the frames as shown in the following figure and remove the PF roller fasten spacer with tweezer. Left PF roller bushing Step1 Step1 Paper guide front 1 2 Step2 Figure 4-51. Remove the Front paper guide PF roller fasten spacer Figure 4-52. Fit the protrusions of the Left PF roller bushing to each notches 8. Slide the Left PF roller bushing to right side as above figure Step 2. Disassembly and Assembly Disassembly 95
-
 1
1 -
2
-
3
-
4
-
5
-
6
-
7
-
8
-
9
-
10
-
11
-
12
-
13
-
14
-
15
-
16
-
17
-
18
-
19
-
20
-
21
-
22
-
23
-
24
-
25
-
26
-
27
-
28
-
29
-
30
-
31
-
32
-
33
-
34
-
35
-
36
-
37
-
38
-
39
-
40
-
41
-
42
-
43
-
44
-
45
-
46
-
47
-
48
-
49
-
50
-
51
-
52
-
53
-
54
-
55
-
56
-
57
-
58
-
59
-
60
-
61
-
62
-
63
-
64
-
65
-
66
-
67
-
68
-
69
-
70
-
71
-
72
-
73
-
74
-
75
-
76
-
77
-
78
-
79
-
80
-
81
-
82
-
83
-
84
-
85
-
86
-
87
-
88
-
89
-
 90
90 -
 91
91 -
 92
92 -
 93
93 -
 94
94 -
 95
95 -
 96
96 -
 97
97 -
 98
98 -
 99
99 -
 100
100 -
101
-
102
-
103
-
104
-
105
-
106
-
107
-
108
-
109
-
110
-
111
-
112
-
113
-
114
-
115
-
116
-
117
-
118
-
119
-
120
-
121
-
122
-
123
-
124
-
125
-
126
-
127
-
128
-
129
-
130
-
131
-
132
-
133
-
134
-
135
-
136
-
137
-
138
-
139
-
140
-
141
-
142
-
143
-
144
-
145
 |
 |