Epson 680Pro Service Manual - Page 54
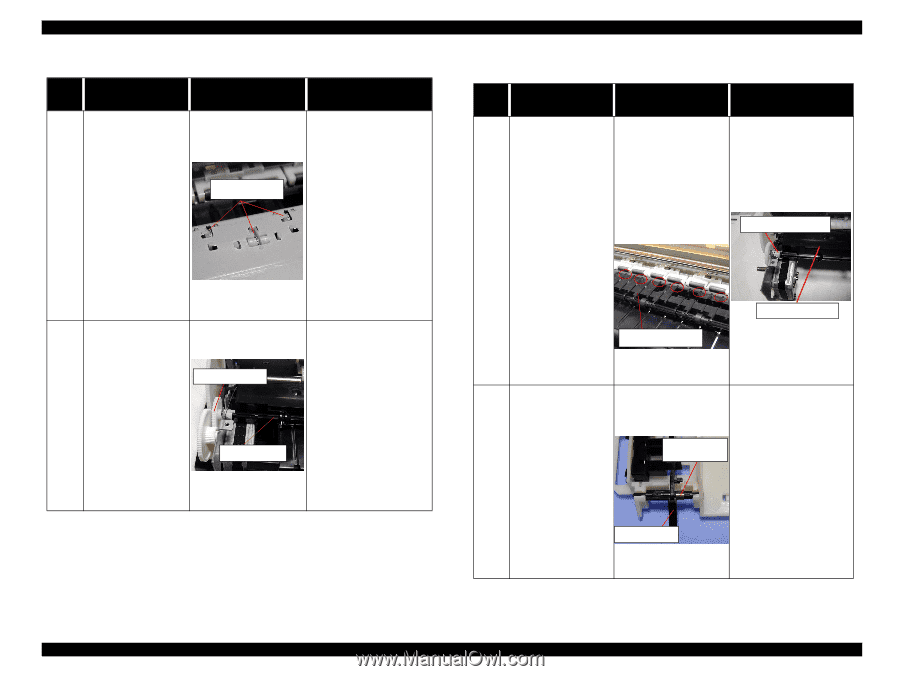
Table 3-8. Paper jam error indication, Detail phenomenon, Check point, Remedy
 |
UPC - 010343832138
View all Epson 680Pro manuals
Add to My Manuals
Save this manual to your list of manuals |
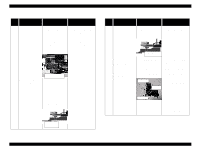
Page 54 highlights
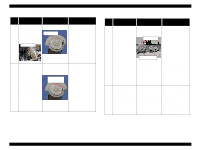
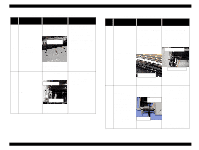
EPSON Stylus COLOR 680/777/777i Table 3-8. Paper jam error indication Step No. Detail phenomenon Paper is not ejected 1 completely and jammed around the Paper eject frame. Check point Remedy • Check if the star wheel assembly is assembled in the Paper eject frame. Star wheel assy • Remove the jammed paper and assemble the Star wheel assembly in the Paper eject frame completely. If the hook portion of the Star wheel assembly is broken, replace the Star wheel assembly with new one. 2 Ditto If it is no problem, proceed the next step. • Check if the Paper eject roller is rotating correctly. Paper eject roller • Set the tip of the Spur gear 25.6 to the Combination gear 11.6, 36.8 and assemble it correctly. Spur gear 25.6 If it is no problem, proceed the next step. Revision B Table 3-9. Paper jam error indication Step No. Detail phenomenon Check point Remedy 1. Check if the Front 1. Assemble the Front paper guide is floating paper guide front to the from the assemble suitable portion and position. confirm the PF 2. Check if there is any damage around the rear edge of the each grounding spring is securing the Front paper guide. rib on the Front paper guide. PF grounding spring The paper is jammed 3 around the Front paper guide. Front Paper guide Front paper guide 2. Replace the Front paper guide with new one. If it is no problem, proceed the next step. • Check if the Torsion • If the Torsion spring spring 0.22 comes off 0.22 is not set on the Paper is loaded on the both PE sensor correct position, set it correctly from ASF. lever. correctly. If any paper But, after complete the Tension spring dust is placed around the print job, paper jam 0.22 PE sensor lever, remove indicated on the screen it. 4 without any paper jam. If you send the new print job in this condition, the General error is indicated on the screen. PE sensor lever • If it is no problem, proceed the next step. Troubleshooting Troubleshooting with LED Error Indications 54
-
 1
1 -
2
-
3
-
4
-
5
-
6
-
7
-
8
-
9
-
10
-
11
-
12
-
13
-
14
-
15
-
16
-
17
-
18
-
19
-
20
-
21
-
22
-
23
-
24
-
25
-
26
-
27
-
28
-
29
-
30
-
31
-
32
-
33
-
34
-
35
-
36
-
37
-
38
-
39
-
40
-
41
-
42
-
43
-
44
-
45
-
46
-
47
-
48
-
 49
49 -
 50
50 -
 51
51 -
 52
52 -
 53
53 -
 54
54 -
 55
55 -
 56
56 -
 57
57 -
 58
58 -
 59
59 -
60
-
61
-
62
-
63
-
64
-
65
-
66
-
67
-
68
-
69
-
70
-
71
-
72
-
73
-
74
-
75
-
76
-
77
-
78
-
79
-
80
-
81
-
82
-
83
-
84
-
85
-
86
-
87
-
88
-
89
-
90
-
91
-
92
-
93
-
94
-
95
-
96
-
97
-
98
-
99
-
100
-
101
-
102
-
103
-
104
-
105
-
106
-
107
-
108
-
109
-
110
-
111
-
112
-
113
-
114
-
115
-
116
-
117
-
118
-
119
-
120
-
121
-
122
-
123
-
124
-
125
-
126
-
127
-
128
-
129
-
130
-
131
-
132
-
133
-
134
-
135
-
136
-
137
-
138
-
139
-
140
-
141
-
142
-
143
-
144
-
145
 |
 |