Epson FX-286 User Manual - Page 120
Installing the new print head, D-1. Print head replacement
 |
View all Epson FX-286 manuals
Add to My Manuals
Save this manual to your list of manuals |
Page 120 highlights
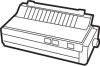
to cool. Next, remove the dust cover and ribbon cartridge. Push the silver head-lock lever on the left side of the head away from you. Figure D-1. Print head replacement Push the carriage to the left end and disconnect the ribbon cable from the connector block (at the bottom of the printer mechanism, under the carriage) by pulling the heavy plastic tab just below the ribbon cable. Pull the print head straight up and off of the carriage. Installing the new print head Place the new print head onto the head mount and flip the locking lever back toward the front of the printer. Connect the cable to the block. That's all there is to it! D-2
-
 1
1 -
2
-
3
-
4
-
5
-
6
-
7
-
8
-
9
-
10
-
11
-
12
-
13
-
14
-
15
-
16
-
17
-
18
-
19
-
20
-
21
-
22
-
23
-
24
-
25
-
26
-
27
-
28
-
29
-
30
-
31
-
32
-
33
-
34
-
35
-
36
-
37
-
38
-
39
-
40
-
41
-
42
-
43
-
44
-
45
-
46
-
47
-
48
-
49
-
50
-
51
-
52
-
53
-
54
-
55
-
56
-
57
-
58
-
59
-
60
-
61
-
62
-
63
-
64
-
65
-
66
-
67
-
68
-
69
-
70
-
71
-
72
-
73
-
74
-
75
-
76
-
77
-
78
-
79
-
80
-
81
-
82
-
83
-
84
-
85
-
86
-
87
-
88
-
89
-
90
-
91
-
92
-
93
-
94
-
95
-
96
-
97
-
98
-
99
-
100
-
101
-
102
-
103
-
104
-
105
-
106
-
107
-
108
-
109
-
110
-
111
-
112
-
113
-
114
-
 115
115 -
 116
116 -
 117
117 -
 118
118 -
 119
119 -
 120
120 -
 121
121 -
 122
122 -
 123
123 -
 124
124 -
 125
125 -
126
-
127
-
128
-
129
-
130
-
131
-
132
-
133
-
134
-
135
-
136
-
137
-
138
-
139
-
140
-
141
-
142
-
143
-
144
-
145
-
146
-
147
-
148
-
149
-
150
-
151
-
152
-
153
-
154
-
155
-
156
-
157
-
158
-
159
-
160
-
161
-
162
-
163
-
164
-
165
-
166
-
167
-
168
-
169
-
170
-
171
-
172
-
173
-
174
-
175
-
176
-
177
-
178
-
179
-
180
-
181
-
182
-
183
-
184
-
185
-
186
-
187
-
188
-
189
-
190
-
191
-
192
-
193
-
194
-
195
-
196
-
197
-
198
-
199
-
200
-
201
-
202
-
203
-
204
-
205
-
206
-
207
-
208
-
209
-
210
-
211
-
212
-
213
-
214
-
215
-
216
-
217
-
218
-
219
-
220
-
221
-
222
-
223
 |
 |

to cool. Next, remove the dust cover and ribbon cartridge. Push the
silver head-lock lever on the left side of the head away from you.
Figure D-1. Print head replacement
Push the carriage to the left end and disconnect the ribbon cable
from the connector block (at the bottom of the printer mechanism,
under the carriage) by pulling the heavy plastic tab just below the
ribbon cable. Pull the print head straight up and off of the carriage.
Installing the new print head
Place the new print head onto the head mount and flip the locking
lever back toward the front of the printer. Connect the cable to the
block. That’s all there is to it!
D-2