Epson FX-286 User Manual - Page 19
Replacing the ribbon..., Loading Continuous-feed Paper, Positioning the ribbon
 |
View all Epson FX-286 manuals
Add to My Manuals
Save this manual to your list of manuals |
Page 19 highlights
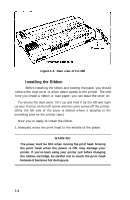
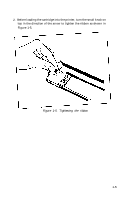
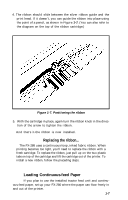
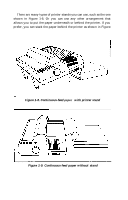
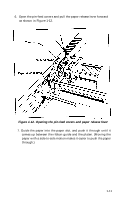
4. The ribbon should slide between the silver ribbon guide and the print head. If it doesn't, you can guide the ribbon into place using the point of a pencil, as shown in Figure 1-7. (You can also refer to the diagram on the top of the ribbon cartridge.) Figure 1-7. Positioning the ribbon 5. With the cartridge in place, again turn the ribbon knob in the direc- tion of the arrow to tighten the ribbon. And that's it-the ribbon is now installed. Replacing the ribbon... The FX-286 uses a continuous-loop, inked fabric ribbon. When printing becomes too light, you'll need to replace the ribbon with a fresh cartridge. To replace the ribbon, just pull up on the two plastic tabs on top of the cartridge and lift the cartridge out of the printer. To install a new ribbon, follow the preceding steps. 4 Loading Continuous-feed Paper If you plan to use the installed tractor feed unit and continuous-feed paper, set up your FX-286 where the paper can flow freely in and out of the printer. 1-7
-
 1
1 -
2
-
3
-
4
-
5
-
6
-
7
-
8
-
9
-
10
-
11
-
12
-
13
-
 14
14 -
 15
15 -
 16
16 -
 17
17 -
 18
18 -
 19
19 -
 20
20 -
 21
21 -
 22
22 -
 23
23 -
 24
24 -
25
-
26
-
27
-
28
-
29
-
30
-
31
-
32
-
33
-
34
-
35
-
36
-
37
-
38
-
39
-
40
-
41
-
42
-
43
-
44
-
45
-
46
-
47
-
48
-
49
-
50
-
51
-
52
-
53
-
54
-
55
-
56
-
57
-
58
-
59
-
60
-
61
-
62
-
63
-
64
-
65
-
66
-
67
-
68
-
69
-
70
-
71
-
72
-
73
-
74
-
75
-
76
-
77
-
78
-
79
-
80
-
81
-
82
-
83
-
84
-
85
-
86
-
87
-
88
-
89
-
90
-
91
-
92
-
93
-
94
-
95
-
96
-
97
-
98
-
99
-
100
-
101
-
102
-
103
-
104
-
105
-
106
-
107
-
108
-
109
-
110
-
111
-
112
-
113
-
114
-
115
-
116
-
117
-
118
-
119
-
120
-
121
-
122
-
123
-
124
-
125
-
126
-
127
-
128
-
129
-
130
-
131
-
132
-
133
-
134
-
135
-
136
-
137
-
138
-
139
-
140
-
141
-
142
-
143
-
144
-
145
-
146
-
147
-
148
-
149
-
150
-
151
-
152
-
153
-
154
-
155
-
156
-
157
-
158
-
159
-
160
-
161
-
162
-
163
-
164
-
165
-
166
-
167
-
168
-
169
-
170
-
171
-
172
-
173
-
174
-
175
-
176
-
177
-
178
-
179
-
180
-
181
-
182
-
183
-
184
-
185
-
186
-
187
-
188
-
189
-
190
-
191
-
192
-
193
-
194
-
195
-
196
-
197
-
198
-
199
-
200
-
201
-
202
-
203
-
204
-
205
-
206
-
207
-
208
-
209
-
210
-
211
-
212
-
213
-
214
-
215
-
216
-
217
-
218
-
219
-
220
-
221
-
222
-
223
 |
 |
