Epson FX-286 User Manual - Page 83
Density Varieties, reset code to return the printer to its defaults.
 |
View all Epson FX-286 manuals
Add to My Manuals
Save this manual to your list of manuals |
Page 83 highlights
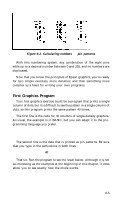
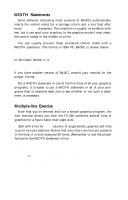
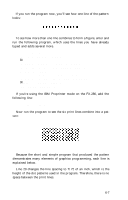
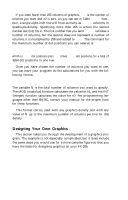
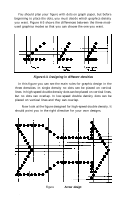
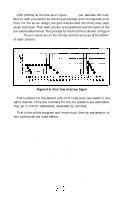
Line 30 begins a loop to produce multiple print lines. Lines 40 and 50 were explained previously. Lines 70 and 80 are similar to lines 40 and 50 except that line 80 uses a reversal of the patterns in line 50. As the loop is executed, the program prints lines 50 and 80 alternately so that the patterns of the print lines will fit together well. Notice that the graphics command can be in effect for only one print line. The command is in lines 40 and 70 so that it is issued each time a new print line is begun. To print more than one line of graphics, the graphics command must be issued before each line. Line 100 is the reset code to return the printer to its defaults. Density Varieties Although all the examples so far in this chapter have been in the singledensity graphics mode, the FX-286 offers seven other eight-pin density modes and two for nine-pin. Nine-pin graphics (Epson mode only) is not necessary for most uses, but you can find the command (ESCape "^") in Appendix G. All the eight-pin densities and their com- mands are described in Table 6-1. 6-8
-
 1
1 -
2
-
3
-
4
-
5
-
6
-
7
-
8
-
9
-
10
-
11
-
12
-
13
-
14
-
15
-
16
-
17
-
18
-
19
-
20
-
21
-
22
-
23
-
24
-
25
-
26
-
27
-
28
-
29
-
30
-
31
-
32
-
33
-
34
-
35
-
36
-
37
-
38
-
39
-
40
-
41
-
42
-
43
-
44
-
45
-
46
-
47
-
48
-
49
-
50
-
51
-
52
-
53
-
54
-
55
-
56
-
57
-
58
-
59
-
60
-
61
-
62
-
63
-
64
-
65
-
66
-
67
-
68
-
69
-
70
-
71
-
72
-
73
-
74
-
75
-
76
-
77
-
 78
78 -
 79
79 -
 80
80 -
 81
81 -
 82
82 -
 83
83 -
 84
84 -
 85
85 -
 86
86 -
 87
87 -
 88
88 -
89
-
90
-
91
-
92
-
93
-
94
-
95
-
96
-
97
-
98
-
99
-
100
-
101
-
102
-
103
-
104
-
105
-
106
-
107
-
108
-
109
-
110
-
111
-
112
-
113
-
114
-
115
-
116
-
117
-
118
-
119
-
120
-
121
-
122
-
123
-
124
-
125
-
126
-
127
-
128
-
129
-
130
-
131
-
132
-
133
-
134
-
135
-
136
-
137
-
138
-
139
-
140
-
141
-
142
-
143
-
144
-
145
-
146
-
147
-
148
-
149
-
150
-
151
-
152
-
153
-
154
-
155
-
156
-
157
-
158
-
159
-
160
-
161
-
162
-
163
-
164
-
165
-
166
-
167
-
168
-
169
-
170
-
171
-
172
-
173
-
174
-
175
-
176
-
177
-
178
-
179
-
180
-
181
-
182
-
183
-
184
-
185
-
186
-
187
-
188
-
189
-
190
-
191
-
192
-
193
-
194
-
195
-
196
-
197
-
198
-
199
-
200
-
201
-
202
-
203
-
204
-
205
-
206
-
207
-
208
-
209
-
210
-
211
-
212
-
213
-
214
-
215
-
216
-
217
-
218
-
219
-
220
-
221
-
222
-
223
 |
 |
