Epson FX-286 User Manual - Page 31
Adjusting the Paper-thickness Lever, FX-286
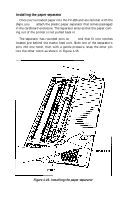
 |
View all Epson FX-286 manuals
Add to My Manuals
Save this manual to your list of manuals |
Page 31 highlights
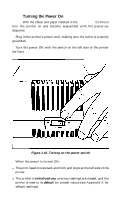
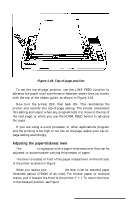
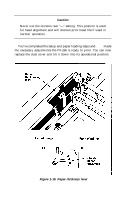
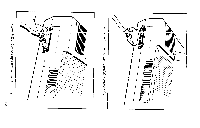
Figure 1-18. Top-of-page position To set the top-of-page position, use the LINE FEED function to advance the paper until a perforation between sheets lines up evenly with the top of the ribbon guide, as shown in Figure 1-18. Now turn the printer OFF, then back ON. This reinitializes the printer and records this top-of-page setting. The printer remembers this setting and uses it when any program tells it to move to the top of the next page, or when you use the FORM FEED button to advance the paper. If you are using a word processor or other applications program and the printing is too high or too low on the page, adjust your top-ofpage setting accordingly. Adjusting the paper-thickness lever The FX-286 is equipped with a paper-thickness lever that can be adjusted to accommodate varying thicknesses of paper. The lever is located in front of the paper release lever on the left side of the printer as shown in Figure 1-19. When you receive your FX-286, the lever is set for standard paper thickness (about 1/500th of an inch). For thicker paper or multiple copies, pull it toward the front of the printer ("+"). To return the lever to the standard position, see Figure 1-19. 1-19
-
 1
1 -
2
-
3
-
4
-
5
-
6
-
7
-
8
-
9
-
10
-
11
-
12
-
13
-
14
-
15
-
16
-
17
-
18
-
19
-
20
-
21
-
22
-
23
-
24
-
25
-
 26
26 -
 27
27 -
 28
28 -
 29
29 -
 30
30 -
 31
31 -
 32
32 -
 33
33 -
 34
34 -
 35
35 -
 36
36 -
37
-
38
-
39
-
40
-
41
-
42
-
43
-
44
-
45
-
46
-
47
-
48
-
49
-
50
-
51
-
52
-
53
-
54
-
55
-
56
-
57
-
58
-
59
-
60
-
61
-
62
-
63
-
64
-
65
-
66
-
67
-
68
-
69
-
70
-
71
-
72
-
73
-
74
-
75
-
76
-
77
-
78
-
79
-
80
-
81
-
82
-
83
-
84
-
85
-
86
-
87
-
88
-
89
-
90
-
91
-
92
-
93
-
94
-
95
-
96
-
97
-
98
-
99
-
100
-
101
-
102
-
103
-
104
-
105
-
106
-
107
-
108
-
109
-
110
-
111
-
112
-
113
-
114
-
115
-
116
-
117
-
118
-
119
-
120
-
121
-
122
-
123
-
124
-
125
-
126
-
127
-
128
-
129
-
130
-
131
-
132
-
133
-
134
-
135
-
136
-
137
-
138
-
139
-
140
-
141
-
142
-
143
-
144
-
145
-
146
-
147
-
148
-
149
-
150
-
151
-
152
-
153
-
154
-
155
-
156
-
157
-
158
-
159
-
160
-
161
-
162
-
163
-
164
-
165
-
166
-
167
-
168
-
169
-
170
-
171
-
172
-
173
-
174
-
175
-
176
-
177
-
178
-
179
-
180
-
181
-
182
-
183
-
184
-
185
-
186
-
187
-
188
-
189
-
190
-
191
-
192
-
193
-
194
-
195
-
196
-
197
-
198
-
199
-
200
-
201
-
202
-
203
-
204
-
205
-
206
-
207
-
208
-
209
-
210
-
211
-
212
-
213
-
214
-
215
-
216
-
217
-
218
-
219
-
220
-
221
-
222
-
223
 |
 |
