Epson FX-286 User Manual - Page 26
Installing the paper separator, Installing the paper separator
 |
View all Epson FX-286 manuals
Add to My Manuals
Save this manual to your list of manuals |
Page 26 highlights
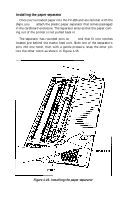
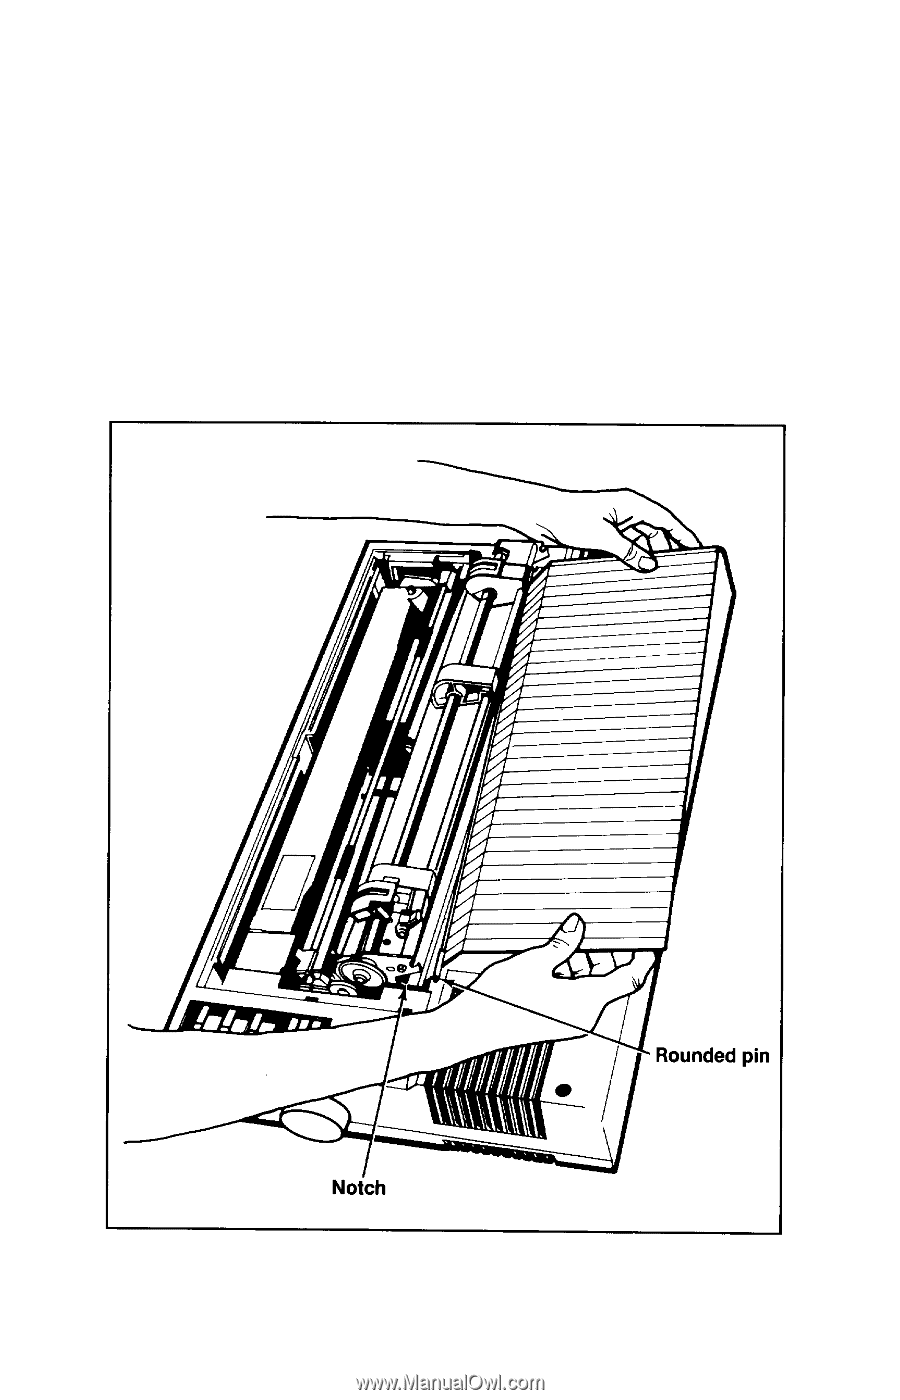
Installing the paper separator Once you've loaded paper into the FX-286 and are familiar with the steps, you can attach the plastic paper separator that comes packaged in the cardboard enclosure. The separator ensures that the paper coming out of the printer is not pulled back in. The separator has rounded pins on each end that fit into notches located just behind the tractor feed unit. Slide one of the separator's pins into one notch, then with a gentle pressure, snap the other pin into the other notch as shown in Figure 1-15. Figure 1-15. Installing the paper separator 1-14
-
 1
1 -
2
-
3
-
4
-
5
-
6
-
7
-
8
-
9
-
10
-
11
-
12
-
13
-
14
-
15
-
16
-
17
-
18
-
19
-
20
-
 21
21 -
 22
22 -
 23
23 -
 24
24 -
 25
25 -
 26
26 -
 27
27 -
 28
28 -
 29
29 -
 30
30 -
 31
31 -
32
-
33
-
34
-
35
-
36
-
37
-
38
-
39
-
40
-
41
-
42
-
43
-
44
-
45
-
46
-
47
-
48
-
49
-
50
-
51
-
52
-
53
-
54
-
55
-
56
-
57
-
58
-
59
-
60
-
61
-
62
-
63
-
64
-
65
-
66
-
67
-
68
-
69
-
70
-
71
-
72
-
73
-
74
-
75
-
76
-
77
-
78
-
79
-
80
-
81
-
82
-
83
-
84
-
85
-
86
-
87
-
88
-
89
-
90
-
91
-
92
-
93
-
94
-
95
-
96
-
97
-
98
-
99
-
100
-
101
-
102
-
103
-
104
-
105
-
106
-
107
-
108
-
109
-
110
-
111
-
112
-
113
-
114
-
115
-
116
-
117
-
118
-
119
-
120
-
121
-
122
-
123
-
124
-
125
-
126
-
127
-
128
-
129
-
130
-
131
-
132
-
133
-
134
-
135
-
136
-
137
-
138
-
139
-
140
-
141
-
142
-
143
-
144
-
145
-
146
-
147
-
148
-
149
-
150
-
151
-
152
-
153
-
154
-
155
-
156
-
157
-
158
-
159
-
160
-
161
-
162
-
163
-
164
-
165
-
166
-
167
-
168
-
169
-
170
-
171
-
172
-
173
-
174
-
175
-
176
-
177
-
178
-
179
-
180
-
181
-
182
-
183
-
184
-
185
-
186
-
187
-
188
-
189
-
190
-
191
-
192
-
193
-
194
-
195
-
196
-
197
-
198
-
199
-
200
-
201
-
202
-
203
-
204
-
205
-
206
-
207
-
208
-
209
-
210
-
211
-
212
-
213
-
214
-
215
-
216
-
217
-
218
-
219
-
220
-
221
-
222
-
223
 |
 |
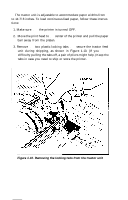
Installing the paper separator
Once you’ve loaded paper into the FX-286 and are familiar with the
steps, you
can
attach the plastic paper separator that comes packaged
in the cardboard enclosure. The separator ensures that the paper com-
ing out of the printer is not pulled back in.
The separator has rounded pins on
each
end that fit into notches
located just behind the tractor feed unit. Slide one of the separator’s
pins into one notch, then with a gentle pressure, snap the other pin
into the other notch as shown in Figure 1-15.
Figure 1-15. Installing the paper separator
1-14