Fujitsu 6770 Operator's Guide - Page 112
Operating the Scanner, With FUJITSU ISIS Scanner Driver
 |
UPC - 097564307478
View all Fujitsu 6770 manuals
Add to My Manuals
Save this manual to your list of manuals |
Page 112 highlights
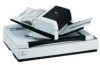
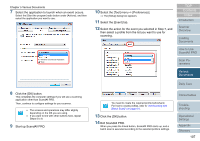
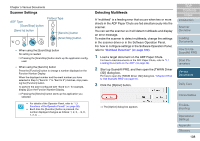
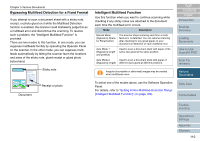
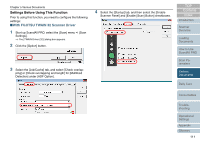
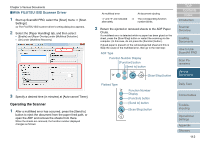
Chapter 5 Various Documents ■With FUJITSU ISIS Scanner Driver 1 Start up ScandAll PRO, select the [Scan] menu D [Scan Settings]. ⇒ The FUJITSU ISIS scanner driver's setting dialog box appears. 2 Select the [Paper Handling] tab, and then select: • [Enable] and [Paper Overlap] under [Multifeed Detection] • [On] under [Multifeed Recovery] 3 Specify a desired time (in minutes) at [Auto-cancel Timer]. Operating the Scanner 1 After a multifeed error has occurred, press the [Send to] button to eject the document from the paper feed path, or open the ADF and remove the sheets from there. When the sheets are removed, the function number displayed changes as follows: At multifeed error "J" and "2" are indicated alternately. At document ejecting D The corresponding function number blinks. 2 Return the ejected or removed sheets to the ADF Paper Chute. If a multifeed error is detected while no paper has been glued on the sheet, press the [Scan/Stop] button or restart the scanning via the computer. (In this case, do not press the [Function] button.) If glued paper is present on the removed/ejected sheet and this is likely the cause of the multifeed error, then go to the next step: ADF Type Function Number Display [Function] button [Send to] button Function Scan / Stop Power Check Send to [Scan/Stop] button Flatbed Type Check Function Send to Scan / Stop Power Function Number Display [Function] button [Send to] button [Scan/Stop] button TOP Contents Index Introduction Scanner Overview Loading Documents How to Use ScandAll PRO Scan Parameters Various Documents Daily Care Consumables Troubleshooting Operational Settings Appendix Glossary 112
-
 1
1 -
2
-
3
-
4
-
5
-
6
-
7
-
8
-
9
-
10
-
11
-
12
-
13
-
14
-
15
-
16
-
17
-
18
-
19
-
20
-
21
-
22
-
23
-
24
-
25
-
26
-
27
-
28
-
29
-
30
-
31
-
32
-
33
-
34
-
35
-
36
-
37
-
38
-
39
-
40
-
41
-
42
-
43
-
44
-
45
-
46
-
47
-
48
-
49
-
50
-
51
-
52
-
53
-
54
-
55
-
56
-
57
-
58
-
59
-
60
-
61
-
62
-
63
-
64
-
65
-
66
-
67
-
68
-
69
-
70
-
71
-
72
-
73
-
74
-
75
-
76
-
77
-
78
-
79
-
80
-
81
-
82
-
83
-
84
-
85
-
86
-
87
-
88
-
89
-
90
-
91
-
92
-
93
-
94
-
95
-
96
-
97
-
98
-
99
-
100
-
101
-
102
-
103
-
104
-
105
-
106
-
 107
107 -
 108
108 -
 109
109 -
 110
110 -
 111
111 -
 112
112 -
 113
113 -
 114
114 -
 115
115 -
 116
116 -
 117
117 -
118
-
119
-
120
-
121
-
122
-
123
-
124
-
125
-
126
-
127
-
128
-
129
-
130
-
131
-
132
-
133
-
134
-
135
-
136
-
137
-
138
-
139
-
140
-
141
-
142
-
143
-
144
-
145
-
146
-
147
-
148
-
149
-
150
-
151
-
152
-
153
-
154
-
155
-
156
-
157
-
158
-
159
-
160
-
161
-
162
-
163
-
164
-
165
-
166
-
167
-
168
-
169
-
170
-
171
-
172
-
173
-
174
-
175
-
176
-
177
-
178
-
179
-
180
-
181
-
182
-
183
-
184
-
185
-
186
-
187
-
188
-
189
-
190
-
191
-
192
-
193
-
194
-
195
-
196
-
197
-
198
-
199
-
200
-
201
-
202
-
203
-
204
-
205
-
206
-
207
-
208
-
209
-
210
-
211
-
212
 |
 |
