Fujitsu 6770 Operator's Guide - Page 92
Creating with Adobe Acrobat
 |
UPC - 097564307478
View all Fujitsu 6770 manuals
Add to My Manuals
Save this manual to your list of manuals |
Page 92 highlights
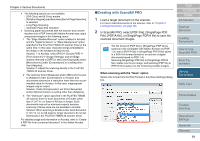
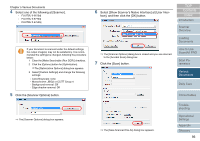
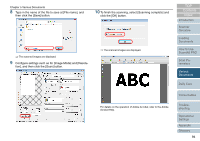
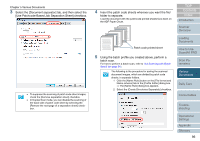
Chapter 5 Various Documents When scanning with the "Batch Scan" option Display a profile name you want to use for scanning your file in the [Profile Editor] dialog box. Select the [File format and Name scheme] tab, and then select a file format from [File Format]. 3 To configure PDF-related optional settings, click the [PDF Option] button. ⇒ The [Output PDF File] dialog box appears. 4 From ScandAll PRO, perform a scan. For how to perform a scan, refer to "Chapter 3 How to Use ScandAll PRO" (on page 51). ʂ ScandAll PRO features the outputting of scanned document images as PDF file(s), but does not officially support the function to open PDF files. To view PDF files, it is recommended you use an application that can open PDF files, such as Adobe Acrobat. ■Creating with Adobe Acrobat 1 Load a target document on the scanner. For how to load document on the scanner, refer to "Chapter 2 Loading Documents" (on page 38). 2 Select the [start] menu D [All Programs] D [Adobe Acrobat]. ⇒ Adobe Acrobat starts up. 3 Select the [File] menu D [Create PDF] D [From Scanner]. TOP Contents Index Introduction Scanner Overview Loading Documents How to Use ScandAll PRO Scan Parameters Various Documents Daily Care In this dialog box, you can change the compression rate for creating a file, turn on the OCR (i.e., text recognition) function to make searchable PDF files, and enhance the security of created PDF files by adding a password to. For details about the [Output PDF File] dialog box, refer to the ScandAll PRO Help. ⇒ The [Acrobat Scan] dialog box appears. Consumables Troubleshooting Operational Settings Appendix Glossary 92
-
 1
1 -
2
-
3
-
4
-
5
-
6
-
7
-
8
-
9
-
10
-
11
-
12
-
13
-
14
-
15
-
16
-
17
-
18
-
19
-
20
-
21
-
22
-
23
-
24
-
25
-
26
-
27
-
28
-
29
-
30
-
31
-
32
-
33
-
34
-
35
-
36
-
37
-
38
-
39
-
40
-
41
-
42
-
43
-
44
-
45
-
46
-
47
-
48
-
49
-
50
-
51
-
52
-
53
-
54
-
55
-
56
-
57
-
58
-
59
-
60
-
61
-
62
-
63
-
64
-
65
-
66
-
67
-
68
-
69
-
70
-
71
-
72
-
73
-
74
-
75
-
76
-
77
-
78
-
79
-
80
-
81
-
82
-
83
-
84
-
85
-
86
-
 87
87 -
 88
88 -
 89
89 -
 90
90 -
 91
91 -
 92
92 -
 93
93 -
 94
94 -
 95
95 -
 96
96 -
 97
97 -
98
-
99
-
100
-
101
-
102
-
103
-
104
-
105
-
106
-
107
-
108
-
109
-
110
-
111
-
112
-
113
-
114
-
115
-
116
-
117
-
118
-
119
-
120
-
121
-
122
-
123
-
124
-
125
-
126
-
127
-
128
-
129
-
130
-
131
-
132
-
133
-
134
-
135
-
136
-
137
-
138
-
139
-
140
-
141
-
142
-
143
-
144
-
145
-
146
-
147
-
148
-
149
-
150
-
151
-
152
-
153
-
154
-
155
-
156
-
157
-
158
-
159
-
160
-
161
-
162
-
163
-
164
-
165
-
166
-
167
-
168
-
169
-
170
-
171
-
172
-
173
-
174
-
175
-
176
-
177
-
178
-
179
-
180
-
181
-
182
-
183
-
184
-
185
-
186
-
187
-
188
-
189
-
190
-
191
-
192
-
193
-
194
-
195
-
196
-
197
-
198
-
199
-
200
-
201
-
202
-
203
-
204
-
205
-
206
-
207
-
208
-
209
-
210
-
211
-
212
 |
 |
