Fujitsu 6770 Operator's Guide - Page 126
Attach new two Pick Rollers to the scanner., Attach the ADF Paper Chute., Close the ADF., Reset
 |
UPC - 097564307478
View all Fujitsu 6770 manuals
Add to My Manuals
Save this manual to your list of manuals |
Page 126 highlights
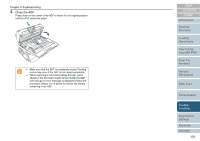
Chapter 7 Consumables 2 Pull out the two Pick Rollers from the rotating shaft. 5 Attach new two Pick Rollers to the scanner. 1 Attach both of the two Pick Rollers to the rotating shaft. Insert each roller so its socket will fit to the rotating shaft screw on the scanner. 2 Close the Pick Roller Cover. Confirm that both sides of the cover are locked firmly. 6 Attach the ADF Paper Chute. 7 Close the ADF. Press down on the center of the ADF to return it to its original position until the ADF clicks into place. TOP Contents Index Introduction Scanner Overview Loading Documents How to Use ScandAll PRO Scan Parameters CAUTION Be careful, the ADF may close and pinch your fingers. ʂ • Do not close the ADF while the Pick Roller Cover is kept open. • Confirm that the Pick Rollers are attached firmly. If not, paper feed errors such as paper jams will occur. 8 Reset the pick roller counter. Start up the Software Operation Panel, and then reset the counter. For details, refer to "Resetting the counters" (on page 166). Various Documents Daily Care Consumables Troubleshooting Operational Settings Appendix Glossary 126
-
 1
1 -
2
-
3
-
4
-
5
-
6
-
7
-
8
-
9
-
10
-
11
-
12
-
13
-
14
-
15
-
16
-
17
-
18
-
19
-
20
-
21
-
22
-
23
-
24
-
25
-
26
-
27
-
28
-
29
-
30
-
31
-
32
-
33
-
34
-
35
-
36
-
37
-
38
-
39
-
40
-
41
-
42
-
43
-
44
-
45
-
46
-
47
-
48
-
49
-
50
-
51
-
52
-
53
-
54
-
55
-
56
-
57
-
58
-
59
-
60
-
61
-
62
-
63
-
64
-
65
-
66
-
67
-
68
-
69
-
70
-
71
-
72
-
73
-
74
-
75
-
76
-
77
-
78
-
79
-
80
-
81
-
82
-
83
-
84
-
85
-
86
-
87
-
88
-
89
-
90
-
91
-
92
-
93
-
94
-
95
-
96
-
97
-
98
-
99
-
100
-
101
-
102
-
103
-
104
-
105
-
106
-
107
-
108
-
109
-
110
-
111
-
112
-
113
-
114
-
115
-
116
-
117
-
118
-
119
-
120
-
 121
121 -
 122
122 -
 123
123 -
 124
124 -
 125
125 -
 126
126 -
 127
127 -
 128
128 -
 129
129 -
 130
130 -
 131
131 -
132
-
133
-
134
-
135
-
136
-
137
-
138
-
139
-
140
-
141
-
142
-
143
-
144
-
145
-
146
-
147
-
148
-
149
-
150
-
151
-
152
-
153
-
154
-
155
-
156
-
157
-
158
-
159
-
160
-
161
-
162
-
163
-
164
-
165
-
166
-
167
-
168
-
169
-
170
-
171
-
172
-
173
-
174
-
175
-
176
-
177
-
178
-
179
-
180
-
181
-
182
-
183
-
184
-
185
-
186
-
187
-
188
-
189
-
190
-
191
-
192
-
193
-
194
-
195
-
196
-
197
-
198
-
199
-
200
-
201
-
202
-
203
-
204
-
205
-
206
-
207
-
208
-
209
-
210
-
211
-
212
 |
 |
