Garmin GTN 750 Pilot's Guide - Page 24
Pilot Controls - installed
 |
View all Garmin GTN 750 manuals
Add to My Manuals
Save this manual to your list of manuals |
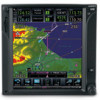
Page 24 highlights
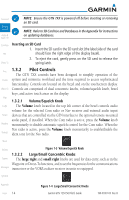
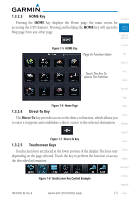
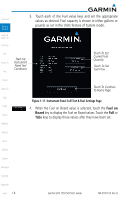
Foreword Getting Started Audio & Xpdr Ctrl NOTE: Ensure the GTN 7XX is powered off before inserting or removing an SD card. NOTE: Refer to SD Card Use and Databases in the Appendix for instructions on updating databases. Com/Nav FPL Direct-To Inserting an SD Card 1. Insert the SD card in the SD card slot (the label side of the card should face the right edge of the display bezel). 2. To eject the card, gently press on the SD card to release the spring latch. Proc 1.3.2 Pilot Controls The GTN 7XX controls have been designed to simplify operation of the Charts system and minimize workload and the time required to access sophisticated functionality. Controls are located on the bezel and on the touchscreen display. Wpt Info Controls are comprised of dual concentric knobs, volume/squelch knob, bezel keys, and active touch areas on the display. Map 1.3.2.1 Volume/Squelch Knob Traffic The Volume knob located in the top left corner of the bezel controls audio volume for the selected Com radio or Nav receiver and external audio input Terrain devices that are controlled via the GTN interface to the optional remote-mounted audio panel, if installed. When the Com radio is active, press the Volume knob Weather momentarily to disable automatic squelch control for the Com radio. When the Nav radio is active, press the Volume knob momentarily to enable/disable the Nearest ident tone for the Nav radio. Music Utilities Figure 1-3 Volume/Squelch Knob 1.3.2.2 Large/Small Concentric Knobs System The large right and small right knobs are used for data entry, such as in the Waypoint or Direct-To functions, and to set the frequencies for the communications Messages transceiver or the VOR/Localizer receiver in units so equipped. Symbols Appendix Index 1-4 Figure 1-4 Large/Small Concentric Knobs Garmin GTN 725/750 Pilot's Guide 190-01007-03 Rev. B
-
 1
1 -
2
-
3
-
4
-
5
-
6
-
7
-
8
-
9
-
10
-
11
-
12
-
13
-
14
-
15
-
16
-
17
-
18
-
 19
19 -
 20
20 -
 21
21 -
 22
22 -
 23
23 -
 24
24 -
 25
25 -
 26
26 -
 27
27 -
 28
28 -
 29
29 -
30
-
31
-
32
-
33
-
34
-
35
-
36
-
37
-
38
-
39
-
40
-
41
-
42
-
43
-
44
-
45
-
46
-
47
-
48
-
49
-
50
-
51
-
52
-
53
-
54
-
55
-
56
-
57
-
58
-
59
-
60
-
61
-
62
-
63
-
64
-
65
-
66
-
67
-
68
-
69
-
70
-
71
-
72
-
73
-
74
-
75
-
76
-
77
-
78
-
79
-
80
-
81
-
82
-
83
-
84
-
85
-
86
-
87
-
88
-
89
-
90
-
91
-
92
-
93
-
94
-
95
-
96
-
97
-
98
-
99
-
100
-
101
-
102
-
103
-
104
-
105
-
106
-
107
-
108
-
109
-
110
-
111
-
112
-
113
-
114
-
115
-
116
-
117
-
118
-
119
-
120
-
121
-
122
-
123
-
124
-
125
-
126
-
127
-
128
-
129
-
130
-
131
-
132
-
133
-
134
-
135
-
136
-
137
-
138
-
139
-
140
-
141
-
142
-
143
-
144
-
145
-
146
-
147
-
148
-
149
-
150
-
151
-
152
-
153
-
154
-
155
-
156
-
157
-
158
-
159
-
160
-
161
-
162
-
163
-
164
-
165
-
166
-
167
-
168
-
169
-
170
-
171
-
172
-
173
-
174
-
175
-
176
-
177
-
178
-
179
-
180
-
181
-
182
-
183
-
184
-
185
-
186
-
187
-
188
-
189
-
190
-
191
-
192
-
193
-
194
-
195
-
196
-
197
-
198
-
199
-
200
-
201
-
202
-
203
-
204
-
205
-
206
-
207
-
208
-
209
-
210
-
211
-
212
-
213
-
214
-
215
-
216
-
217
-
218
-
219
-
220
-
221
-
222
-
223
-
224
-
225
-
226
-
227
-
228
-
229
-
230
-
231
-
232
-
233
-
234
-
235
-
236
-
237
-
238
-
239
-
240
-
241
-
242
-
243
-
244
-
245
-
246
-
247
-
248
-
249
-
250
-
251
-
252
-
253
-
254
-
255
-
256
-
257
-
258
-
259
-
260
-
261
-
262
-
263
-
264
-
265
-
266
-
267
-
268
-
269
-
270
-
271
-
272
-
273
-
274
-
275
-
276
-
277
-
278
-
279
-
280
-
281
-
282
-
283
-
284
-
285
-
286
-
287
-
288
-
289
-
290
-
291
-
292
-
293
-
294
-
295
-
296
-
297
-
298
-
299
-
300
-
301
-
302
-
303
-
304
-
305
-
306
-
307
-
308
-
309
-
310
-
311
-
312
-
313
-
314
-
315
-
316
-
317
-
318
-
319
-
320
-
321
-
322
-
323
-
324
-
325
-
326
-
327
-
328
-
329
-
330
-
331
-
332
-
333
-
334
-
335
-
336
-
337
-
338
-
339
-
340
-
341
-
342
-
343
-
344
-
345
-
346
-
347
-
348
-
349
-
350
-
351
-
352
-
353
-
354
-
355
-
356
-
357
-
358
-
359
-
360
-
361
-
362
-
363
-
364
-
365
-
366
-
367
-
368
-
369
-
370
-
371
-
372
-
373
-
374
-
375
-
376
-
377
-
378
-
379
-
380
-
381
-
382
-
383
-
384
-
385
-
386
-
387
-
388
-
389
-
390
-
391
-
392
-
393
-
394
-
395
-
396
-
397
-
398
-
399
-
400
-
401
-
402
-
403
-
404
-
405
-
406
-
407
-
408
-
409
-
410
-
411
-
412
-
413
-
414
-
415
-
416
-
417
-
418
 |
 |
