HP 1240 HP Fax 1240 - (English) Getting Started Guide - Page 137
prepare your hp fax for shipment, support
 |
UPC - 829160181998
View all HP 1240 manuals
Add to My Manuals
Save this manual to your list of manuals |
Page 137 highlights
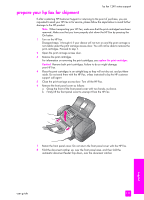
prepare your hp fax for shipment hp fax 1240 series support If after contacting HP Customer Support or returning to the point of purchase, you are requested to send your HP Fax in for service, please follow the steps below to avoid further damage to the HP product. Note: When transporting your HP Fax, make sure that the print cartridges have been removed. Make sure that you have properly shut down the HP Fax by pressing the On button. 1 Turn on the HP Fax. Disregard steps 1 through 6 if your device will not turn on and the print carriage is not visible under the print carriage access door. You will not be able to remove the print cartridges. Proceed to step 7. 2 Open the print carriage access door. 3 Remove the print cartridges. For information on removing the print cartridges, see replace the print cartridges. Caution! Remove both print cartridges. Failure to do so might damage your HP Fax. 4 Place the print cartridges in an airtight bag so they will not dry out, and put them aside. Do not send them with the HP Fax, unless instructed to by the HP customer support call agent. 5 Close the print-carriage access door. Turn off the HP Fax. 6 Remove the front panel cover as follows: a. Grasp the front of the front panel cover with two hands, as shown. b. Firmly lift the front panel cover to unsnap it from the HP Fax. 7 Retain the front panel cover. Do not return the front panel cover with the HP Fax. 8 Fold the document catcher up, over the front panel area, and then fold the automatic document feeder tray down, over the document catcher. user guide 127 support
-
 1
1 -
2
-
3
-
4
-
5
-
6
-
7
-
8
-
9
-
10
-
11
-
12
-
13
-
14
-
15
-
16
-
17
-
18
-
19
-
20
-
21
-
22
-
23
-
24
-
25
-
26
-
27
-
28
-
29
-
30
-
31
-
32
-
33
-
34
-
35
-
36
-
37
-
38
-
39
-
40
-
41
-
42
-
43
-
44
-
45
-
46
-
47
-
48
-
49
-
50
-
51
-
52
-
53
-
54
-
55
-
56
-
57
-
58
-
59
-
60
-
61
-
62
-
63
-
64
-
65
-
66
-
67
-
68
-
69
-
70
-
71
-
72
-
73
-
74
-
75
-
76
-
77
-
78
-
79
-
80
-
81
-
82
-
83
-
84
-
85
-
86
-
87
-
88
-
89
-
90
-
91
-
92
-
93
-
94
-
95
-
96
-
97
-
98
-
99
-
100
-
101
-
102
-
103
-
104
-
105
-
106
-
107
-
108
-
109
-
110
-
111
-
112
-
113
-
114
-
115
-
116
-
117
-
118
-
119
-
120
-
121
-
122
-
123
-
124
-
125
-
126
-
127
-
128
-
129
-
130
-
131
-
 132
132 -
 133
133 -
 134
134 -
 135
135 -
 136
136 -
 137
137 -
 138
138 -
 139
139 -
 140
140 -
 141
141 -
 142
142 -
143
-
144
-
145
-
146
-
147
-
148
 |
 |
