HP 1240 HP Fax 1240 - (English) Getting Started Guide - Page 55
set automatic reduction for incoming faxes, Advanced Fax Setup, Busy Redial, No Answer Redial, Redial
 |
UPC - 829160181998
View all HP 1240 manuals
Add to My Manuals
Save this manual to your list of manuals |
Page 55 highlights
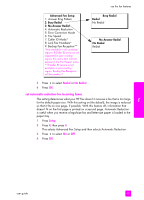
use the fax features Advanced Fax Setup 1: Answer Ring Pattern 2: Busy Redial 3: No Answer Redial 4: Automatic Reduction 5: Error Correction Mode 6: Fax Speed 7: Caller ID Mode* 8: Junk Fax Numbers* 9: Backup Fax Reception** *Not available in all countries/ regions. If Caller ID service is not supported in your country/ region, this menu item will not appear in the Print Report menu. **If Caller ID service is not available in your country/ region, Backup Fax Reception will be number 7. Busy Redial Redial No Redial No Answer Redial No Redial Redial 3 Press ! to select Redial or No Redial. 4 Press OK. set automatic reduction for incoming faxes This setting determines what your HP Fax does if it receives a fax that is too large for the default paper size. With this setting on (the default), the image is reduced so that it fits on one page, if possible. With this feature off, information that doesn't fit on the first page is printed on a second page. Automatic Reduction is useful when you receive a legal-size fax and letter-size paper is loaded in the paper tray. 1 Press Setup. 2 Press 4, then press 4. This selects Advanced Fax Setup and then selects Automatic Reduction. 3 Press ! to select On or Off. 4 Press OK. fax user guide 45
-
 1
1 -
2
-
3
-
4
-
5
-
6
-
7
-
8
-
9
-
10
-
11
-
12
-
13
-
14
-
15
-
16
-
17
-
18
-
19
-
20
-
21
-
22
-
23
-
24
-
25
-
26
-
27
-
28
-
29
-
30
-
31
-
32
-
33
-
34
-
35
-
36
-
37
-
38
-
39
-
40
-
41
-
42
-
43
-
44
-
45
-
46
-
47
-
48
-
49
-
 50
50 -
 51
51 -
 52
52 -
 53
53 -
 54
54 -
 55
55 -
 56
56 -
 57
57 -
 58
58 -
 59
59 -
 60
60 -
61
-
62
-
63
-
64
-
65
-
66
-
67
-
68
-
69
-
70
-
71
-
72
-
73
-
74
-
75
-
76
-
77
-
78
-
79
-
80
-
81
-
82
-
83
-
84
-
85
-
86
-
87
-
88
-
89
-
90
-
91
-
92
-
93
-
94
-
95
-
96
-
97
-
98
-
99
-
100
-
101
-
102
-
103
-
104
-
105
-
106
-
107
-
108
-
109
-
110
-
111
-
112
-
113
-
114
-
115
-
116
-
117
-
118
-
119
-
120
-
121
-
122
-
123
-
124
-
125
-
126
-
127
-
128
-
129
-
130
-
131
-
132
-
133
-
134
-
135
-
136
-
137
-
138
-
139
-
140
-
141
-
142
-
143
-
144
-
145
-
146
-
147
-
148
 |
 |
