HP 500X HP JetDirect Print Servers 600N/400N/500X/300X Administrator's Guide - - Page 147
Viewing the Embedded Web Server
 |
UPC - 088698574287
View all HP 500X manuals
Add to My Manuals
Save this manual to your list of manuals |
Page 147 highlights
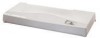
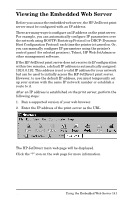
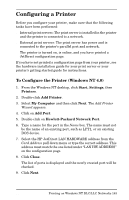
Viewing the Embedded Web Server Before you can use the embedded web server, the HP JetDirect print server must be configured with an IP address. There are many ways to configure an IP address on the print server. For example, you can automatically configure IP parameters over the network using BOOTP (Bootstrap Protocol) or DHCP (Dynamic Host Configuration Protocol) each time the printer is turned on. Or, you can manually configure IP parameters using the printer's control panel (for selected printers), Telnet, HP Web JetAdmin or other management software. If the HP JetDirect print server does not receive its IP configuration within two minutes, a default IP address is automatically assigned: 192.0.0.192. This address is not a valid IP address for your network but can be used to initially access the HP JetDirect print server. However, to use the default IP address, you must temporarily set up your system with the same IP network number or establish a route to it. After an IP address is established on the print server, perform the following steps: 1. Run a supported version of your web browser. 2. Enter the IP address of the print server as the URL. Figure B.2 Entering the IP Address The HP JetDirect main web page will be displayed. Click the "?" icon on the web page for more information. EN Using the Embedded Web Server 141
-
 1
1 -
2
-
3
-
4
-
5
-
6
-
7
-
8
-
9
-
10
-
11
-
12
-
13
-
14
-
15
-
16
-
17
-
18
-
19
-
20
-
21
-
22
-
23
-
24
-
25
-
26
-
27
-
28
-
29
-
30
-
31
-
32
-
33
-
34
-
35
-
36
-
37
-
38
-
39
-
40
-
41
-
42
-
43
-
44
-
45
-
46
-
47
-
48
-
49
-
50
-
51
-
52
-
53
-
54
-
55
-
56
-
57
-
58
-
59
-
60
-
61
-
62
-
63
-
64
-
65
-
66
-
67
-
68
-
69
-
70
-
71
-
72
-
73
-
74
-
75
-
76
-
77
-
78
-
79
-
80
-
81
-
82
-
83
-
84
-
85
-
86
-
87
-
88
-
89
-
90
-
91
-
92
-
93
-
94
-
95
-
96
-
97
-
98
-
99
-
100
-
101
-
102
-
103
-
104
-
105
-
106
-
107
-
108
-
109
-
110
-
111
-
112
-
113
-
114
-
115
-
116
-
117
-
118
-
119
-
120
-
121
-
122
-
123
-
124
-
125
-
126
-
127
-
128
-
129
-
130
-
131
-
132
-
133
-
134
-
135
-
136
-
137
-
138
-
139
-
140
-
141
-
 142
142 -
 143
143 -
 144
144 -
 145
145 -
 146
146 -
 147
147 -
 148
148 -
 149
149 -
 150
150 -
 151
151 -
 152
152 -
153
-
154
-
155
-
156
-
157
-
158
-
159
-
160
-
161
-
162
-
163
-
164
 |
 |