HP 500X HP JetDirect Print Servers 600N/400N/500X/300X Administrator's Guide - - Page 77
LPR Port, New Port, ports, use - jetdirect external print server
 |
UPC - 088698574287
View all HP 500X manuals
Add to My Manuals
Save this manual to your list of manuals |
Page 77 highlights
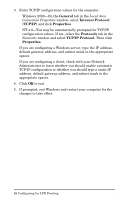
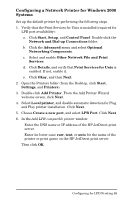
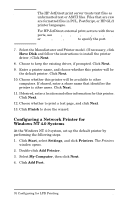
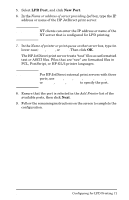
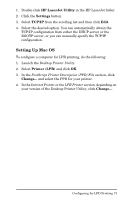
5. Select LPR Port, and click New Port. 6. In the Name or address of server providing lpd box, type the IP address or name of the HP JetDirect print server. Note NT clients can enter the IP address or name of the NT server that is configured for LPD printing. 7. In the Name of printer or print queue on that server box, type (in lower case) raw, text, or auto. Then click OK. The HP JetDirect print server treats "text" files as unformatted text or ASCII files. Files that are "raw" are formatted files in PCL, PostScript, or HP-GL/2 printer languages. Note For HP JetDirect external print servers with three ports, use raw1, raw2, raw3, text1, text2, text3 or auto1, auto2, auto3 to specify the port. 8. Ensure that the port is selected in the Add Printer list of the available ports, then click Next. 9. Follow the remaining instructions on the screen to complete the configuration. EN Configuring for LPD Printing 71
-
 1
1 -
2
-
3
-
4
-
5
-
6
-
7
-
8
-
9
-
10
-
11
-
12
-
13
-
14
-
15
-
16
-
17
-
18
-
19
-
20
-
21
-
22
-
23
-
24
-
25
-
26
-
27
-
28
-
29
-
30
-
31
-
32
-
33
-
34
-
35
-
36
-
37
-
38
-
39
-
40
-
41
-
42
-
43
-
44
-
45
-
46
-
47
-
48
-
49
-
50
-
51
-
52
-
53
-
54
-
55
-
56
-
57
-
58
-
59
-
60
-
61
-
62
-
63
-
64
-
65
-
66
-
67
-
68
-
69
-
70
-
71
-
 72
72 -
 73
73 -
 74
74 -
 75
75 -
 76
76 -
 77
77 -
 78
78 -
 79
79 -
 80
80 -
 81
81 -
 82
82 -
83
-
84
-
85
-
86
-
87
-
88
-
89
-
90
-
91
-
92
-
93
-
94
-
95
-
96
-
97
-
98
-
99
-
100
-
101
-
102
-
103
-
104
-
105
-
106
-
107
-
108
-
109
-
110
-
111
-
112
-
113
-
114
-
115
-
116
-
117
-
118
-
119
-
120
-
121
-
122
-
123
-
124
-
125
-
126
-
127
-
128
-
129
-
130
-
131
-
132
-
133
-
134
-
135
-
136
-
137
-
138
-
139
-
140
-
141
-
142
-
143
-
144
-
145
-
146
-
147
-
148
-
149
-
150
-
151
-
152
-
153
-
154
-
155
-
156
-
157
-
158
-
159
-
160
-
161
-
162
-
163
-
164
 |
 |