HP 6125XLG R2306-HP 6125XLG Blade Switch Security Configuration Guide - Page 149
Stelnet configuration examples, Password authentication enabled Stelnet server configuration example
 |
View all HP 6125XLG manuals
Add to My Manuals
Save this manual to your list of manuals |
Page 149 highlights
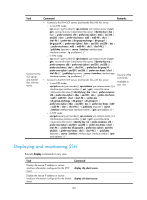
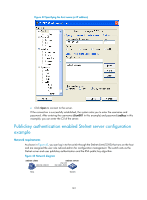
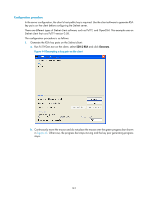
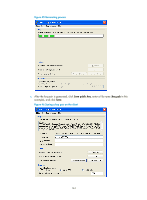
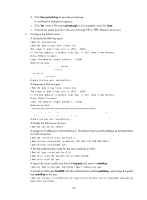
Task Command Display SSH server status information or session information on an SSH server. display ssh server { session | status } Display SSH user information on the SSH server. display ssh user-information [ username ] Display the public keys of the local key pairs. display public-key local { dsa | rsa } public [ name publickey-name ] Display the public keys of the SSH peers. display public-key peer [ brief | name publickey-name ] Stelnet configuration examples This section provides examples of configuring Stelnet on switches. Unless otherwise noted, devices in the configuration examples are in non-FIPS mode. Password authentication enabled Stelnet server configuration example Network requirements As shown in Figure 41, you can log in to the switch through the Stelnet client that runs on the host and are assigned the user role network-admin for configuration management. The switch acts as the Stelnet server and uses password authentication. The username and password of the client are saved on the switch. Figure 41 Network diagram Stelnet client 192.168.1.56/24 Stelnet server Vlan-int2 192.168.1.40/24 Host Switch Configuration procedure 1. Configure the Stelnet server: # Generate the RSA key pairs. system-view [Switch] public-key local create rsa The range of public key size is (512 ~ 2048). If the key modulus is greater than 512, it will take a few minutes. Press CTRL+C to abort. Input the modulus length [default = 1024]: Generating Keys Create the key pair successfully. 140
-
 1
1 -
2
-
3
-
4
-
5
-
6
-
7
-
8
-
9
-
10
-
11
-
12
-
13
-
14
-
15
-
16
-
17
-
18
-
19
-
20
-
21
-
22
-
23
-
24
-
25
-
26
-
27
-
28
-
29
-
30
-
31
-
32
-
33
-
34
-
35
-
36
-
37
-
38
-
39
-
40
-
41
-
42
-
43
-
44
-
45
-
46
-
47
-
48
-
49
-
50
-
51
-
52
-
53
-
54
-
55
-
56
-
57
-
58
-
59
-
60
-
61
-
62
-
63
-
64
-
65
-
66
-
67
-
68
-
69
-
70
-
71
-
72
-
73
-
74
-
75
-
76
-
77
-
78
-
79
-
80
-
81
-
82
-
83
-
84
-
85
-
86
-
87
-
88
-
89
-
90
-
91
-
92
-
93
-
94
-
95
-
96
-
97
-
98
-
99
-
100
-
101
-
102
-
103
-
104
-
105
-
106
-
107
-
108
-
109
-
110
-
111
-
112
-
113
-
114
-
115
-
116
-
117
-
118
-
119
-
120
-
121
-
122
-
123
-
124
-
125
-
126
-
127
-
128
-
129
-
130
-
131
-
132
-
133
-
134
-
135
-
136
-
137
-
138
-
139
-
140
-
141
-
142
-
143
-
 144
144 -
 145
145 -
 146
146 -
 147
147 -
 148
148 -
 149
149 -
 150
150 -
 151
151 -
 152
152 -
 153
153 -
 154
154 -
155
-
156
-
157
-
158
-
159
-
160
-
161
-
162
-
163
-
164
-
165
-
166
-
167
-
168
-
169
-
170
-
171
-
172
-
173
-
174
-
175
-
176
-
177
-
178
-
179
-
180
-
181
-
182
-
183
-
184
-
185
-
186
-
187
-
188
-
189
-
190
-
191
-
192
-
193
-
194
-
195
-
196
-
197
-
198
-
199
-
200
-
201
-
202
-
203
-
204
-
205
-
206
-
207
-
208
-
209
-
210
-
211
-
212
-
213
-
214
-
215
-
216
-
217
-
218
-
219
-
220
-
221
-
222
-
223
-
224
-
225
-
226
-
227
-
228
-
229
-
230
-
231
-
232
-
233
-
234
-
235
-
236
-
237
-
238
-
239
-
240
-
241
-
242
-
243
-
244
-
245
-
246
-
247
-
248
-
249
-
250
-
251
-
252
-
253
-
254
-
255
-
256
-
257
-
258
-
259
-
260
-
261
-
262
-
263
-
264
-
265
-
266
-
267
-
268
-
269
-
270
-
271
-
272
-
273
-
274
-
275
-
276
 |
 |