HP 9040 HP LaserJet 9040mfp/9050mfp - User Guide - Page 57
Basic printing instructions, To print
 |
UPC - 829160792927
View all HP 9040 manuals
Add to My Manuals
Save this manual to your list of manuals |
Page 57 highlights
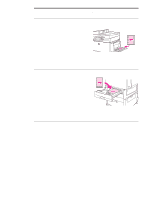
Basic printing instructions This section provides instructions for printing when you want to set options for the MFP for Microsoft Windows or Macintosh operating systems. If possible, set the MFP options in the software program or in the Print dialog box. In most Windows and Macintosh programs, you can set the MFP options. If a setting is not available in the program or printer driver, you must set it by using the MFP control panel. To print 1 Make sure that paper is loaded in the MFP. See Loading input trays or Orienting media for instructions. 2 If you loaded a custom-size paper in Tray 2, Tray 3, or Tray 4, or if you loaded any size paper in Tray 1, set the tray to the size of paper that you loaded. See Loading input trays for instructions. 3 Set the paper size. • For Windows: On the File menu, click Page Setup or Print. If you select Print, make sure that this MFP is selected and then click Properties. • For Macintosh: On the File menu, select Page Setup. Make sure that this MFP is selected. 4 In the paper size box, select one of the following: • The size of paper that you are using • Custom 5 Select the orientation, such as Portrait or Landscape. 6 If the printer driver is not already open, on the File menu click Print. In Windows programs, also click Properties. 7 In the paper source box, select the paper type and size, or select the tray from which you want paper pulled. See Specifying paper to print on. 8 Select any other settings that you want, such as duplexing, watermarks, or different first page. For more information about these settings, see the tasks in this section. 9 Click Print to print the job. ENWW Basic printing instructions 53
-
 1
1 -
2
-
3
-
4
-
5
-
6
-
7
-
8
-
9
-
10
-
11
-
12
-
13
-
14
-
15
-
16
-
17
-
18
-
19
-
20
-
21
-
22
-
23
-
24
-
25
-
26
-
27
-
28
-
29
-
30
-
31
-
32
-
33
-
34
-
35
-
36
-
37
-
38
-
39
-
40
-
41
-
42
-
43
-
44
-
45
-
46
-
47
-
48
-
49
-
50
-
51
-
 52
52 -
 53
53 -
 54
54 -
 55
55 -
 56
56 -
 57
57 -
 58
58 -
 59
59 -
 60
60 -
 61
61 -
 62
62 -
63
-
64
-
65
-
66
-
67
-
68
-
69
-
70
-
71
-
72
-
73
-
74
-
75
-
76
-
77
-
78
-
79
-
80
-
81
-
82
-
83
-
84
-
85
-
86
-
87
-
88
-
89
-
90
-
91
-
92
-
93
-
94
-
95
-
96
-
97
-
98
-
99
-
100
-
101
-
102
-
103
-
104
-
105
-
106
-
107
-
108
-
109
-
110
-
111
-
112
-
113
-
114
-
115
-
116
-
117
-
118
-
119
-
120
-
121
-
122
-
123
-
124
-
125
-
126
-
127
-
128
-
129
-
130
-
131
-
132
-
133
-
134
-
135
-
136
-
137
-
138
-
139
-
140
-
141
-
142
-
143
-
144
-
145
-
146
-
147
-
148
-
149
-
150
-
151
-
152
-
153
-
154
-
155
-
156
-
157
-
158
-
159
-
160
-
161
-
162
-
163
-
164
-
165
-
166
-
167
-
168
-
169
-
170
-
171
-
172
-
173
-
174
-
175
-
176
-
177
-
178
-
179
-
180
-
181
-
182
-
183
-
184
-
185
-
186
-
187
-
188
-
189
-
190
-
191
-
192
-
193
-
194
-
195
-
196
-
197
-
198
-
199
-
200
-
201
-
202
-
203
-
204
-
205
-
206
-
207
-
208
-
209
-
210
-
211
-
212
-
213
-
214
-
215
-
216
-
217
-
218
-
219
-
220
-
221
-
222
-
223
-
224
-
225
-
226
-
227
-
228
-
229
-
230
-
231
-
232
-
233
-
234
-
235
-
236
-
237
-
238
-
239
-
240
-
241
-
242
-
243
-
244
-
245
-
246
-
247
-
248
-
249
-
250
-
251
-
252
-
253
-
254
-
255
-
256
-
257
-
258
-
259
-
260
 |
 |