HP 9040 HP LaserJet 9040mfp/9050mfp - User Guide - Page 91
Local address book, To add e-mail addresses to the local address book
 |
UPC - 829160792927
View all HP 9040 manuals
Add to My Manuals
Save this manual to your list of manuals |
Page 91 highlights
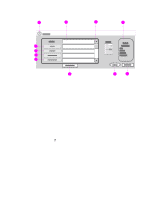
Note ENWW Local address book Use the local address book to store frequently-used e-mail addresses. The local address book can be shared between MFPs that use the same server to gain access to the HP Digital Sending software. You can use the address book when you type e-mail addresses in the From:, To:, CC:, or BCC: fields. You can also add or delete addresses in the address book. To open the address book, touch the address book button in the keyboard screen. When you touch Local, the Edit button appears. Touch this button to add or delete items from the address book. To add e-mail addresses to the local address book 1 Touch Local. 2 Touch Edit. 3 Touch Add. 4 In the Address field, type the e-mail address for the new entry (required). 5 In the Name field, type a name for the new entry (optional). The Name is the alias for the e-mail address. If you do not type an alias name, the alias will be the e-mail address itself. 6 Do one of the following: • To add the e-mail address to the local address book and remain in the Add screen, touch Save. • To return to the Edit screen without saving the e-mail address, touch Cancel. • To save the e-mail address and return to the Edit screen, touch OK. After you add an address, the following confirmation message is displayed: Address was stored successfully The e-mail address is added to the public address book. All users will have access to this address. To delete e-mail addresses from the local address book You can delete e-mail addresses that you no longer use. To change an e-mail address, you must delete the address and add it as a new address in the local address book. 1 Touch Local. 2 Touch Edit. 3 Touch Delete to display a list of e-mail addresses that you can deleted from the local address book. If no addresses exit to delete, the list appears blank. 4 Touch the checkbox(es) for the e-mail address(es) that you want to delete, and then touch OK. The following confirmation message is displayed: Do you want to delete the selected address(es)? [Yes] [No] 5 Touch Yes to delete the e-mail address(es) or No to return to the Delete screen. 6 To return to the Edit screen, touch OK. Using the address book 87
-
 1
1 -
2
-
3
-
4
-
5
-
6
-
7
-
8
-
9
-
10
-
11
-
12
-
13
-
14
-
15
-
16
-
17
-
18
-
19
-
20
-
21
-
22
-
23
-
24
-
25
-
26
-
27
-
28
-
29
-
30
-
31
-
32
-
33
-
34
-
35
-
36
-
37
-
38
-
39
-
40
-
41
-
42
-
43
-
44
-
45
-
46
-
47
-
48
-
49
-
50
-
51
-
52
-
53
-
54
-
55
-
56
-
57
-
58
-
59
-
60
-
61
-
62
-
63
-
64
-
65
-
66
-
67
-
68
-
69
-
70
-
71
-
72
-
73
-
74
-
75
-
76
-
77
-
78
-
79
-
80
-
81
-
82
-
83
-
84
-
85
-
 86
86 -
 87
87 -
 88
88 -
 89
89 -
 90
90 -
 91
91 -
 92
92 -
 93
93 -
 94
94 -
 95
95 -
 96
96 -
97
-
98
-
99
-
100
-
101
-
102
-
103
-
104
-
105
-
106
-
107
-
108
-
109
-
110
-
111
-
112
-
113
-
114
-
115
-
116
-
117
-
118
-
119
-
120
-
121
-
122
-
123
-
124
-
125
-
126
-
127
-
128
-
129
-
130
-
131
-
132
-
133
-
134
-
135
-
136
-
137
-
138
-
139
-
140
-
141
-
142
-
143
-
144
-
145
-
146
-
147
-
148
-
149
-
150
-
151
-
152
-
153
-
154
-
155
-
156
-
157
-
158
-
159
-
160
-
161
-
162
-
163
-
164
-
165
-
166
-
167
-
168
-
169
-
170
-
171
-
172
-
173
-
174
-
175
-
176
-
177
-
178
-
179
-
180
-
181
-
182
-
183
-
184
-
185
-
186
-
187
-
188
-
189
-
190
-
191
-
192
-
193
-
194
-
195
-
196
-
197
-
198
-
199
-
200
-
201
-
202
-
203
-
204
-
205
-
206
-
207
-
208
-
209
-
210
-
211
-
212
-
213
-
214
-
215
-
216
-
217
-
218
-
219
-
220
-
221
-
222
-
223
-
224
-
225
-
226
-
227
-
228
-
229
-
230
-
231
-
232
-
233
-
234
-
235
-
236
-
237
-
238
-
239
-
240
-
241
-
242
-
243
-
244
-
245
-
246
-
247
-
248
-
249
-
250
-
251
-
252
-
253
-
254
-
255
-
256
-
257
-
258
-
259
-
260
 |
 |