HP Dc5750 WebPAM User Manual - Page 103
Choosing Stripe Block Size, Gigabyte Boundary, Initialization, drives
 |
UPC - 883585056446
View all HP Dc5750 manuals
Add to My Manuals
Save this manual to your list of manuals |
Page 103 highlights
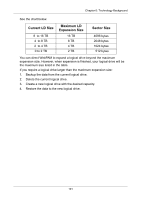
Chapter 6: Technology Background Choosing Stripe Block Size The stripe block size value can be set to 32 KB, 64 KB and 128 KB. 64 KB is the default. This selection will directly affect performance. There are two issues to consider when selecting the stripe block size. • Choose a stripe block size equal to or smaller than the smallest cache buffer found on any disk drive in your logical drive. A larger value slows the logical drive down because disk drives with smaller cache buffers need more time for multiple accesses to fill their buffers. • If your data retrieval consists of fixed-size data blocks, such as some database and video applications, choose that data block size as your stripe block size. Generally speaking, email, POS and webservers prefer smaller stripe block sizes. Video and database applications prefer larger stripe block sizes. Gigabyte Boundary The Gigabyte Boundary feature is designed for logical drives in which a drive has failed and the user cannot replace the drive with the same capacity or larger. Instead, the Gigabyte Boundary feature permits the installation of a replacement drive that is slightly smaller (within 1 gigabyte) than the remaining working drive (for example, an 80.5GB drive would be rounded down to 80GB). This can be helpful in the event that a drive fails and an exact replacement model is no longer available. Initialization Initialization is the process of setting all of the data bits on all of the disk drives to zero. This has the effect of erasing any existing data from the drives. This action is especially helpful in creating accurate parity in logical drives with more than four drives. Initialization applies to RAID 1, 5 and 10. When you create one of these logical drives, you can specify Quick or Full Initialization. See "Create a Logical Drive" on page 62. The Full Initialization process begins immediately after the logical drive is created and may take some time to finish, depending on the size of the disk drives in your logical drive. Your logical drive is available while initialization is in progress. 97
-
 1
1 -
2
-
3
-
4
-
5
-
6
-
7
-
8
-
9
-
10
-
11
-
12
-
13
-
14
-
15
-
16
-
17
-
18
-
19
-
20
-
21
-
22
-
23
-
24
-
25
-
26
-
27
-
28
-
29
-
30
-
31
-
32
-
33
-
34
-
35
-
36
-
37
-
38
-
39
-
40
-
41
-
42
-
43
-
44
-
45
-
46
-
47
-
48
-
49
-
50
-
51
-
52
-
53
-
54
-
55
-
56
-
57
-
58
-
59
-
60
-
61
-
62
-
63
-
64
-
65
-
66
-
67
-
68
-
69
-
70
-
71
-
72
-
73
-
74
-
75
-
76
-
77
-
78
-
79
-
80
-
81
-
82
-
83
-
84
-
85
-
86
-
87
-
88
-
89
-
90
-
91
-
92
-
93
-
94
-
95
-
96
-
97
-
 98
98 -
 99
99 -
 100
100 -
 101
101 -
 102
102 -
 103
103 -
 104
104 -
 105
105 -
 106
106 -
 107
107 -
 108
108 -
109
-
110
-
111
-
112
-
113
-
114
 |
 |