HP Dc5750 WebPAM User Manual - Page 31
Write Back, Write Through, GB Rounding, Quick Initialization, No Boundary function.
 |
UPC - 883585056446
View all HP Dc5750 manuals
Add to My Manuals
Save this manual to your list of manuals |
Page 31 highlights
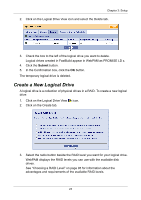
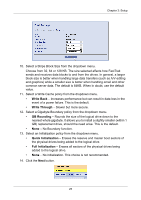
Chapter 3: Setup 10. Select a Stripe Block Size from the dropdown menu. Choose from 32, 64 or 128 KB. The size selected affects how FastTrak sends and receives data blocks to and from the drives. In general, a larger block size is better when handling large data transfers (such as A/V editing and graphics) while a smaller size is better when handling email and other common server data. The default is 64KB. When in doubt, use the default value. 11. Select a Write Cache policy from the dropdown menu. • Write Back - Increases performance but can result in data loss in the event of a power failure. This is the default. • Write Through - Slower but more secure. 12. Select a Gigabyte Boundary policy from the dropdown menu. • GB Rounding - Rounds the size of the logical drive down to the nearest whole gigabyte. It allows you to install a slightly smaller (within 1 GB) replacement drive, should the need arise. This is the default. • None - No Boundary function. 13. Select an Initialization policy from the dropdown menu. • Quick Initialization - Erases the reserve and master boot sectors of the physical drives being added to the logical drive. • Full Initialization - Erases all sectors of the physical drives being added to the logical drive. • None - No initialization. This choice is not recommended. 14. Click the Next button. 25
-
 1
1 -
2
-
3
-
4
-
5
-
6
-
7
-
8
-
9
-
10
-
11
-
12
-
13
-
14
-
15
-
16
-
17
-
18
-
19
-
20
-
21
-
22
-
23
-
24
-
25
-
 26
26 -
 27
27 -
 28
28 -
 29
29 -
 30
30 -
 31
31 -
 32
32 -
 33
33 -
 34
34 -
 35
35 -
 36
36 -
37
-
38
-
39
-
40
-
41
-
42
-
43
-
44
-
45
-
46
-
47
-
48
-
49
-
50
-
51
-
52
-
53
-
54
-
55
-
56
-
57
-
58
-
59
-
60
-
61
-
62
-
63
-
64
-
65
-
66
-
67
-
68
-
69
-
70
-
71
-
72
-
73
-
74
-
75
-
76
-
77
-
78
-
79
-
80
-
81
-
82
-
83
-
84
-
85
-
86
-
87
-
88
-
89
-
90
-
91
-
92
-
93
-
94
-
95
-
96
-
97
-
98
-
99
-
100
-
101
-
102
-
103
-
104
-
105
-
106
-
107
-
108
-
109
-
110
-
111
-
112
-
113
-
114
 |
 |
