HP Dc5750 WebPAM User Manual - Page 23
Setup, Log-in to WebPAM, Regular Connection
 |
UPC - 883585056446
View all HP Dc5750 manuals
Add to My Manuals
Save this manual to your list of manuals |
Page 23 highlights
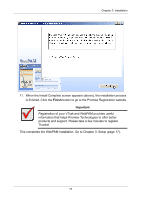
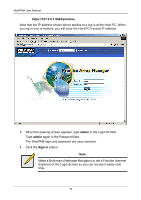
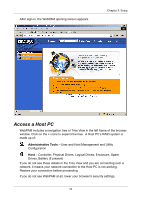
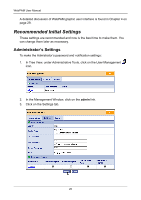
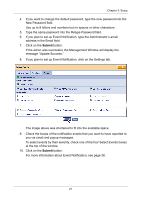
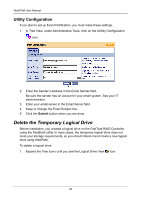
Chapter 3: Setup • Log-in to WebPAM (page 17) • Access a Host PC (page 19) • Recommended Initial Settings (page 20) • Delete the Temporary Logical Drive (page 22) • Create a New Logical Drive (page 23) • Log-out of WebPAM (page 27) • Internet Connection using WebPAM (page 27) • Run WebPAM without Network Connection (page 27) After installation, the next step is to log into and configure WebPAM PRO. Log-in to WebPAM Double-click on the WebPAM icon on your desktop (right). Or, 1. Launch your Browser. 2. In the Browser address field, type in the IP address of the Host PC, as explained below. If you did not choose the External Security option during WebPAM installation (see page 12), use the Regular connection. If you chose the External Security option during WebPAM installation, use the Secure connection. Regular Connection • WebPAM uses an HTTP connection http:// • Enter the Host PC's IP address 127.0.0.1 • Enter the Port number 8080 • Add to launch WebPAM promise Together, your entry looks like this: http://127.0.0.1:8080/promise Secure Connection • WebPAM uses a secure HTTP connection https:// • Enter the Host PC's IP address 127.0.0.1 • Enter the Port number 8443 • Add to launch WebPAM promise Together, your entry looks like this: 17
-
 1
1 -
2
-
3
-
4
-
5
-
6
-
7
-
8
-
9
-
10
-
11
-
12
-
13
-
14
-
15
-
16
-
17
-
 18
18 -
 19
19 -
 20
20 -
 21
21 -
 22
22 -
 23
23 -
 24
24 -
 25
25 -
 26
26 -
 27
27 -
 28
28 -
29
-
30
-
31
-
32
-
33
-
34
-
35
-
36
-
37
-
38
-
39
-
40
-
41
-
42
-
43
-
44
-
45
-
46
-
47
-
48
-
49
-
50
-
51
-
52
-
53
-
54
-
55
-
56
-
57
-
58
-
59
-
60
-
61
-
62
-
63
-
64
-
65
-
66
-
67
-
68
-
69
-
70
-
71
-
72
-
73
-
74
-
75
-
76
-
77
-
78
-
79
-
80
-
81
-
82
-
83
-
84
-
85
-
86
-
87
-
88
-
89
-
90
-
91
-
92
-
93
-
94
-
95
-
96
-
97
-
98
-
99
-
100
-
101
-
102
-
103
-
104
-
105
-
106
-
107
-
108
-
109
-
110
-
111
-
112
-
113
-
114
 |
 |