HP ET115AV HP xw4400 Workstation - Service and Technical Reference Guide - Page 104
Installing hard drive into optical drive bay
 |
View all HP ET115AV manuals
Add to My Manuals
Save this manual to your list of manuals |
Page 104 highlights
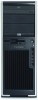
2. Place the hard drive in the bracket (1) and secure with American National screws (2) as shown in the following illustration. Figure 4-51 Installing hard drive into bracket 3. Screw four screws to the bracket (1). Align the screws with the grooves in the optical drive bay and slide the drive in (2) the chassis. Figure 4-52 Installing hard drive into optical drive bay 4. Connect the data cable to the hard drive (1) and to the system board (2). SATA installation is shown. 94 Chapter 4 Removal and replacement procedures ENWW
-
 1
1 -
2
-
3
-
4
-
5
-
6
-
7
-
8
-
9
-
10
-
11
-
12
-
13
-
14
-
15
-
16
-
17
-
18
-
19
-
20
-
21
-
22
-
23
-
24
-
25
-
26
-
27
-
28
-
29
-
30
-
31
-
32
-
33
-
34
-
35
-
36
-
37
-
38
-
39
-
40
-
41
-
42
-
43
-
44
-
45
-
46
-
47
-
48
-
49
-
50
-
51
-
52
-
53
-
54
-
55
-
56
-
57
-
58
-
59
-
60
-
61
-
62
-
63
-
64
-
65
-
66
-
67
-
68
-
69
-
70
-
71
-
72
-
73
-
74
-
75
-
76
-
77
-
78
-
79
-
80
-
81
-
82
-
83
-
84
-
85
-
86
-
87
-
88
-
89
-
90
-
91
-
92
-
93
-
94
-
95
-
96
-
97
-
98
-
 99
99 -
 100
100 -
 101
101 -
 102
102 -
 103
103 -
 104
104 -
 105
105 -
 106
106 -
 107
107 -
 108
108 -
 109
109 -
110
-
111
-
112
-
113
-
114
-
115
-
116
-
117
-
118
-
119
-
120
-
121
-
122
-
123
-
124
-
125
-
126
-
127
-
128
-
129
-
130
-
131
-
132
-
133
-
134
-
135
-
136
-
137
-
138
-
139
-
140
-
141
-
142
-
143
-
144
-
145
-
146
-
147
-
148
-
149
-
150
-
151
-
152
-
153
-
154
-
155
-
156
-
157
-
158
-
159
-
160
-
161
-
162
-
163
-
164
-
165
-
166
-
167
-
168
-
169
-
170
-
171
-
172
-
173
-
174
-
175
-
176
-
177
-
178
-
179
-
180
-
181
-
182
-
183
-
184
-
185
-
186
-
187
-
188
-
189
-
190
 |
 |

2.
Place the hard drive in the bracket
(1)
and secure with American National screws
(2)
as shown in
the following illustration.
Figure 4-51
Installing hard drive into bracket
3.
Screw four screws to the bracket
(1)
. Align the screws with the grooves in the optical drive bay and
slide the drive in
(2)
the chassis.
Figure 4-52
Installing hard drive into optical drive bay
4.
Connect the data cable to the hard drive
(1)
and to the system board
(2)
. SATA installation is shown.
94
Chapter 4
Removal and replacement procedures
ENWW