HP ET115AV HP xw4400 Workstation - Service and Technical Reference Guide - Page 106
CAUTION, Lift the CPU heatsink
 |
View all HP ET115AV manuals
Add to My Manuals
Save this manual to your list of manuals |
Page 106 highlights
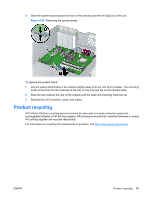
2. Loosen the four processor screws slowly and evenly. Loosen one pair of diagonally opposite screws (1) until the screw shanks disengage from the system board, and then loosen the remaining pair (2). Do not fully loosen one screw, and then move on to the next. Loosen all of the screws a little at a time, being sure the processor remains level. Figure 4-54 Identifying proper screw loosening sequence 3. Disconnect the CPU heatsink fan cable (1) from the system board. 4. Gently twist the heatsink unit to break the thermal grease binding. 5. Lift the CPU heatsink (2). Figure 4-55 Removing the CPU heatsink from the system board 6. Use alcohol and a soft cloth to clean all of the thermal interface residue from the CPU heatsink and processor. CAUTION: Allow the alcohol on the processor and CPU heatsink to dry completely. 96 Chapter 4 Removal and replacement procedures ENWW
-
 1
1 -
2
-
3
-
4
-
5
-
6
-
7
-
8
-
9
-
10
-
11
-
12
-
13
-
14
-
15
-
16
-
17
-
18
-
19
-
20
-
21
-
22
-
23
-
24
-
25
-
26
-
27
-
28
-
29
-
30
-
31
-
32
-
33
-
34
-
35
-
36
-
37
-
38
-
39
-
40
-
41
-
42
-
43
-
44
-
45
-
46
-
47
-
48
-
49
-
50
-
51
-
52
-
53
-
54
-
55
-
56
-
57
-
58
-
59
-
60
-
61
-
62
-
63
-
64
-
65
-
66
-
67
-
68
-
69
-
70
-
71
-
72
-
73
-
74
-
75
-
76
-
77
-
78
-
79
-
80
-
81
-
82
-
83
-
84
-
85
-
86
-
87
-
88
-
89
-
90
-
91
-
92
-
93
-
94
-
95
-
96
-
97
-
98
-
99
-
100
-
 101
101 -
 102
102 -
 103
103 -
 104
104 -
 105
105 -
 106
106 -
 107
107 -
 108
108 -
 109
109 -
 110
110 -
 111
111 -
112
-
113
-
114
-
115
-
116
-
117
-
118
-
119
-
120
-
121
-
122
-
123
-
124
-
125
-
126
-
127
-
128
-
129
-
130
-
131
-
132
-
133
-
134
-
135
-
136
-
137
-
138
-
139
-
140
-
141
-
142
-
143
-
144
-
145
-
146
-
147
-
148
-
149
-
150
-
151
-
152
-
153
-
154
-
155
-
156
-
157
-
158
-
159
-
160
-
161
-
162
-
163
-
164
-
165
-
166
-
167
-
168
-
169
-
170
-
171
-
172
-
173
-
174
-
175
-
176
-
177
-
178
-
179
-
180
-
181
-
182
-
183
-
184
-
185
-
186
-
187
-
188
-
189
-
190
 |
 |
