HP Hw6515 HP iPAQ hw6500 Mobile Messenger Series for the Cingular Network - Page 116
Image, Options, Sync options, Settings, Include camera images on, storage cards
 |
View all HP Hw6515 manuals
Add to My Manuals
Save this manual to your list of manuals |
Page 116 highlights
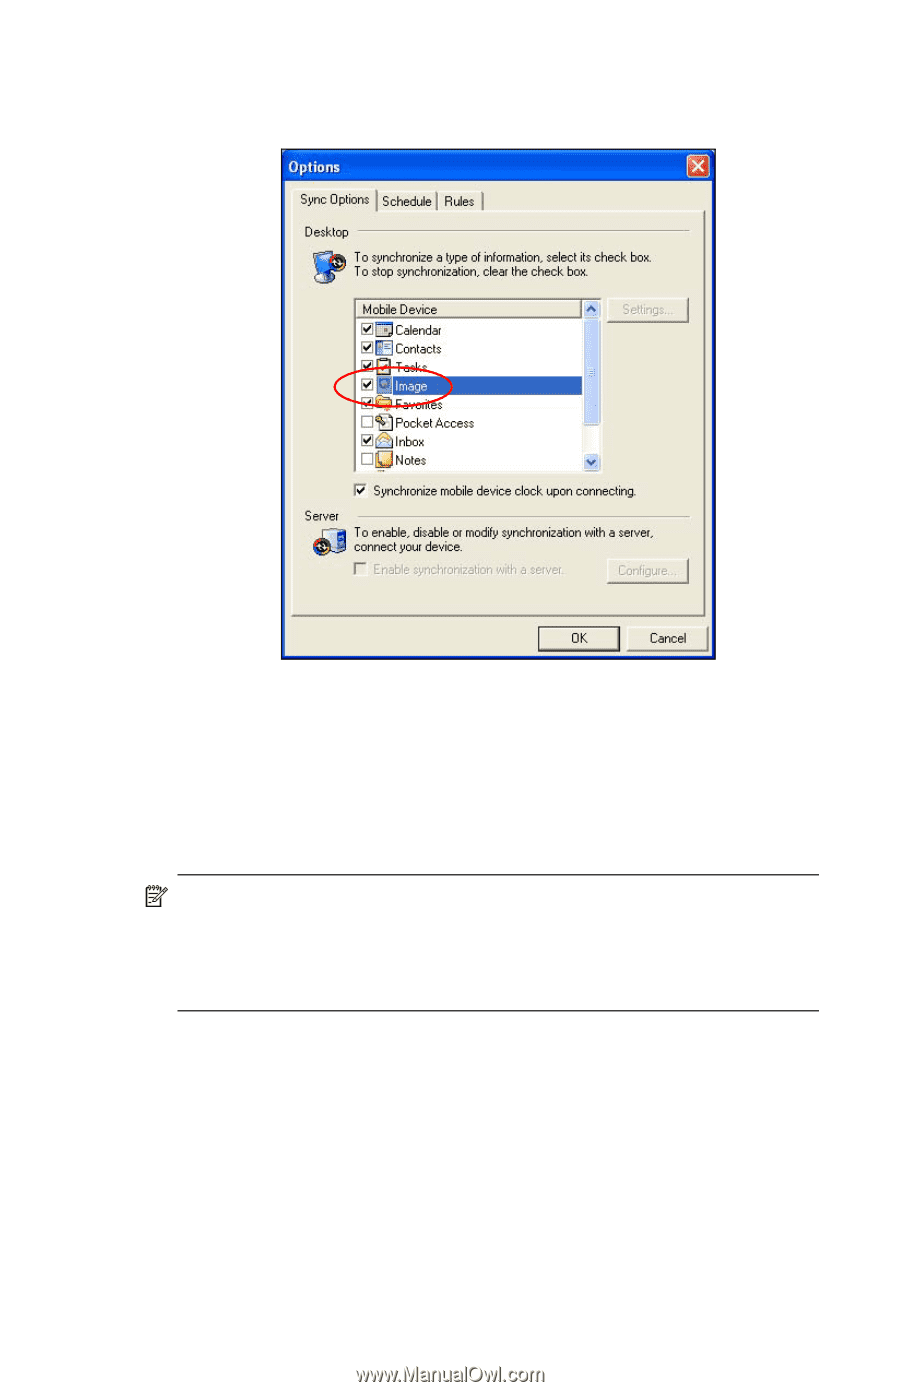
Once HP Image Transfer has been installed and is recognized by ActiveSync, the ActiveSync window displays the Image check box. To enable and modify HP Image Transfer settings: 1. Open ActiveSync on your personal computer, if it is not already open. 2. Double-click Image under the Details window or select Options from the ActiveSync menu. 3. Select Image on the Sync options tab, and then select the Settings button. NOTE: Once image transfer has been enabled, the schedule and rules you have configured for ActiveSync synchronization are also applied to your image transfers. Depending on your configuration, images may be transferred continuously while the device is connected, only upon connection, or manually. HP iPAQ Image Transfer allows the transferring of images in the following ways: • Mobile Device - displays the location of the images you want to transfer from your HP iPAQ. Also, if you want to transfer images from storage cards, check the Include camera images on storage cards check box. • The Computer - allows you to create subfolders on your desktop computer where images can be saved. For example, you can configure the images to be transferred to a subfolder with the same name as the folder on your HP iPAQ. If you are transferring images Using the Camera Features 10-14
-
 1
1 -
2
-
3
-
4
-
5
-
6
-
7
-
8
-
9
-
10
-
11
-
12
-
13
-
14
-
15
-
16
-
17
-
18
-
19
-
20
-
21
-
22
-
23
-
24
-
25
-
26
-
27
-
28
-
29
-
30
-
31
-
32
-
33
-
34
-
35
-
36
-
37
-
38
-
39
-
40
-
41
-
42
-
43
-
44
-
45
-
46
-
47
-
48
-
49
-
50
-
51
-
52
-
53
-
54
-
55
-
56
-
57
-
58
-
59
-
60
-
61
-
62
-
63
-
64
-
65
-
66
-
67
-
68
-
69
-
70
-
71
-
72
-
73
-
74
-
75
-
76
-
77
-
78
-
79
-
80
-
81
-
82
-
83
-
84
-
85
-
86
-
87
-
88
-
89
-
90
-
91
-
92
-
93
-
94
-
95
-
96
-
97
-
98
-
99
-
100
-
101
-
102
-
103
-
104
-
105
-
106
-
107
-
108
-
109
-
110
-
 111
111 -
 112
112 -
 113
113 -
 114
114 -
 115
115 -
 116
116 -
 117
117 -
 118
118 -
 119
119 -
 120
120 -
 121
121 -
122
-
123
-
124
-
125
-
126
-
127
-
128
-
129
-
130
-
131
-
132
-
133
-
134
-
135
-
136
-
137
-
138
-
139
-
140
-
141
-
142
-
143
-
144
-
145
-
146
-
147
-
148
-
149
-
150
-
151
-
152
-
153
-
154
-
155
-
156
-
157
-
158
-
159
-
160
-
161
-
162
-
163
-
164
-
165
-
166
-
167
-
168
-
169
-
170
 |
 |