HP K850 User's Guide - Page 35
Printing with the front or rear manual feed slot, Changing the software settings - printer manual
 |
UPC - 882780027831
View all HP K850 manuals
Add to My Manuals
Save this manual to your list of manuals |
Page 35 highlights
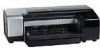
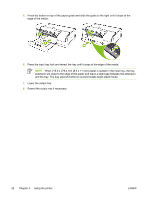
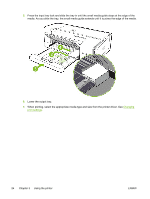
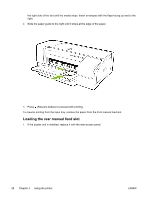
Printing with the front or rear manual feed slot If you are printing one or just a few photos, envelopes, or sheets of paper, you can use the front manual feed slot and leave your regular media in the input tray. The rear manual feed slot uses a straight paper path and is designed for printing single sheets of thick paper (up to 280 g/m2) such as cardstock. For information on media types and sizes supported by the manual feed slots, see Understanding specifications for supported media. Printing from the manual feed slots is performed in two stages: 1) changing the software settings, and 2) loading the media. The following sections contain procedures for performing each stage. NOTE If the duplex unit is installed and you want to print using the rear manual feed slot, replace the duplex unit with the rear-access panel. Changing the software settings Windows 1. Open the printer driver. 2. Click the Paper/Quality tab. 3. Select the manual feed option from the Source is drop-down list. 4. Change any other desired settings, and then click OK. 5. Print your document. Mac OS 1. Click File, and then click Page Setup. 2. Select the media size, and then click OK. 3. Click File, and then click Print. 4. Open the Paper Type/Quality panel. 5. In the Paper panel, select the source. 6. Change any other desired settings, and then click Print. Loading the front manual feed slot NOTE If there are any printouts on the output tray, remove them before using the front manual feed slot. 1. Extend the output tray. 2. Slide the paper guide to the left to its outermost position. 3. Lift the clear plastic flap and insert the media into the narrow opening between the output tray and the plastic flap. Insert up to 10 sheets of paper or 5 cards or envelopes, print-side down into ENWW Printing with the front or rear manual feed slot 27
-
 1
1 -
2
-
3
-
4
-
5
-
6
-
7
-
8
-
9
-
10
-
11
-
12
-
13
-
14
-
15
-
16
-
17
-
18
-
19
-
20
-
21
-
22
-
23
-
24
-
25
-
26
-
27
-
28
-
29
-
 30
30 -
 31
31 -
 32
32 -
 33
33 -
 34
34 -
 35
35 -
 36
36 -
 37
37 -
 38
38 -
 39
39 -
 40
40 -
41
-
42
-
43
-
44
-
45
-
46
-
47
-
48
-
49
-
50
-
51
-
52
-
53
-
54
-
55
-
56
-
57
-
58
-
59
-
60
-
61
-
62
-
63
-
64
-
65
-
66
-
67
-
68
-
69
-
70
-
71
-
72
-
73
-
74
-
75
-
76
-
77
-
78
-
79
-
80
-
81
-
82
-
83
-
84
-
85
-
86
-
87
-
88
-
89
-
90
-
91
-
92
-
93
-
94
-
95
-
96
-
97
-
98
-
99
-
100
-
101
-
102
-
103
-
104
-
105
-
106
-
107
-
108
-
109
-
110
-
111
-
112
-
113
-
114
-
115
-
116
-
117
-
118
-
119
-
120
-
121
-
122
-
123
-
124
-
125
-
126
-
127
-
128
-
129
-
130
-
131
-
132
-
133
-
134
-
135
-
136
-
137
-
138
-
139
-
140
-
141
-
142
-
143
-
144
-
145
-
146
-
147
-
148
-
149
-
150
 |
 |