HP K850 User's Guide - Page 60
Printers and Faxes, Network Printer Server
 |
UPC - 882780027831
View all HP K850 manuals
Add to My Manuals
Save this manual to your list of manuals |
Page 60 highlights
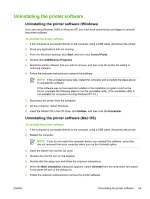
To install the printer driver using Add Printer 1. From the Windows desktop, click Start, point to Settings, and then click Printers. Or, click Start, click Control Panel, and then click Printers and Faxes or Printers (depending on the operating system). 2. Double-click Add Printer, and then click Next. 3. Select Network Printer or Network Printer Server. 4. Click Next. 5. Do one of the following: ● Type in the network path or queue name of the shared printer, and then click Next. Click Have Disk when prompted to select the printer model. ● Click Next, and then locate the printer in the Shared printers list. 6. Click Next, and then follow the onscreen instructions to complete the installation. To create a locally shared port 1. From the Windows desktop, click Start, point to Settings, and then click Printers. Or, click Start, click Control Panel, and then click Printers and Faxes or Printers (depending on the operating system). 2. Right-click the printer icon, click Properties, and then click the Ports tab. 3. Click Add Port, click Local Port, and then click New Port. 4. Enter a name for the new port, then click OK, and then click Close. 5. Click Close again. 52 Chapter 4 Configuring and managing the printer ENWW
-
 1
1 -
2
-
3
-
4
-
5
-
6
-
7
-
8
-
9
-
10
-
11
-
12
-
13
-
14
-
15
-
16
-
17
-
18
-
19
-
20
-
21
-
22
-
23
-
24
-
25
-
26
-
27
-
28
-
29
-
30
-
31
-
32
-
33
-
34
-
35
-
36
-
37
-
38
-
39
-
40
-
41
-
42
-
43
-
44
-
45
-
46
-
47
-
48
-
49
-
50
-
51
-
52
-
53
-
54
-
 55
55 -
 56
56 -
 57
57 -
 58
58 -
 59
59 -
 60
60 -
 61
61 -
 62
62 -
 63
63 -
 64
64 -
 65
65 -
66
-
67
-
68
-
69
-
70
-
71
-
72
-
73
-
74
-
75
-
76
-
77
-
78
-
79
-
80
-
81
-
82
-
83
-
84
-
85
-
86
-
87
-
88
-
89
-
90
-
91
-
92
-
93
-
94
-
95
-
96
-
97
-
98
-
99
-
100
-
101
-
102
-
103
-
104
-
105
-
106
-
107
-
108
-
109
-
110
-
111
-
112
-
113
-
114
-
115
-
116
-
117
-
118
-
119
-
120
-
121
-
122
-
123
-
124
-
125
-
126
-
127
-
128
-
129
-
130
-
131
-
132
-
133
-
134
-
135
-
136
-
137
-
138
-
139
-
140
-
141
-
142
-
143
-
144
-
145
-
146
-
147
-
148
-
149
-
150
 |
 |