HP K850 User's Guide - Page 38
Printing on both sides (duplexing), Guidelines for duplexing, Duplexing (Windows) - ink
 |
UPC - 882780027831
View all HP K850 manuals
Add to My Manuals
Save this manual to your list of manuals |
Page 38 highlights
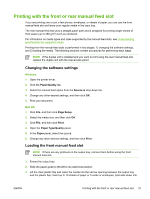
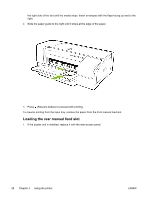
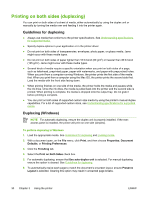
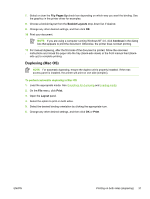
Printing on both sides (duplexing) You can print on both sides of a sheet of media, either automatically by using the duplex unit or manually by turning the media over and feeding it into the printer again. Guidelines for duplexing ● Always use media that conforms to the printer specifications. See Understanding specifications for supported media. ● Specify duplex options in your application or in the printer driver. ● Do not print on both sides of transparencies, envelopes, photo paper, or glossy media. Jams might occur with these media types. ● Do not print on both sides of paper lighter than 16 lb bond (60 g/m2) or heavier than 36 lb bond (135 g/m2). Jams might occur with these media types. ● Several kinds of media require a specific orientation when you print on both sides of a page, such as letterhead, preprinted paper, paper with watermarks, and paper with prepunched holes. When you print from a computer running Windows, the printer prints the first side of the media first. When you print from a computer using the Mac OS, the printer prints the second side first. Load the media with the front side facing down. ● When printing finishes on one side of the media, the printer holds the media and pauses while the ink dries. Once the ink dries, the media is pulled back into the printer and the second side is printed. When printing is complete, the media is dropped onto the output tray. Do not grab it before printing is complete. ● You can print on both sides of supported custom-size media by using the printer's manual duplex capabilities. For a list of supported custom sizes, see Understanding specifications for supported media. Duplexing (Windows) NOTE For automatic duplexing, ensure the duplex unit is properly installed. If the rearaccess panel is installed, the printer will print on one side (simplex). To perform duplexing in Windows 1. Load the appropriate media. See Guidelines for duplexing and Loading media. 2. With a document open, on the File menu, click Print, and then choose Properties, Document Defaults, or Printing Preferences. 3. Click the Finishing tab. 4. Select the Print on Both Sides check box. 5. For automatic duplexing, ensure that Use auto-duplex unit is selected. For manual duplexing, ensure the option is cleared. See Guidelines for duplexing. 6. To automatically resize each page to match the document's onscreen layout, ensure Preserve Layout is selected. Clearing this option may result in unwanted page breaks. 30 Chapter 3 Using the printer ENWW
-
 1
1 -
2
-
3
-
4
-
5
-
6
-
7
-
8
-
9
-
10
-
11
-
12
-
13
-
14
-
15
-
16
-
17
-
18
-
19
-
20
-
21
-
22
-
23
-
24
-
25
-
26
-
27
-
28
-
29
-
30
-
31
-
32
-
 33
33 -
 34
34 -
 35
35 -
 36
36 -
 37
37 -
 38
38 -
 39
39 -
 40
40 -
 41
41 -
 42
42 -
 43
43 -
44
-
45
-
46
-
47
-
48
-
49
-
50
-
51
-
52
-
53
-
54
-
55
-
56
-
57
-
58
-
59
-
60
-
61
-
62
-
63
-
64
-
65
-
66
-
67
-
68
-
69
-
70
-
71
-
72
-
73
-
74
-
75
-
76
-
77
-
78
-
79
-
80
-
81
-
82
-
83
-
84
-
85
-
86
-
87
-
88
-
89
-
90
-
91
-
92
-
93
-
94
-
95
-
96
-
97
-
98
-
99
-
100
-
101
-
102
-
103
-
104
-
105
-
106
-
107
-
108
-
109
-
110
-
111
-
112
-
113
-
114
-
115
-
116
-
117
-
118
-
119
-
120
-
121
-
122
-
123
-
124
-
125
-
126
-
127
-
128
-
129
-
130
-
131
-
132
-
133
-
134
-
135
-
136
-
137
-
138
-
139
-
140
-
141
-
142
-
143
-
144
-
145
-
146
-
147
-
148
-
149
-
150
 |
 |