HP LaserJet MFP M139-M142 User Guide - Page 67
Improve copy and scan image quality, Check the scanner glass for dirt and smudges
 |
View all HP LaserJet MFP M139-M142 manuals
Add to My Manuals
Save this manual to your list of manuals |
Page 67 highlights
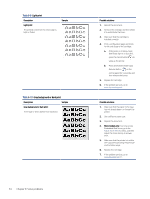
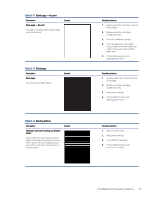
Table 8-18 Output defects (continued) Description Sample Output stacking: The paper does not stack well in the output tray. The stack might be uneven, skewed, or the pages might be pushed out of the tray and onto the floor. Any of the following conditions can cause this defect: ● Extreme paper curl ● The paper in the tray is wrinkled or deformed ● The paper is a non-standard paper type, such as envelopes ● The output tray is too full Possible solutions 1. Reprint the document. 2. Extend the output bin extension. 3. If the defect is caused by extreme paper curl, complete the troubleshooting steps for Output curl. 4. Use a different paper type. 5. Use freshly opened paper. 6. Remove the paper from the output tray before the tray gets too full. 7. If the problem persists, go to www.hp.com/support. Improve copy and scan image quality If the printer is having image quality problems, first make sure you are using high-quality originals. If the problem still exists, try the following solutions in the order presented to resolve the issue. If the issue is not resolved, see Improve print quality for further solutions. Check the scanner glass for dirt and smudges Over time, specks of debris might collect on the scanner glass and white plastic backing, which can affect performance. Use the following procedure to clean the scanner. 1. Press the power button to turn the printer off, and then disconnect the power cable from the electrical outlet. 2. Open the scanner lid. 3. Clean the scanner glass and the white plastic backing underneath the scanner lid with a soft cloth or sponge that has been moistened with nonabrasive glass cleaner. CAUTION: Do not use abrasives, acetone, benzene, ammonia, ethyl alcohol, or carbon tetrachloride on any part of the printer; these can damage the printer. Do not place liquids directly on the glass or platen. They might seep and damage the printer. 4. Dry the glass and white plastic parts with a chamois or a cellulose sponge to prevent spotting. 5. Connect the power cable to an outlet, and then press the power button to turn the printer on. Check the paper settings Check the paper settings from the HP Embedded Web Server, and then change the setting as needed. 1. Open the HP Embedded Web Server. See Access the Embedded Web Server (EWS). 2. On the Systems tab, click Paper Setup. 58 Chapter 8 Solve problems
-
 1
1 -
2
-
3
-
4
-
5
-
6
-
7
-
8
-
9
-
10
-
11
-
12
-
13
-
14
-
15
-
16
-
17
-
18
-
19
-
20
-
21
-
22
-
23
-
24
-
25
-
26
-
27
-
28
-
29
-
30
-
31
-
32
-
33
-
34
-
35
-
36
-
37
-
38
-
39
-
40
-
41
-
42
-
43
-
44
-
45
-
46
-
47
-
48
-
49
-
50
-
51
-
52
-
53
-
54
-
55
-
56
-
57
-
58
-
59
-
60
-
61
-
 62
62 -
 63
63 -
 64
64 -
 65
65 -
 66
66 -
 67
67 -
 68
68 -
 69
69 -
 70
70 -
 71
71 -
 72
72 -
73
-
74
-
75
-
76
-
77
-
78
-
79
-
80
-
81
-
82
-
83
-
84
-
85
-
86
-
87
-
88
-
89
-
90
-
91
-
92
-
93
-
94
-
95
-
96
-
97
-
98
-
99
-
100
-
101
-
102
-
103
-
104
-
105
-
106
-
107
-
108
-
109
-
110
-
111
-
112
-
113
-
114
 |
 |
