HP Vectra XU 6/XXX HP Vectra XU6/150 PC - User’s Guide - Page 52
Installing The Board
 |
View all HP Vectra XU 6/XXX manuals
Add to My Manuals
Save this manual to your list of manuals |
Page 52 highlights
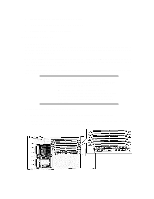
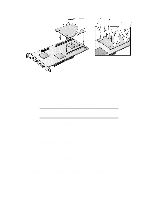
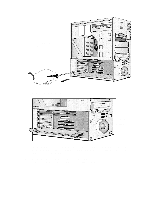
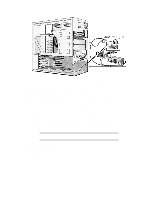
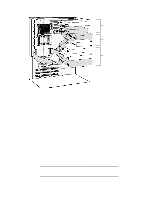
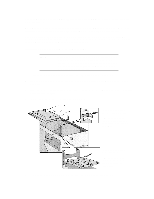
Windows 95 can detect and configure automatically Plug and Play accessories if Plug and Play Device Management is set to Full in the Setup program. Non-Plug and Play ISA Accessory Boards You must run the Add New Hardware wizard to configure non-Plug and Play accessories. The Add New Hardware wizard can identify automatically many accessory boards. If the Add New Hardware wizard does not recognize the accessory board, you can manually select the accessory board from a list of supported products. Windows 95 is preloaded with configuration details for many non-Plug and Play accessory boards. Windows 95 will determine the recommended settings for each ISA non-Plug and Play board you want to install. These settings may be different from those recommended by the accessory board's manufacturer. In this case, the board's jumper settings and driver options must be altered. To run the Add New Hardware wizard: 1 Click the Start button on the Windows 95 task bar. 2 Point to Settings. 3 Double-click Add New Hardware. 4 Follow the instructions provided by the Add New Hardware wizard to configure the accessory board. INSTALLING THE BOARD 1 Before installing the board, refer to "Installing Accessory Boards" earlier in this chapter for important Plug and Play configuration information. NOTE PCI boards are configured automatically when installed in the PC. 2 Disconnect the computer's power cord and any telecommunications cable. 3 Remove the computer's cover and power supply (see "Removing and Replacing the Cover" and "Replacing the Power Supply after Installing Accessories" earlier in this chapter). 4 Find a free slot. ISA boards should be installed in the lowest available slot and PCI boards in the highest available slot to ease cable routing. Some boards may have preferred locations and special installation instructions detailed in their manuals. 5 Unscrew and remove the slot cover. Store it in a safe place. If the slot cover is tight, loosen the screws on the adjacent slots.
-
 1
1 -
2
-
3
-
4
-
5
-
6
-
7
-
8
-
9
-
10
-
11
-
12
-
13
-
14
-
15
-
16
-
17
-
18
-
19
-
20
-
21
-
22
-
23
-
24
-
25
-
26
-
27
-
28
-
29
-
30
-
31
-
32
-
33
-
34
-
35
-
36
-
37
-
38
-
39
-
40
-
41
-
42
-
43
-
44
-
45
-
46
-
 47
47 -
 48
48 -
 49
49 -
 50
50 -
 51
51 -
 52
52 -
 53
53 -
 54
54 -
 55
55 -
 56
56 -
 57
57 -
58
-
59
-
60
-
61
-
62
-
63
-
64
-
65
-
66
-
67
-
68
-
69
-
70
-
71
-
72
-
73
-
74
-
75
-
76
-
77
-
78
-
79
-
80
-
81
-
82
-
83
-
84
-
85
-
86
-
87
-
88
-
89
-
90
-
91
-
92
-
93
-
94
-
95
-
96
-
97
-
98
-
99
-
100
-
101
-
102
-
103
-
104
-
105
-
106
-
107
-
108
-
109
-
110
-
111
-
112
-
113
-
114
-
115
-
116
-
117
-
118
-
119
-
120
-
121
-
122
-
123
-
124
-
125
-
126
 |
 |