HP Vectra XU 6/XXX HP Vectra XU6/150 PC - User’s Guide - Page 57
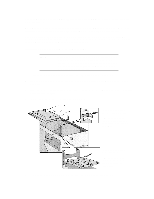
Installing a Hard Disk Drive in an Internal Shelf
 |
View all HP Vectra XU 6/XXX manuals
Add to My Manuals
Save this manual to your list of manuals |
Page 57 highlights
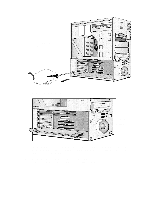
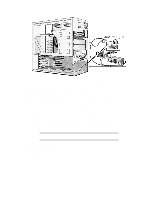
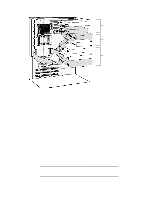
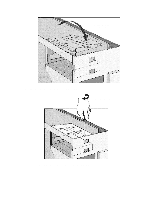
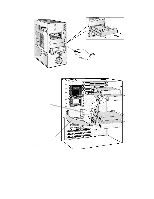
You should assign an unused SCSI address to the second SCSI hard disk drive (for example, SCSI address 1). The SCSI address is usually configured with jumpers on the SCSI hard disk drive. Refer to the installation guide supplied with the drive for information on selecting a SCSI address. Some SCSI disk drives may have termination resistors that must be removed or disabled before installation in your computer. Refer to the drive's installation guide for more details and to see if there is a special installation procedure to follow. Installing a Hard Disk Drive in an Internal Shelf NOTE Hard disk drives ordered from HP are supplied with a mounting tray. If you order your drive from another supplier, you may need to order a mounting tray from HP. You should order product number D2037A (3.5inch hard disk mounting tray). 1 Disconnect the computer's power cord and any telecommunications cable. 2 Remove the computer's cover (see "Removing and Replacing the Cover" earlier in this chapter). 3 Slide the power supply out to improve access to the drive (see "Moving the Power Supply" earlier in this chapter). 4 Install the drive in the first or second internal shelf. If you install the drive in the first (uppermost) shelf: Align the drive (upside down) with the hinges on the shelf, then insert it into the hinges If you install the drive in the second shelf: Align the drive with the slots in the shelf, then insert it carefully, as shown here 5 If the drive is being installed in the first shelf, rotate the drive into position.
-
 1
1 -
2
-
3
-
4
-
5
-
6
-
7
-
8
-
9
-
10
-
11
-
12
-
13
-
14
-
15
-
16
-
17
-
18
-
19
-
20
-
21
-
22
-
23
-
24
-
25
-
26
-
27
-
28
-
29
-
30
-
31
-
32
-
33
-
34
-
35
-
36
-
37
-
38
-
39
-
40
-
41
-
42
-
43
-
44
-
45
-
46
-
47
-
48
-
49
-
50
-
51
-
 52
52 -
 53
53 -
 54
54 -
 55
55 -
 56
56 -
 57
57 -
 58
58 -
 59
59 -
 60
60 -
 61
61 -
 62
62 -
63
-
64
-
65
-
66
-
67
-
68
-
69
-
70
-
71
-
72
-
73
-
74
-
75
-
76
-
77
-
78
-
79
-
80
-
81
-
82
-
83
-
84
-
85
-
86
-
87
-
88
-
89
-
90
-
91
-
92
-
93
-
94
-
95
-
96
-
97
-
98
-
99
-
100
-
101
-
102
-
103
-
104
-
105
-
106
-
107
-
108
-
109
-
110
-
111
-
112
-
113
-
114
-
115
-
116
-
117
-
118
-
119
-
120
-
121
-
122
-
123
-
124
-
125
-
126
 |
 |
