HP Vectra XU 6/XXX HP Vectra XU6/150 PC - User’s Guide - Page 63
Installing A Drive In A Front-access Shelf
 |
View all HP Vectra XU 6/XXX manuals
Add to My Manuals
Save this manual to your list of manuals |
Page 63 highlights
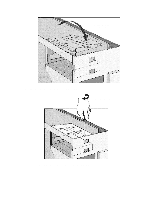
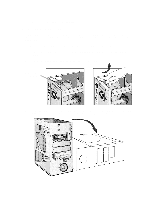
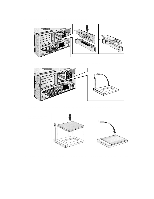
INSTALLING A DRIVE IN A FRONT-ACCESS SHELF These instructions explain how to install a drive (such as a disk drive, a CD-ROM drive, or a tape drive) in one of the front-access drive shelves. You should also refer to the manual supplied with the drive for any additional installation instructions. Before Installing an IDE Device Refer to the drive's installation guide to see if you must set jumpers or if there is a special installation procedure to follow. Before Installing a SCSI Device If you are installing a SCSI device (for example, a tape drive) you must select a SCSI address for it. SCSI addresses range from 0 to 7, with SCSI addresses 0 and 1 usually used by the SCSI hard disk drives. SCSI address 7 is reserved for the integrated SCSI controller. NOTE You don't need to select a SCSI address for Plug and Play SCSI devices (SCSI devices which support the SCAM protocol). You should assign an unused SCSI address to the new SCSI device (for example, SCSI address 2). The SCSI address is usually configured with jumpers on the SCSI device. Refer to the installation guide supplied with the device for information on selecting a SCSI address. Note that the device may be preconfigured for SCSI address 2 or 3 by default. Some SCSI devices may have termination resistors that must be removed or disabled before installation in your computer. Refer to the device's installation guide for more details and to see if there is a special installation procedure to follow. NOTE Drives ordered from HP are supplied with mounting rails. If you order your drive from another supplier, you may need to order drive mounting rails from HP. You should order product number D2880A for 5.25inch disk drive rails or product number D3566A for 3.5-inch disk drive rails. 1 Disconnect the computer's power cord and any telecommunications cable. 2 Remove the computer's cover (see "Removing and Replacing the Cover" earlier in this chapter). 3 Slide out the power supply to provide better access to the disk drive cables (see "Moving the Power Supply" earlier in this chapter). 4 If installing a drive in a 5.25-inch wide shelf, remove the drive tray and put it in a safe place.
-
 1
1 -
2
-
3
-
4
-
5
-
6
-
7
-
8
-
9
-
10
-
11
-
12
-
13
-
14
-
15
-
16
-
17
-
18
-
19
-
20
-
21
-
22
-
23
-
24
-
25
-
26
-
27
-
28
-
29
-
30
-
31
-
32
-
33
-
34
-
35
-
36
-
37
-
38
-
39
-
40
-
41
-
42
-
43
-
44
-
45
-
46
-
47
-
48
-
49
-
50
-
51
-
52
-
53
-
54
-
55
-
56
-
57
-
 58
58 -
 59
59 -
 60
60 -
 61
61 -
 62
62 -
 63
63 -
 64
64 -
 65
65 -
 66
66 -
 67
67 -
 68
68 -
69
-
70
-
71
-
72
-
73
-
74
-
75
-
76
-
77
-
78
-
79
-
80
-
81
-
82
-
83
-
84
-
85
-
86
-
87
-
88
-
89
-
90
-
91
-
92
-
93
-
94
-
95
-
96
-
97
-
98
-
99
-
100
-
101
-
102
-
103
-
104
-
105
-
106
-
107
-
108
-
109
-
110
-
111
-
112
-
113
-
114
-
115
-
116
-
117
-
118
-
119
-
120
-
121
-
122
-
123
-
124
-
125
-
126
 |
 |