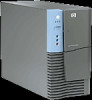
HP Workstation i2000 hp workstation i2000 owner's guide (a6037-90003) - Page 103
Installing Accessory Hard Disk Drives
 |
View all HP Workstation i2000 manuals
Add to My Manuals
Save this manual to your list of manuals |
Page 103 highlights
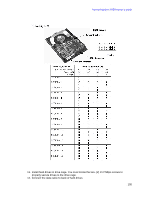
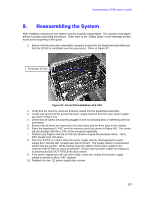
hp workstation i2000 owner's guide 8.7 Installing Accessory Hard Disk Drives To install additional hard drives in the hp workstation i2000: 1. Carefully place the system on its side. The side containing the lock in the center should be facing upwards. 2. Pull the system out from the work area and grasp the bottom inside of the bezel. Locate the two- (2) bezel clips (as show in Figure 39) near the bottom of the system and press in to disengage the bezel from the chassis sheet metal. Once disengaged, gently pull the front bezel away from the system. There are four- (4) interlock clips that disengage from the slots within the system chassis. Press the two tabs on the bottom of the bezel, 3. With the system in an upright (normal) position, and resting on an antistatic surface, loosen the four- (4) Phillips-head screws from the rear (as shown in Figure 38). 4. Remove the side cover by firmly pressing on the center of th panel and pushing, forcing the panel to slide backwards toward the rear of the unit. 5. Remove the two- (2) Phillips-head screws from the power supply door and set aside for later reinstallation. (as shown in Figure 40). 6. Remove the baseboard E-PAC (black Styrofoam protective material as shown in Figure 41). 7. Disconnect power and data cables from SCSI hard drive. 8. Disconnect SCSI cable from SCSI card. 9. Remove two- (2) Phillips-head screws from the hard drive cage. 10. Set unique SCSI ID's for each hard drive. To set the SCSI ID: Assign an unused SCSI ID. See below: SCSI ID # • If you are adding a SCSI hard drive to your system, consider setting the new hard drive SCSI ID to 1. However, if you have other SCSI devices connected externally, or have changed the SCSI ID of the currently installed hard drive, remember this SCSI ID must be unique. • If you are replacing a SCSI hard drive, you can use the SCSI ID number of the current hard drive for the replacement hard drive. • SCSI IDs are set by jumpering pins on the disk drive. 103
-
 1
1 -
2
-
3
-
4
-
5
-
6
-
7
-
8
-
9
-
10
-
11
-
12
-
13
-
14
-
15
-
16
-
17
-
18
-
19
-
20
-
21
-
22
-
23
-
24
-
25
-
26
-
27
-
28
-
29
-
30
-
31
-
32
-
33
-
34
-
35
-
36
-
37
-
38
-
39
-
40
-
41
-
42
-
43
-
44
-
45
-
46
-
47
-
48
-
49
-
50
-
51
-
52
-
53
-
54
-
55
-
56
-
57
-
58
-
59
-
60
-
61
-
62
-
63
-
64
-
65
-
66
-
67
-
68
-
69
-
70
-
71
-
72
-
73
-
74
-
75
-
76
-
77
-
78
-
79
-
80
-
81
-
82
-
83
-
84
-
85
-
86
-
87
-
88
-
89
-
90
-
91
-
92
-
93
-
94
-
95
-
96
-
97
-
 98
98 -
 99
99 -
 100
100 -
 101
101 -
 102
102 -
 103
103 -
 104
104 -
 105
105 -
 106
106 -
 107
107 -
 108
108 -
109
-
110
-
111
-
112
-
113
-
114
-
115
-
116
-
117
-
118
-
119
-
120
-
121
-
122
-
123
-
124
-
125
-
126
-
127
-
128
-
129
-
130
-
131
-
132
 |
 |
