HP Workstation i2000 hp workstation i2000 owner's guide (a6037-90003) - Page 86
Removing the Processor Board
 |
View all HP Workstation i2000 manuals
Add to My Manuals
Save this manual to your list of manuals |
Page 86 highlights
hp workstation i2000 owner's guide 7.2 Removing the Processor Board 1. Locate and remove the processor Power Pod's power harness from the main power supply (shown in Figure 43). Processor Assembly Power Harness Figure 42. Processor Power Harness 2. Locate and remove the two- (2) screws securing the processor assembly to the system chassis and set aside for later reinstallation. Remove the processor assembly from the system chassis by lifting as shown in Figure 44. Place the entire assembly aside on an anti-static surface. Processor Assembly Screws Figure 43. Processor Assembly 86
-
 1
1 -
2
-
3
-
4
-
5
-
6
-
7
-
8
-
9
-
10
-
11
-
12
-
13
-
14
-
15
-
16
-
17
-
18
-
19
-
20
-
21
-
22
-
23
-
24
-
25
-
26
-
27
-
28
-
29
-
30
-
31
-
32
-
33
-
34
-
35
-
36
-
37
-
38
-
39
-
40
-
41
-
42
-
43
-
44
-
45
-
46
-
47
-
48
-
49
-
50
-
51
-
52
-
53
-
54
-
55
-
56
-
57
-
58
-
59
-
60
-
61
-
62
-
63
-
64
-
65
-
66
-
67
-
68
-
69
-
70
-
71
-
72
-
73
-
74
-
75
-
76
-
77
-
78
-
79
-
80
-
 81
81 -
 82
82 -
 83
83 -
 84
84 -
 85
85 -
 86
86 -
 87
87 -
 88
88 -
 89
89 -
 90
90 -
 91
91 -
92
-
93
-
94
-
95
-
96
-
97
-
98
-
99
-
100
-
101
-
102
-
103
-
104
-
105
-
106
-
107
-
108
-
109
-
110
-
111
-
112
-
113
-
114
-
115
-
116
-
117
-
118
-
119
-
120
-
121
-
122
-
123
-
124
-
125
-
126
-
127
-
128
-
129
-
130
-
131
-
132
 |
 |

hp workstation i2000 owner’s guide
86
7.2
Removing the Processor Board
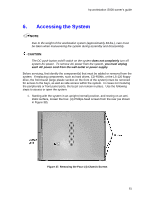
1.
Locate and remove the processor Power Pod’s power harness from the main
power supply (shown in Figure 43).
Figure 42. Processor Power Harness
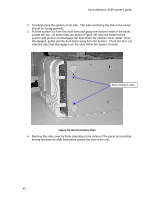
2.
Locate and remove the two- (2) screws securing the processor assembly to the
system chassis and set aside for later reinstallation.
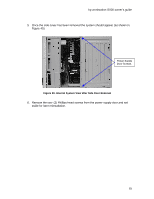
Remove the processor
assembly from the system chassis by lifting as shown in Figure 44.
Place the
entire assembly aside on an anti-static surface.
Figure 43. Processor Assembly
Processor
Assembly
Power Harness
Processor
Assembly
Screws