HP Workstation i2000 hp workstation i2000 owner's guide (a6037-90003) - Page 92
Removal of the Front Panel Assembly
 |
View all HP Workstation i2000 manuals
Add to My Manuals
Save this manual to your list of manuals |
Page 92 highlights
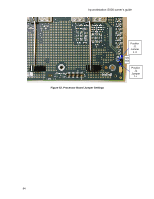
hp workstation i2000 owner's guide 7.7 Removal of the Front Panel Assembly 1. Remove the Phillips-head screw from the bottom of the front panel assembly. Refer to Figure 51. Front Panel Assembly Screw Figure 50. Chassis Front With Bezel Removed 2. Lift the assembly upward and pull forward while feeding cables through from the inside. Note the routing of the cable. Refer to Figure 52. Figure 51. Front Panel Assembly 3. To reinstall, feed the power switch / audio and USB assembly cables through the chassis where the prior cables were removed. 4. Reattach with the screw that was removed in step 1. 5. Reconnect the cables. 92
-
 1
1 -
2
-
3
-
4
-
5
-
6
-
7
-
8
-
9
-
10
-
11
-
12
-
13
-
14
-
15
-
16
-
17
-
18
-
19
-
20
-
21
-
22
-
23
-
24
-
25
-
26
-
27
-
28
-
29
-
30
-
31
-
32
-
33
-
34
-
35
-
36
-
37
-
38
-
39
-
40
-
41
-
42
-
43
-
44
-
45
-
46
-
47
-
48
-
49
-
50
-
51
-
52
-
53
-
54
-
55
-
56
-
57
-
58
-
59
-
60
-
61
-
62
-
63
-
64
-
65
-
66
-
67
-
68
-
69
-
70
-
71
-
72
-
73
-
74
-
75
-
76
-
77
-
78
-
79
-
80
-
81
-
82
-
83
-
84
-
85
-
86
-
 87
87 -
 88
88 -
 89
89 -
 90
90 -
 91
91 -
 92
92 -
 93
93 -
 94
94 -
 95
95 -
 96
96 -
 97
97 -
98
-
99
-
100
-
101
-
102
-
103
-
104
-
105
-
106
-
107
-
108
-
109
-
110
-
111
-
112
-
113
-
114
-
115
-
116
-
117
-
118
-
119
-
120
-
121
-
122
-
123
-
124
-
125
-
126
-
127
-
128
-
129
-
130
-
131
-
132
 |
 |

hp workstation i2000 owner’s guide
92
7.7
Removal of the Front Panel Assembly
1.
Remove the Phillips-head screw from the bottom of the front panel assembly.
Refer to Figure 51.
Figure 50. Chassis Front With Bezel Removed
2.
Lift the assembly upward and pull forward while feeding cables through from the
inside.
Note the routing of the cable.
Refer to Figure 52.
Figure 51. Front Panel Assembly
3.
To reinstall, feed the power switch / audio and USB assembly cables through the
chassis where the prior cables were removed.
4.
Reattach with the screw that was removed in step 1.
5. Reconnect the cables.
Front
Panel
Assembly
Screw