HP Workstation i2000 hp workstation i2000 owner's guide (a6037-90003) - Page 107
Reassembling the System
 |
View all HP Workstation i2000 manuals
Add to My Manuals
Save this manual to your list of manuals |
Page 107 highlights
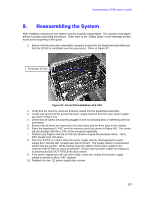
hp workstation i2000 owner's guide 9. Reassembling the System After installing components, the system must be properly reassembled. The operator must again adhere to proper grounding techniques. Refer back to the "Safety Steps" in the Warnings section found at the beginning of this guide. 1. Ensure that the processor assembly is properly seated into the baseboard assembly and that the E-PAC is reinstalled over the processors. Refer to Figure 57. Processor E-PAC Figure 57. Correct Reinstallation of E-PAC 2. Verify that the memory cards are properly seated into the baseboard assembly. 3. Locate and reconnect the peripheral power supply harness from the main power supply (as show in Figure 41). 4. Check that all cables are properly plugged in and not blocking fans or interfering with fan movement. 5. Ensure that all drives are fastened to the drive bays and the drive bays to the chassis. 6. Place the baseboard E-PAC over the memory cards (as shown in Figure 68). The center tab should align with the E-PAC of the processor assembly. 7. Position your fingers over the E-PAC (as shown in Figure 59) and push down. The E- PAC should "pop" into place. 8. Once the E-PAC is in place close the power supply door by disengaging the power supply door "locking tab", located near the I/O board. The supply closes in a downward motion into the system. While closing, keep the cables of the power supply in the channel of the E-PAC as much as possible. Ensure that no power cables are being cut or pinched and DO NOT FORCE the door closed. 9. If the power supply door will not close easily, check the routing of the power supply cables in relation to the E-PAC channel. 10. Reattach the two- (2) power supply door screws. 107
-
 1
1 -
2
-
3
-
4
-
5
-
6
-
7
-
8
-
9
-
10
-
11
-
12
-
13
-
14
-
15
-
16
-
17
-
18
-
19
-
20
-
21
-
22
-
23
-
24
-
25
-
26
-
27
-
28
-
29
-
30
-
31
-
32
-
33
-
34
-
35
-
36
-
37
-
38
-
39
-
40
-
41
-
42
-
43
-
44
-
45
-
46
-
47
-
48
-
49
-
50
-
51
-
52
-
53
-
54
-
55
-
56
-
57
-
58
-
59
-
60
-
61
-
62
-
63
-
64
-
65
-
66
-
67
-
68
-
69
-
70
-
71
-
72
-
73
-
74
-
75
-
76
-
77
-
78
-
79
-
80
-
81
-
82
-
83
-
84
-
85
-
86
-
87
-
88
-
89
-
90
-
91
-
92
-
93
-
94
-
95
-
96
-
97
-
98
-
99
-
100
-
101
-
 102
102 -
 103
103 -
 104
104 -
 105
105 -
 106
106 -
 107
107 -
 108
108 -
 109
109 -
 110
110 -
 111
111 -
 112
112 -
113
-
114
-
115
-
116
-
117
-
118
-
119
-
120
-
121
-
122
-
123
-
124
-
125
-
126
-
127
-
128
-
129
-
130
-
131
-
132
 |
 |
