HP Workstation i2000 hp workstation i2000 owner's guide (a6037-90003) - Page 108
E-PAC Inserted over Memory Cards, E-PAC Installation
 |
View all HP Workstation i2000 manuals
Add to My Manuals
Save this manual to your list of manuals |
Page 108 highlights
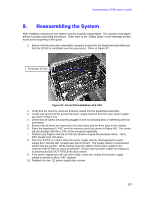
hp workstation i2000 owner's guide E-PAC Channel Baseboard E-PAC Figure 58. E-PAC Inserted over Memory Cards Center Tab Figure 59. E-PAC Installation 11. Reattach the side panel by placing the tabs of the sheet metal into the slots of the system at the top. Then slide the side panel towards the front of the system. When properly in place, the lock can be depressed into the system and secured. 12. Reattach the bezel by aligning the top of the bezel to the top of the system. Then by aligning the interlock clips with their respective slots push the clips into the slots starting with the top two down to the bottom clips. 13. Reattach all external devices such as the keyboard, mouse, video monitor and AC power into their respective ports. 14. The system is now ready to power on. 108
-
 1
1 -
2
-
3
-
4
-
5
-
6
-
7
-
8
-
9
-
10
-
11
-
12
-
13
-
14
-
15
-
16
-
17
-
18
-
19
-
20
-
21
-
22
-
23
-
24
-
25
-
26
-
27
-
28
-
29
-
30
-
31
-
32
-
33
-
34
-
35
-
36
-
37
-
38
-
39
-
40
-
41
-
42
-
43
-
44
-
45
-
46
-
47
-
48
-
49
-
50
-
51
-
52
-
53
-
54
-
55
-
56
-
57
-
58
-
59
-
60
-
61
-
62
-
63
-
64
-
65
-
66
-
67
-
68
-
69
-
70
-
71
-
72
-
73
-
74
-
75
-
76
-
77
-
78
-
79
-
80
-
81
-
82
-
83
-
84
-
85
-
86
-
87
-
88
-
89
-
90
-
91
-
92
-
93
-
94
-
95
-
96
-
97
-
98
-
99
-
100
-
101
-
102
-
 103
103 -
 104
104 -
 105
105 -
 106
106 -
 107
107 -
 108
108 -
 109
109 -
 110
110 -
 111
111 -
 112
112 -
 113
113 -
114
-
115
-
116
-
117
-
118
-
119
-
120
-
121
-
122
-
123
-
124
-
125
-
126
-
127
-
128
-
129
-
130
-
131
-
132
 |
 |
