IBM 4500R Hardware Maintenance Manual - Page 61
Installing a non-hot-swap drive
 |
UPC - 087944567837
View all IBM 4500R manuals
Add to My Manuals
Save this manual to your list of manuals |
Page 61 highlights
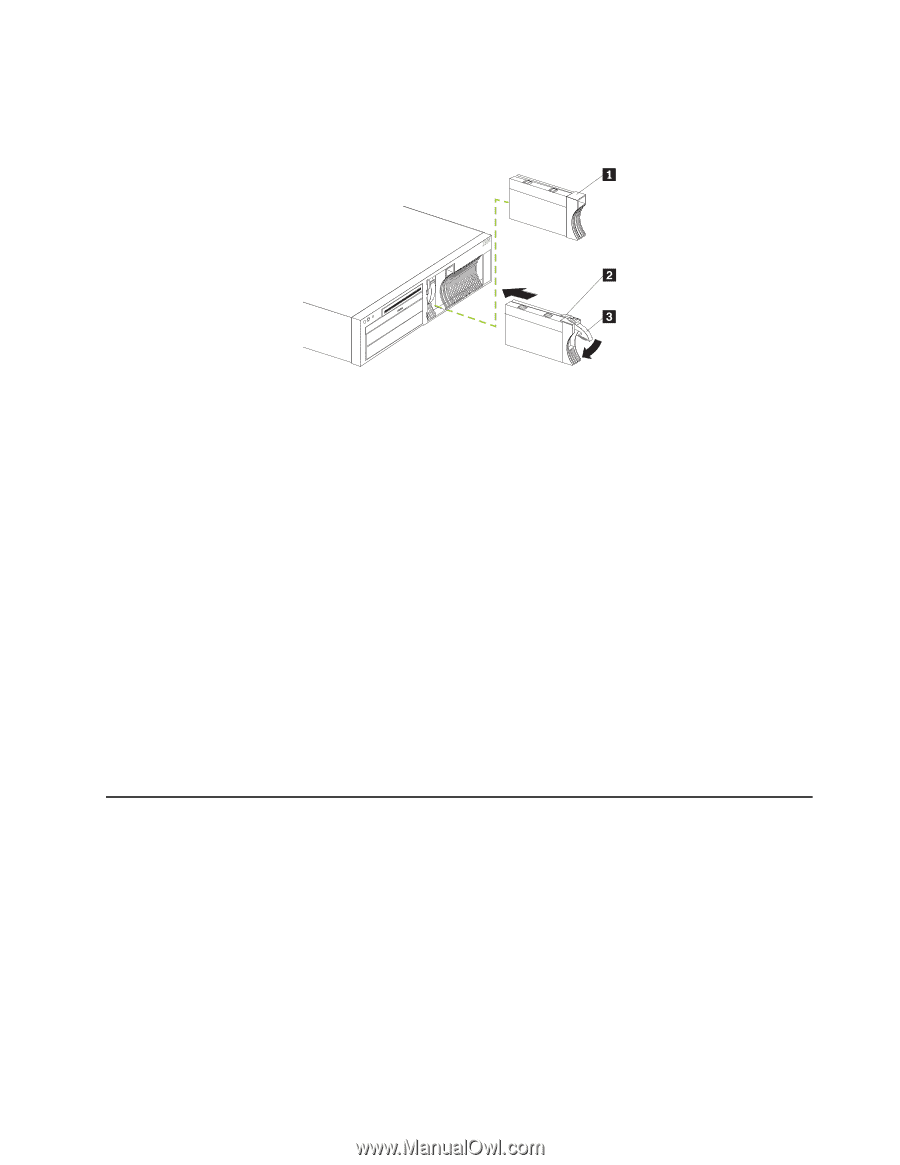
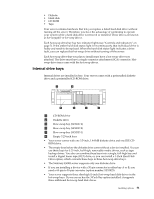
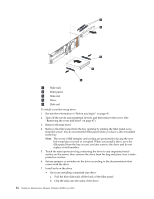
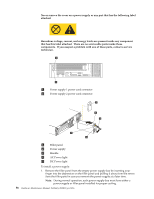
2. You do not have to turn off the server to install hot-swap drives. However, you must turn off the server when performing any steps that involve installing or removing cables. 1 Filler panel 2 Drive-tray assembly 3 Drive handle To install a drive in a hot-swap drive bay: 1. Review the information in "Before you begin" on page 45. Attention: To maintain proper system cooling, do not operate the server for more than two minutes without either a drive or a filler panel installed for each bay. 2. Remove the filler panel from one of the empty hot-swap bays by inserting your finger into the depression on the filler panel and pulling it away from the server. 3. Install the hard disk drive in the hot-swap bay: a. Ensure the tray handle is open (that is, perpendicular to the drive). b. Align the drive/tray assembly with the guide rails in the bay. c. Gently push the drive/tray assembly into the bay until the drive connects to the backplane. d. Push the tray handle down until it locks. 4. Check the hard disk drive status indicators to verify that the hard disk drive is operating properly. Installing a non-hot-swap drive Before you install drives in your server, verify that you have all the cables and any other equipment specified in the documentation that comes with the internal drive. You might also need to perform certain preinstallation activities. Some of the steps are required only during the initial installation of an option. Installing options 53
-
 1
1 -
2
-
3
-
4
-
5
-
6
-
7
-
8
-
9
-
10
-
11
-
12
-
13
-
14
-
15
-
16
-
17
-
18
-
19
-
20
-
21
-
22
-
23
-
24
-
25
-
26
-
27
-
28
-
29
-
30
-
31
-
32
-
33
-
34
-
35
-
36
-
37
-
38
-
39
-
40
-
41
-
42
-
43
-
44
-
45
-
46
-
47
-
48
-
49
-
50
-
51
-
52
-
53
-
54
-
55
-
 56
56 -
 57
57 -
 58
58 -
 59
59 -
 60
60 -
 61
61 -
 62
62 -
 63
63 -
 64
64 -
 65
65 -
 66
66 -
67
-
68
-
69
-
70
-
71
-
72
-
73
-
74
-
75
-
76
-
77
-
78
-
79
-
80
-
81
-
82
-
83
-
84
-
85
-
86
-
87
-
88
-
89
-
90
-
91
-
92
-
93
-
94
-
95
-
96
-
97
-
98
-
99
-
100
-
101
-
102
-
103
-
104
-
105
-
106
-
107
-
108
-
109
-
110
-
111
-
112
-
113
-
114
-
115
-
116
-
117
-
118
-
119
-
120
-
121
-
122
-
123
-
124
-
125
-
126
-
127
-
128
-
129
-
130
-
131
-
132
-
133
-
134
-
135
-
136
-
137
-
138
-
139
-
140
-
141
-
142
-
143
-
144
-
145
-
146
-
147
-
148
-
149
-
150
-
151
-
152
-
153
-
154
-
155
-
156
-
157
-
158
-
159
-
160
-
161
-
162
-
163
-
164
-
165
-
166
-
167
-
168
-
169
-
170
-
171
-
172
-
173
-
174
-
175
-
176
-
177
-
178
-
179
-
180
-
181
-
182
-
183
-
184
-
185
-
186
-
187
-
188
-
189
-
190
-
191
-
192
 |
 |