IBM 4500R Hardware Maintenance Manual - Page 63
Installing a microprocessor, World Wide Web
 |
UPC - 087944567837
View all IBM 4500R manuals
Add to My Manuals
Save this manual to your list of manuals |
Page 63 highlights
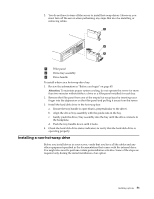
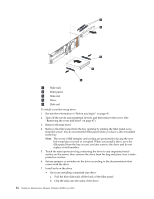
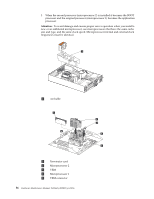
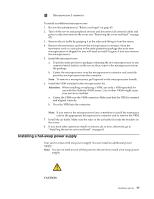
• If you are installing a digital linear tape (DLT) backup drive, use the metal slide rails and screws that are shipped in the box that contains the server documentation. 8. Place the drive so that the slide rails engage in the bay guide rails. Push the drive into the bay until it clicks into place. 9. If you are installing a SCSI device, continue with the next step. If you are installing an IDE device, go to step 12.. 10. To install a SCSI device: a. Attach the connector on the 1-drop SCSI cable for the non-hot-swap drive bays to the back of the drive. The cable is shipped restrained in a cable clamp on the bottom of the server chassis near the bays. Connect the other end of the cable to SCSI channel A on the system board, if it is not already attached. See "System board internal cable connectors" on page 41 for the location of the SCSI channel A connector. Note: If you want to install more than one optional SCSI 5.25-inch device, install an optional SCSI adapter to control the device. b. Connect a power cable to the back of the drive. Power cables for non-hotswap drives come installed in your server. The connectors are keyed and can be inserted only one way. c. Continue with step 12. 11. To install an IDE device, such as a CD-ROM drive or a DVD-ROM drive, use the two-drop IDE cable that comes with the option: Note: If you add an IDE device such as a CD-ROM R/W drive or a DVD-ROM drive, you will no longer be able to use the slim-high CD-ROM that came with the system. a. Remove the cable connecting the CD-ROM drive to the IDE connector on the system board. b. Using the two-drop cable that came with your IDE option, connect the IDE device to the IDE connector on the system board. c. Set the jumper on the back of the new IDE device to master. 12. If you have other options to install or remove, do so now; otherwise, go to "Installing the server cover and bezel" on page 60. Installing a microprocessor Your server comes with one microprocessor installed on the system board. If you install an additional microprocessor, your server can operate as a symmetric multiprocessing (SMP) server. With SMP, certain operating systems and application programs can distribute the processing load between the microprocessors. Notes: 1. Before you install a new microprocessor, review the documentation that comes with the microprocessor, so that you can determine whether you need to update the server basic input/output system (BIOS). The latest level of BIOS for your server is available through the World Wide Web and the IBM Bulletin Board System (BBS). The latest level of BIOS for your server is available through the World Wide Web 2. Obtain an SMP-capable operating system (optional). For a list of supported operating systems, see http://www.ibm.com/pc/us/compat/ on the World Wide Web. Installing options 55
-
 1
1 -
2
-
3
-
4
-
5
-
6
-
7
-
8
-
9
-
10
-
11
-
12
-
13
-
14
-
15
-
16
-
17
-
18
-
19
-
20
-
21
-
22
-
23
-
24
-
25
-
26
-
27
-
28
-
29
-
30
-
31
-
32
-
33
-
34
-
35
-
36
-
37
-
38
-
39
-
40
-
41
-
42
-
43
-
44
-
45
-
46
-
47
-
48
-
49
-
50
-
51
-
52
-
53
-
54
-
55
-
56
-
57
-
 58
58 -
 59
59 -
 60
60 -
 61
61 -
 62
62 -
 63
63 -
 64
64 -
 65
65 -
 66
66 -
 67
67 -
 68
68 -
69
-
70
-
71
-
72
-
73
-
74
-
75
-
76
-
77
-
78
-
79
-
80
-
81
-
82
-
83
-
84
-
85
-
86
-
87
-
88
-
89
-
90
-
91
-
92
-
93
-
94
-
95
-
96
-
97
-
98
-
99
-
100
-
101
-
102
-
103
-
104
-
105
-
106
-
107
-
108
-
109
-
110
-
111
-
112
-
113
-
114
-
115
-
116
-
117
-
118
-
119
-
120
-
121
-
122
-
123
-
124
-
125
-
126
-
127
-
128
-
129
-
130
-
131
-
132
-
133
-
134
-
135
-
136
-
137
-
138
-
139
-
140
-
141
-
142
-
143
-
144
-
145
-
146
-
147
-
148
-
149
-
150
-
151
-
152
-
153
-
154
-
155
-
156
-
157
-
158
-
159
-
160
-
161
-
162
-
163
-
164
-
165
-
166
-
167
-
168
-
169
-
170
-
171
-
172
-
173
-
174
-
175
-
176
-
177
-
178
-
179
-
180
-
181
-
182
-
183
-
184
-
185
-
186
-
187
-
188
-
189
-
190
-
191
-
192
 |
 |