Kyocera KM-4050 3050/4050/5050 Operation Guide Rev-3 (Basic) - Page 79
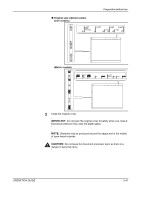
How to Load Originals, IMPORTANT, face-up. Slide the leading
 |
View all Kyocera KM-4050 manuals
Add to My Manuals
Save this manual to your list of manuals |
Page 79 highlights
Preparation before Use • Originals with correction fluid which is not dried • Irregularly shaped (non-rectangular) originals • Originals with cut-out sections • Crumpled paper • Originals with folds (Straighten the folds before loading. Failure to do so may cause the originals to jam). • Originals bound with clips or staples (Remove the clips or staples and straighten curls, wrinkles or creases before loading. Failure to do so may cause the originals to jam). How to Load Originals IMPORTANT: Before loading originals, be sure that there are no originals left on the original eject table. Originals left on the original eject table may cause the new originals to jam. 1 Adjust the original width guides to fit the originals. 2 Place the originals. Put the side to be scanned (or the first side of two-sided originals) face-up. Slide the leading edge into the document processor as far as it will go. The original placement indicator will be lit. IMPORTANT: Confirm that the original width guides exactly fit the originals. If there is a gap, readjust the original width guides. The gap may cause the originals to jam. OPERATION GUIDE 2-49
-
 1
1 -
2
-
3
-
4
-
5
-
6
-
7
-
8
-
9
-
10
-
11
-
12
-
13
-
14
-
15
-
16
-
17
-
18
-
19
-
20
-
21
-
22
-
23
-
24
-
25
-
26
-
27
-
28
-
29
-
30
-
31
-
32
-
33
-
34
-
35
-
36
-
37
-
38
-
39
-
40
-
41
-
42
-
43
-
44
-
45
-
46
-
47
-
48
-
49
-
50
-
51
-
52
-
53
-
54
-
55
-
56
-
57
-
58
-
59
-
60
-
61
-
62
-
63
-
64
-
65
-
66
-
67
-
68
-
69
-
70
-
71
-
72
-
73
-
 74
74 -
 75
75 -
 76
76 -
 77
77 -
 78
78 -
 79
79 -
 80
80 -
 81
81 -
 82
82 -
 83
83 -
 84
84 -
85
-
86
-
87
-
88
-
89
-
90
-
91
-
92
-
93
-
94
-
95
-
96
-
97
-
98
-
99
-
100
-
101
-
102
-
103
-
104
-
105
-
106
-
107
-
108
-
109
-
110
-
111
-
112
-
113
-
114
-
115
-
116
-
117
-
118
-
119
-
120
-
121
-
122
-
123
-
124
-
125
-
126
-
127
-
128
-
129
-
130
-
131
-
132
-
133
-
134
-
135
-
136
-
137
-
138
-
139
-
140
-
141
-
142
-
143
-
144
-
145
-
146
-
147
-
148
-
149
-
150
-
151
-
152
-
153
-
154
-
155
-
156
-
157
-
158
-
159
-
160
-
161
-
162
-
163
-
164
-
165
-
166
-
167
-
168
-
169
-
170
-
171
-
172
-
173
-
174
-
175
-
176
-
177
-
178
-
179
-
180
-
181
-
182
-
183
-
184
-
185
-
186
-
187
-
188
-
189
-
190
-
191
-
192
-
193
-
194
-
195
-
196
-
197
-
198
-
199
-
200
-
201
-
202
-
203
-
204
-
205
-
206
-
207
-
208
-
209
-
210
-
211
-
212
-
213
-
214
-
215
-
216
-
217
-
218
-
219
-
220
 |
 |
