Kyocera KM-4050 3050/4050/5050 Operation Guide Rev-3 (Basic) - Page 95
Adjusting Density, Density Adjustment, Option, Description - manual pdf
 |
View all Kyocera KM-4050 manuals
Add to My Manuals
Save this manual to your list of manuals |
Page 95 highlights
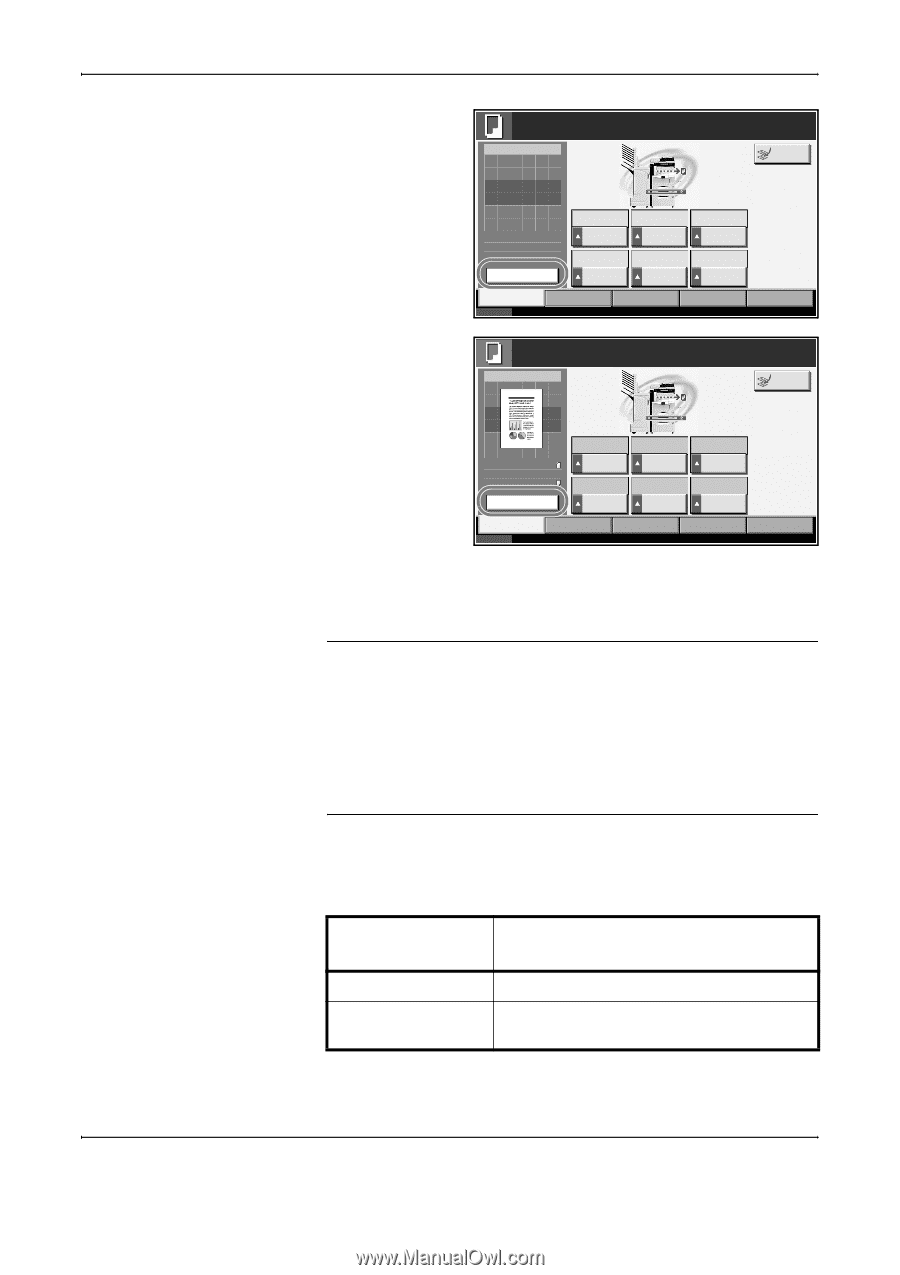
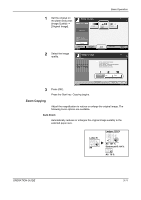
Basic Operation 2 Press [Preview]. Ready to copy. Copy Image Copies 1 Interrupt Set Original. Original : - - Zoom : 100% Paper : - - - Preview Quick Setup Status Auto Zoom 1-sided >>1-sided Duplex Org./Paper/ Finishing Normal 0 Density Text+Photo Original Image Image Quality Letter Plain Paper Selection Collate Collate/ Offset Layout/Edit Advanced Setup 10/5/2006 10:10 3 The machine starts scanning the original. When scanning is completed, the preview image appears on the panel. Ready to copy. Copy Image 100% Original : Letter Zoom : 100% Paper : Letter Change Setting Zoom 1-sided >>1-sided Duplex Quick Setup Status Org./Paper/ Finishing Normal 0 Density Text+Photo Original Image Image Quality Auto Original Size Collate Collate/ Offset Layout/Edit Copies 1 Interrupt Advanced Setup 10/5/2006 10:10 4 To change the quality or the layout, press [Change Setting]. Change the settings and press [Preview] again to see a preview image with the new settings. NOTE: If you scan a multi-page original, only the first page is previewed. If you are compiling multiple pages, first press [Preview], scan all the originals, and then press [Scan finish], and a preview of the first page is displayed. To change the mode when a preview image is displayed, press Reset key and then change the mode. For booklet copying, the finished page including the lead page of the original is displayed. Preview is not available if a high compression PDF is selected. Adjusting Density Use this procedure to adjust the density when copying. Density Adjustment Option Description Manual Adjust density using 7 or 13 levels. Auto Optimum density is selected according to the density of the original. The procedure for adjusting the density of copies is explained below. OPERATION GUIDE 3-9
-
 1
1 -
2
-
3
-
4
-
5
-
6
-
7
-
8
-
9
-
10
-
11
-
12
-
13
-
14
-
15
-
16
-
17
-
18
-
19
-
20
-
21
-
22
-
23
-
24
-
25
-
26
-
27
-
28
-
29
-
30
-
31
-
32
-
33
-
34
-
35
-
36
-
37
-
38
-
39
-
40
-
41
-
42
-
43
-
44
-
45
-
46
-
47
-
48
-
49
-
50
-
51
-
52
-
53
-
54
-
55
-
56
-
57
-
58
-
59
-
60
-
61
-
62
-
63
-
64
-
65
-
66
-
67
-
68
-
69
-
70
-
71
-
72
-
73
-
74
-
75
-
76
-
77
-
78
-
79
-
80
-
81
-
82
-
83
-
84
-
85
-
86
-
87
-
88
-
89
-
 90
90 -
 91
91 -
 92
92 -
 93
93 -
 94
94 -
 95
95 -
 96
96 -
 97
97 -
 98
98 -
 99
99 -
 100
100 -
101
-
102
-
103
-
104
-
105
-
106
-
107
-
108
-
109
-
110
-
111
-
112
-
113
-
114
-
115
-
116
-
117
-
118
-
119
-
120
-
121
-
122
-
123
-
124
-
125
-
126
-
127
-
128
-
129
-
130
-
131
-
132
-
133
-
134
-
135
-
136
-
137
-
138
-
139
-
140
-
141
-
142
-
143
-
144
-
145
-
146
-
147
-
148
-
149
-
150
-
151
-
152
-
153
-
154
-
155
-
156
-
157
-
158
-
159
-
160
-
161
-
162
-
163
-
164
-
165
-
166
-
167
-
168
-
169
-
170
-
171
-
172
-
173
-
174
-
175
-
176
-
177
-
178
-
179
-
180
-
181
-
182
-
183
-
184
-
185
-
186
-
187
-
188
-
189
-
190
-
191
-
192
-
193
-
194
-
195
-
196
-
197
-
198
-
199
-
200
-
201
-
202
-
203
-
204
-
205
-
206
-
207
-
208
-
209
-
210
-
211
-
212
-
213
-
214
-
215
-
216
-
217
-
218
-
219
-
220
 |
 |