Mackie D8B Owners Manual - Page 138
Digital Audio Workstation Setup, Click Digital I/O to open the Digital I/O - pro tools
 |
View all Mackie D8B manuals
Add to My Manuals
Save this manual to your list of manuals |
Page 138 highlights
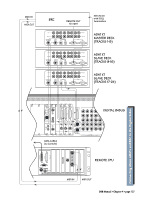
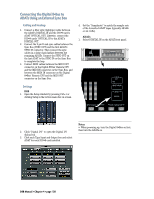
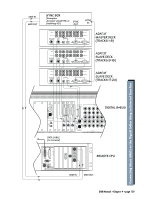
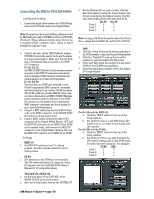
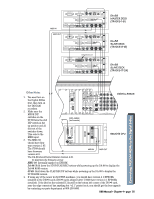
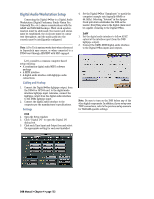
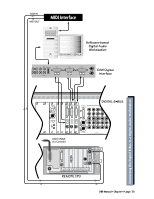
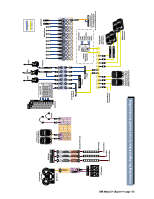
Digital Audio Workstation Setup Connecting the Digital 8•Bus to a Digital Audio Workstation (Digital Performer, Studio Vision Pro, Cakewalk Pro, etc.) shares considerations with the ADAT and TASCAM hookups. Word clock synchronization must be addressed; the master and slaves must be established; the clock rate must be consistent throughout; and the audio path into the console must be intelligently configured. Note: A Pro Tools system works best when referenced to Superclock sync source, or when connected to a PDI•8 card through AES/EBU with SRC engaged. 4. Set the Digital 8•Bus "Samplerate" to match the computer's sample rate (typically 48kHz or 44.1kHz). Selecting "Internal" in the Apogee Clock pull-down establishes the D8B as the master. Everything else in the digital chain must be capable of slaving to the Digital 8•Bus. DAW 1. Set the digital audio interface to follow ADAT optical at the interface input (from the D8B lightpipe output). 2. Connect the DAWs MIDI/digital audio interface to the Digital 8•Bus inputs and outputs. Let's consider a common computer-based setup utilizing: • A combination digital audio/MIDI software package • A MIDI interface • A digital audio interface with lightpipe audio connections Cabling and Hookup 1. Connect the Digital 8•Bus lightpipe output, from the DIO•8 or OPT•8 card, to the digital audio interface lightpipe input. Likewise, connect the lightpipe output from the digital audio interface to the D8Bs lightpipe input. 2. Connect the digital audio interface to the computer per the manufacturer's specifications. Settings D8B 1. Open the Setup window. 2. Click "Digital I/O" to open the Digital I/O dialog box. 3. Click each Tape Input and Output box and select the appropriate setting for each card installed. Note: Be sure to turn on the D8B before any of the other digital components. In addition, if your setup uses TDIF connections, refer to the previous setup scenario for TASCAM-specific settings. D8B Manual • Chapter 4 • page 132
-
 1
1 -
2
-
3
-
4
-
5
-
6
-
7
-
8
-
9
-
10
-
11
-
12
-
13
-
14
-
15
-
16
-
17
-
18
-
19
-
20
-
21
-
22
-
23
-
24
-
25
-
26
-
27
-
28
-
29
-
30
-
31
-
32
-
33
-
34
-
35
-
36
-
37
-
38
-
39
-
40
-
41
-
42
-
43
-
44
-
45
-
46
-
47
-
48
-
49
-
50
-
51
-
52
-
53
-
54
-
55
-
56
-
57
-
58
-
59
-
60
-
61
-
62
-
63
-
64
-
65
-
66
-
67
-
68
-
69
-
70
-
71
-
72
-
73
-
74
-
75
-
76
-
77
-
78
-
79
-
80
-
81
-
82
-
83
-
84
-
85
-
86
-
87
-
88
-
89
-
90
-
91
-
92
-
93
-
94
-
95
-
96
-
97
-
98
-
99
-
100
-
101
-
102
-
103
-
104
-
105
-
106
-
107
-
108
-
109
-
110
-
111
-
112
-
113
-
114
-
115
-
116
-
117
-
118
-
119
-
120
-
121
-
122
-
123
-
124
-
125
-
126
-
127
-
128
-
129
-
130
-
131
-
132
-
 133
133 -
 134
134 -
 135
135 -
 136
136 -
 137
137 -
 138
138 -
 139
139 -
 140
140 -
 141
141 -
 142
142 -
 143
143 -
144
-
145
-
146
-
147
-
148
-
149
-
150
-
151
-
152
-
153
-
154
-
155
-
156
-
157
-
158
-
159
-
160
-
161
-
162
-
163
-
164
-
165
-
166
-
167
-
168
-
169
-
170
-
171
-
172
-
173
-
174
-
175
-
176
-
177
-
178
-
179
-
180
-
181
-
182
-
183
-
184
-
185
-
186
-
187
-
188
-
189
-
190
-
191
-
192
-
193
-
194
-
195
-
196
-
197
-
198
 |
 |
