Mackie D8B Owners Manual - Page 45
Transport POSITION display, RANGE display, SET TIME button, SMPTE VIEW button
 |
View all Mackie D8B manuals
Add to My Manuals
Save this manual to your list of manuals |
Page 45 highlights
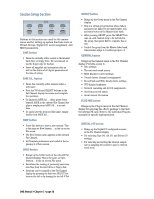
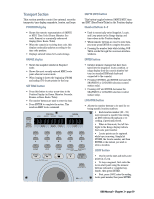
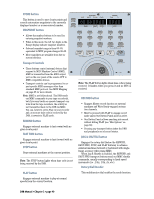
Transport Section This section provides control for external recorder transports, time display, snapshots, locates, and loops. POSITION display SMPTE VIEW button This button toggles between SMPTE/MTC time and BBT (Bars/Beats/Ticks) in the Position display. Number Buttons 0-9 • Shows the numeric representation of SMPTE or MIDI Time Code (Hours: Minutes: Seconds: Frames) or a musically referenced display (Bars: Beats: Ticks). • When the console is receiving time code, this display continually updates according to the time code position. • Displays entered values for Locate storage. • Used to numerically enter Snapshot, Locate, and Loop points in the Range display, and time values in the Position display. • When numeric buttons are used to enter data, you must press ENTER to complete the action. • Pressing the number keys while holding CONTROL scrolls through the on-screen interface windows. RANGE display ENTER button • Shows the snapshot number in Snapshot mode. • Shows the most recently entered MMC locate point when in Locator mode. • When looping it shows the beginning (FROM) and ending (TO) locate points for the loop. SET TIME button • Press this button to enter a new time in the Position Display (in Hours: Minutes: Seconds: Frames or Bars: Beats: Ticks) • The number buttons are used to enter the time. • Press ENTER to complete the action. This sends an MMC locate command. SET TIME SMPTE VIEW HOURS POSITION MINUTES SECONDS FRAMES BARS BEATS TICKS RANGE FROM TO LOOP 1 2 3 4 5 6 7 8 9 0 • Initiates numeric changes that have been typed into the snapshot, locate, position, or range display from the console number buttons (or standard IBM-style keyboard connected to the console). • Pressing CONTROL and ENTER increases the SNAPSHOT or LOCATOR selection (control surface only). • Pressing ALT and ENTER decreases the SNAPSHOT or LOCATOR selection (control surface only). LOCATOR button • Allows the number buttons to be used for entering specific location numbers. • Each location number (00 - 99) may represent a specific time during an MTC-referenced playback or recording, if previously stored. • When in this mode, the left two digits in the Range display indicate the locate point number. • Locate points can be captured while tape is moving. Simply hit STORE, the Locate number, and then ENTER at the instant you wish to store a location. ENTER LOOP STORE LOCATOR SNAPSHOT MODE LOOP button REWIND FAST FWD SHUTTLE STOP PLAY RECORD JOG & SHUTTLE JOG • Used to set the start and end Locate points in a Loop. • To loop a segment, first enter the locate start point using the numeric buttons (onboard or computer keyboard), then press ENTER. • Next, press LOOP, enter the ending locate point number, then press ENTER. D8B Manual • Chapter 2 • page 39
-
 1
1 -
2
-
3
-
4
-
5
-
6
-
7
-
8
-
9
-
10
-
11
-
12
-
13
-
14
-
15
-
16
-
17
-
18
-
19
-
20
-
21
-
22
-
23
-
24
-
25
-
26
-
27
-
28
-
29
-
30
-
31
-
32
-
33
-
34
-
35
-
36
-
37
-
38
-
39
-
 40
40 -
 41
41 -
 42
42 -
 43
43 -
 44
44 -
 45
45 -
 46
46 -
 47
47 -
 48
48 -
 49
49 -
 50
50 -
51
-
52
-
53
-
54
-
55
-
56
-
57
-
58
-
59
-
60
-
61
-
62
-
63
-
64
-
65
-
66
-
67
-
68
-
69
-
70
-
71
-
72
-
73
-
74
-
75
-
76
-
77
-
78
-
79
-
80
-
81
-
82
-
83
-
84
-
85
-
86
-
87
-
88
-
89
-
90
-
91
-
92
-
93
-
94
-
95
-
96
-
97
-
98
-
99
-
100
-
101
-
102
-
103
-
104
-
105
-
106
-
107
-
108
-
109
-
110
-
111
-
112
-
113
-
114
-
115
-
116
-
117
-
118
-
119
-
120
-
121
-
122
-
123
-
124
-
125
-
126
-
127
-
128
-
129
-
130
-
131
-
132
-
133
-
134
-
135
-
136
-
137
-
138
-
139
-
140
-
141
-
142
-
143
-
144
-
145
-
146
-
147
-
148
-
149
-
150
-
151
-
152
-
153
-
154
-
155
-
156
-
157
-
158
-
159
-
160
-
161
-
162
-
163
-
164
-
165
-
166
-
167
-
168
-
169
-
170
-
171
-
172
-
173
-
174
-
175
-
176
-
177
-
178
-
179
-
180
-
181
-
182
-
183
-
184
-
185
-
186
-
187
-
188
-
189
-
190
-
191
-
192
-
193
-
194
-
195
-
196
-
197
-
198
 |
 |
