Mackie D8B Owners Manual - Page 94
Ratio, Active, Mem A/b, Channel Select, Channel Name, Assignment, Route To Tape, Phase, Aux Sends - summing
 |
View all Mackie D8B manuals
Add to My Manuals
Save this manual to your list of manuals |
Page 94 highlights
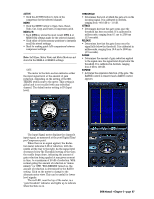
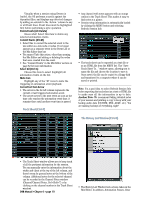
RATIO • Determines the change in output level as a function of the change in input level, once the signal level drops below the threshold. This is sometimes called downward expansion. The ratio control ranges from 1:1.0 to 1:inf. Thus, if the ratio is 1:2, a decrease in input level of 10 dB results in a 20 dB decrease in output level (assuming the input is below the threshold level). MIDI • Enables external MIDI triggering for the gate. • This can be useful for gating drums based on a sequenced MIDI drum pattern. • To set up MIDI gate triggering: 1. Select MIDI Map from the Windows menu. 2. Select New MIDI Route from the Edit window. 3. Assign a MIDI note by selecting Note from the MIDI Status drop-down menu. 4. Select Gate MIDI Trigger from the Parameter column. 5. Send a MIDI note to the D8B from a sequencer or other MIDI device. The Mode setting in the MIDI Map determines when the gate opens and closes (see "Creating a Route" on page 94). • Gate MIDI Enable can also be turned on and off via external MIDI note commands. ACTIVE • Click the ACTIVE button to turn on the gate for the selected channel. MENU • Click the MENU button to Open, Save, Reset, Undo, Cut, Copy, and Paste a Gate patch. MEM A/B • Each MEMory stores the most recent MEM A or MEM B EQ settings made for the selected channel. • Click either of these memory positions to instantly recall the stored settings. • Ideal for making quick A/B comparisons between gate settings. Note: Meter View and Meter Mode are not stored in the MEM A or MEM B settings. Additional Fat Channel Controls CHANNEL SELECT • Use the arrows on either side of the channel number (or the arrow keys on the keyboard) to scroll up or down through the D8B channels. • Click in the "Chan. Select" window for a pull-down of all the channels. CHANNEL NAME • This displays the channel name. • Double-click on the name to highlight it, then type in the new channel name (up to 16 characters). Press Enter or click elsewhere to complete the operation. ASSIGNMENT • Assign the channel to the main L/R bus or any of the 8 bus outputs. D8B Manual • Chapter 3 • page 88 ROUTE TO TAPE • Assign the channel to a tape output. • Highlight the desired numbers to send the channel to one or many tape outputs. • This is the most visual way to tell if a channel is routed to several tape outputs. • A channel can be assigned to more than one tape out, but only the last one selected appears in the channel's OUT window (in the overview screen). • No two channels can be assigned to the same tape output. To sum channels to a tape output, assign them to a bus, the route the bus to a tape out. Phase • Highlight PHASE to invert the channel polarity by 180 degrees. Aux Sends • Use the on-screen knobs to adjust any of the aux send levels. • Press Control while clicking the Aux knob to set Aux send level to unity gain. • Click the PRE button directly below the Aux send knob to toggle the individual Aux Pre/Post status. • Click the OFF button directly below the Aux send knob to toggle the individual channel Aux on and off (mute).
-
 1
1 -
2
-
3
-
4
-
5
-
6
-
7
-
8
-
9
-
10
-
11
-
12
-
13
-
14
-
15
-
16
-
17
-
18
-
19
-
20
-
21
-
22
-
23
-
24
-
25
-
26
-
27
-
28
-
29
-
30
-
31
-
32
-
33
-
34
-
35
-
36
-
37
-
38
-
39
-
40
-
41
-
42
-
43
-
44
-
45
-
46
-
47
-
48
-
49
-
50
-
51
-
52
-
53
-
54
-
55
-
56
-
57
-
58
-
59
-
60
-
61
-
62
-
63
-
64
-
65
-
66
-
67
-
68
-
69
-
70
-
71
-
72
-
73
-
74
-
75
-
76
-
77
-
78
-
79
-
80
-
81
-
82
-
83
-
84
-
85
-
86
-
87
-
88
-
 89
89 -
 90
90 -
 91
91 -
 92
92 -
 93
93 -
 94
94 -
 95
95 -
 96
96 -
 97
97 -
 98
98 -
 99
99 -
100
-
101
-
102
-
103
-
104
-
105
-
106
-
107
-
108
-
109
-
110
-
111
-
112
-
113
-
114
-
115
-
116
-
117
-
118
-
119
-
120
-
121
-
122
-
123
-
124
-
125
-
126
-
127
-
128
-
129
-
130
-
131
-
132
-
133
-
134
-
135
-
136
-
137
-
138
-
139
-
140
-
141
-
142
-
143
-
144
-
145
-
146
-
147
-
148
-
149
-
150
-
151
-
152
-
153
-
154
-
155
-
156
-
157
-
158
-
159
-
160
-
161
-
162
-
163
-
164
-
165
-
166
-
167
-
168
-
169
-
170
-
171
-
172
-
173
-
174
-
175
-
176
-
177
-
178
-
179
-
180
-
181
-
182
-
183
-
184
-
185
-
186
-
187
-
188
-
189
-
190
-
191
-
192
-
193
-
194
-
195
-
196
-
197
-
198
 |
 |
