Mackie D8B Owners Manual - Page 160
Automation and Snapshot Control, Dynamic Real Time, Event Based
 |
View all Mackie D8B manuals
Add to My Manuals
Save this manual to your list of manuals |
Page 160 highlights
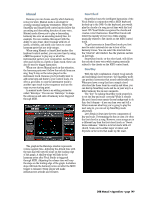
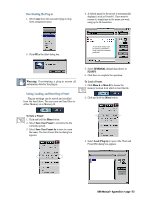
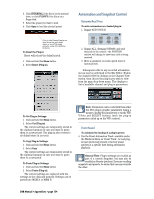
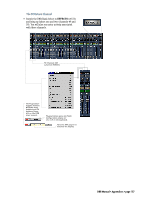
4. Click INTERNAL if the file is on the internal drive, or click FLOPPY if the file is on a floppy disk. 5. Select the preset you want to load. 6. Click Open to load the selected preset. Click in the Preset Display to load from the pull-down menu or scroll through presets using the Up/Down buttons. To Reset the Plug-in: Reset will reload the default patch. 1. Click and hold the Menu button. 2. Select Reset (Plug-in). Automation and Snapshot Control Dynamic Real Time To write automation on a loaded plug-in: 1. Engage AUTO TOUCH. 2. Engage ALL, disengage BYPASS, and send timecode to the console -the POSITION readout will change to show time code is being received. 3. Move a parameter or recall a patch (user or factory preset). Subsequent edits to any recorded automation moves may be performed in the Mix Editor. Enable the channel view by clicking on the Channel View button, then choose the plug-in you wish to view from the page drop-down menu. This displays a list of available channel and plug-in parameters. To Cut Plug-in Settings: 1. Click and hold the Menu button. 2. Select Cut (Plug-in). The current settings are temporarily stored in the clipboard memory in case you want to paste them to a new preset. The plug-in also reverts to its default state (it is reset). To Copy Plug-in Settings: 1. Click and hold the Menu button. 2. Select Copy. The current settings are temporarily stored in the clipboard memory in case you want to paste them to a new patch. To Paste Plug-in Settings: 1. Click and hold the Menu button. 2. Select Paste (Plug-in). The current settings are replaced with the settings in the clipboard memory. Settings can be pasted into MEM A or MEM B. Note: Parameters can be controlled from either the GUI plug-in graphic parameters (using a mouse to modify the parameters) or via the VFD V-Pots and SELECT buttons (with the plug-in parameters called up on the VFD readout). Event Based To automate the loading of a plug-in preset: • Use the Event Automation Track, available under the Windows Menu as 'Event Track', to load plugin user (previously stored) or factory preset patches at a specific time during automation playback. General Note: Plug-in settings are recalled as part of a console Snapshot, but may also be recalled as Presets (patches). If you are recalling snapshots and presets, be aware that one may override the other. D8B Manual • Appendices • page 154
-
 1
1 -
2
-
3
-
4
-
5
-
6
-
7
-
8
-
9
-
10
-
11
-
12
-
13
-
14
-
15
-
16
-
17
-
18
-
19
-
20
-
21
-
22
-
23
-
24
-
25
-
26
-
27
-
28
-
29
-
30
-
31
-
32
-
33
-
34
-
35
-
36
-
37
-
38
-
39
-
40
-
41
-
42
-
43
-
44
-
45
-
46
-
47
-
48
-
49
-
50
-
51
-
52
-
53
-
54
-
55
-
56
-
57
-
58
-
59
-
60
-
61
-
62
-
63
-
64
-
65
-
66
-
67
-
68
-
69
-
70
-
71
-
72
-
73
-
74
-
75
-
76
-
77
-
78
-
79
-
80
-
81
-
82
-
83
-
84
-
85
-
86
-
87
-
88
-
89
-
90
-
91
-
92
-
93
-
94
-
95
-
96
-
97
-
98
-
99
-
100
-
101
-
102
-
103
-
104
-
105
-
106
-
107
-
108
-
109
-
110
-
111
-
112
-
113
-
114
-
115
-
116
-
117
-
118
-
119
-
120
-
121
-
122
-
123
-
124
-
125
-
126
-
127
-
128
-
129
-
130
-
131
-
132
-
133
-
134
-
135
-
136
-
137
-
138
-
139
-
140
-
141
-
142
-
143
-
144
-
145
-
146
-
147
-
148
-
149
-
150
-
151
-
152
-
153
-
154
-
 155
155 -
 156
156 -
 157
157 -
 158
158 -
 159
159 -
 160
160 -
 161
161 -
 162
162 -
 163
163 -
 164
164 -
 165
165 -
166
-
167
-
168
-
169
-
170
-
171
-
172
-
173
-
174
-
175
-
176
-
177
-
178
-
179
-
180
-
181
-
182
-
183
-
184
-
185
-
186
-
187
-
188
-
189
-
190
-
191
-
192
-
193
-
194
-
195
-
196
-
197
-
198
 |
 |
