Mackie D8B Owners Manual - Page 48
Using the Graphic User Interface (GUI), The Beauty of It, The Mouse, FADER, Fader Label Scribble Strip - software
 |
View all Mackie D8B manuals
Add to My Manuals
Save this manual to your list of manuals |
Page 48 highlights
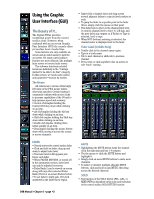
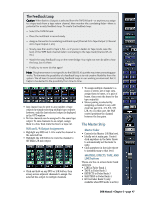
Using the Graphic User Interface (GUI) The Beauty of It... The Digital 8•Bus provides exceptional power from the control surface alone. However, when combined with an on-screen Graphic User Interface (GUI) the console offers yet another facet of audio bliss. Some features are only available onscreen and are much easier to perform on-screen. Yet some control surface features are more efficient, like multiple fader moves or inverse fader moves. The software functions included herein are definitely in the "I always wanted to be able to do that" category. In this section, we touch each control and parameter-section by section. The Mouse All references to mouse clicks imply left-click on the PS/2 mouse unless otherwise specified. Certain keyboard commands combine with mouse clicks to increase capabilities of the OS and to help increase speed and accuracy. • Control-click implies holding the Control (Ctrl) key down while clicking on an item. • Alt-click implies holding the Alt key down while clicking on an item. • Shift-click implies holding the Shift key down while clicking on an item. • Double-click implies clicking twice rather quickly on an item. • Drag implies holding the mouse button down while moving it across the screen or across channels. • Right-click a channel fader and drag across several adjacent faders to copy its level position to each. • To jump the fader to a specific point in the fader throw, simply click the mouse on that point. • This fader has no effect on the channel input level. It controls channel level to bus 1-8, L/R mix, and the post-fader aux outputs or, if Faders to Tape is selected, level to tape. • When BOT (bottom) metering is selected, the channel meter is displayed next to the fader. Fader Label (Scribble Strip) • Double-click in the channel name region. • Type in a track name. • Tab to next channel or shift+tab to previous channel. • Press enter or click anywhere else on-screen to exit "track" naming. FADER • Directly mirrors the control surface fader. • Click and hold on fader; drag up and down to adjust fader level. • The fader level in dB appears just below each fader. • When FADER MOTORS is turned off in the automation section, fader level can only be adjusted on-screen. • Fader Bank 2 can be viewed on-screen along with any other selected Fader Bank (Ctrl-8 or on-screen Faders button. • To set fader to unity gain, Ctrl-click anywhere in the fader throw region. MUTE • Highlighting the MUTE button turns the channel off in the main mix and bus 1-8 outputs. • Use the mouse to click the MUTE button and highlight it. • Simply click on more MUTE buttons to mute more channels. • To select or deselect multiple adjacent MUTE buttons, click and hold on any MUTE, then drag across the desired channels. SOLO • The function of the SOLO button (PFL, AFL, or MIXDOWN) is dependent on the solo mode selection in the control surface SOLO/STUDIO section. D8B Manual • Chapter 3 • page 42
-
 1
1 -
2
-
3
-
4
-
5
-
6
-
7
-
8
-
9
-
10
-
11
-
12
-
13
-
14
-
15
-
16
-
17
-
18
-
19
-
20
-
21
-
22
-
23
-
24
-
25
-
26
-
27
-
28
-
29
-
30
-
31
-
32
-
33
-
34
-
35
-
36
-
37
-
38
-
39
-
40
-
41
-
42
-
 43
43 -
 44
44 -
 45
45 -
 46
46 -
 47
47 -
 48
48 -
 49
49 -
 50
50 -
 51
51 -
 52
52 -
 53
53 -
54
-
55
-
56
-
57
-
58
-
59
-
60
-
61
-
62
-
63
-
64
-
65
-
66
-
67
-
68
-
69
-
70
-
71
-
72
-
73
-
74
-
75
-
76
-
77
-
78
-
79
-
80
-
81
-
82
-
83
-
84
-
85
-
86
-
87
-
88
-
89
-
90
-
91
-
92
-
93
-
94
-
95
-
96
-
97
-
98
-
99
-
100
-
101
-
102
-
103
-
104
-
105
-
106
-
107
-
108
-
109
-
110
-
111
-
112
-
113
-
114
-
115
-
116
-
117
-
118
-
119
-
120
-
121
-
122
-
123
-
124
-
125
-
126
-
127
-
128
-
129
-
130
-
131
-
132
-
133
-
134
-
135
-
136
-
137
-
138
-
139
-
140
-
141
-
142
-
143
-
144
-
145
-
146
-
147
-
148
-
149
-
150
-
151
-
152
-
153
-
154
-
155
-
156
-
157
-
158
-
159
-
160
-
161
-
162
-
163
-
164
-
165
-
166
-
167
-
168
-
169
-
170
-
171
-
172
-
173
-
174
-
175
-
176
-
177
-
178
-
179
-
180
-
181
-
182
-
183
-
184
-
185
-
186
-
187
-
188
-
189
-
190
-
191
-
192
-
193
-
194
-
195
-
196
-
197
-
198
 |
 |
