Mackie D8B Owners Manual - Page 68
Meters Sub-menu, Faders to Tape, Use Nine Pin Control, HUI Mode, Use Pre-Roll, Record Safe
 |
View all Mackie D8B manuals
Add to My Manuals
Save this manual to your list of manuals |
Page 68 highlights
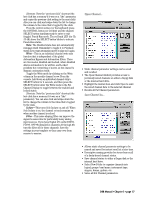
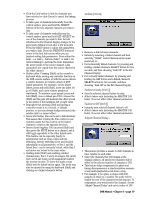
All three of the following menu items are available in the Mix Options section of the Setup window. Use Pre-Roll • Sets machine location a specified amount ahead of the locate point. • The amount of Pre-roll is set in the Locator-MMC section of the Setup window. • Pre-roll is used to provide a set time period for all synchronized device transports to lock together. • Ideally, pre-roll is equal to the sync-lock time for the recording system's transports, so that synchronized playback is a reality by the time the devices roll past the locate position. Record Safe • In Record Safe, the channel RECORD buttons will not engage. However, automation data can still be written. One Button Punch • With this option selected, record mode is activated by pressing the RECORD button in the control surface's transport section. When One Button Punch is not selected, the PLAY button must be held down while pressing RECORD to engage record mode. • To punch out of record status, simply press PLAY, STOP, REWIND or FAST FWD. • One Button Punch affects only the punch-in procedure. • The punch-out procedure is the same no matter what the status of One Button Punch (hit any other transport button to punch out). Meters Sub-menu These meter options apply to the on-screen meters, and not to the meter bridge on the console, which always indicates pre-fader levels. Meter Type • Pre Fader (F6) metering displays the signal level just prior to the fader. This is the default meter type for the meter bridge on the console. • Post Fader (F7) metering displays the signal level just after the fader, but before the mute button. • Post Mute/Fader (F8) metering displays the signal level just after the mute button. D8B Manual • Chapter 3 • page 62 Meter Reference Point • Use to adjust the point at which the on-screen LEDs change from green to yellow. • -10 dB corresponds to the meter bridge on the D8B control surface. • -15 dB provides more operating headroom, and corresponds to the recommended nominal operating level. • -20 dB provides even more operating headroom for program material containing extreme transient peaks. Show Meters In Trim Mode • When Trim Levels automation is selected, the faders go to unity (U) and the bottom meters next to the faders change to indicate the actual fader positions. • Selecting "Show Meters In Trim Mode" overrides the default Trim Mode indicators and allows the bottom meters to indicate the signal level. Show Peak Holds • Select this to cause the Overload indicators (in the TOP meters view) to remain lit when a transient peak triggers the OL indicator. Clear Over Loads • Clears the Overload indicators when "Show Peak Holds" is selected. Pressing F10 also clears all the OL indicators, and clicking an individual OL indicator clears it. Faders to Tape • Direct out levels (Level to Tape) from the tape out follow the sourced channels' faders. For example, if channel 12 is assigned to direct out 24, adjusting channel 12's fader directly affects the tape output level. • Switch this off for independent Level to Tape settings. Use Nine Pin Control • With a Serial•9 card installed in the CPU, this option activates the Sony 9-Pin control via the Serial•9 interface. HUI Mode • This option turns on the HUI layer, giving the D8B control over DAW software applications that support the Mackie HUI (Human User Interface). • When HUI Mode is turned on, a HUI button appears next to the MASTERS button on-screen, just above the master fader. Use the HUI button to access the HUI fader bank. • On the control surface, access the HUI fader bank by pressing SHIFT+MASTERS. • See Appendix F for information about HUI implementation.
-
 1
1 -
2
-
3
-
4
-
5
-
6
-
7
-
8
-
9
-
10
-
11
-
12
-
13
-
14
-
15
-
16
-
17
-
18
-
19
-
20
-
21
-
22
-
23
-
24
-
25
-
26
-
27
-
28
-
29
-
30
-
31
-
32
-
33
-
34
-
35
-
36
-
37
-
38
-
39
-
40
-
41
-
42
-
43
-
44
-
45
-
46
-
47
-
48
-
49
-
50
-
51
-
52
-
53
-
54
-
55
-
56
-
57
-
58
-
59
-
60
-
61
-
62
-
 63
63 -
 64
64 -
 65
65 -
 66
66 -
 67
67 -
 68
68 -
 69
69 -
 70
70 -
 71
71 -
 72
72 -
 73
73 -
74
-
75
-
76
-
77
-
78
-
79
-
80
-
81
-
82
-
83
-
84
-
85
-
86
-
87
-
88
-
89
-
90
-
91
-
92
-
93
-
94
-
95
-
96
-
97
-
98
-
99
-
100
-
101
-
102
-
103
-
104
-
105
-
106
-
107
-
108
-
109
-
110
-
111
-
112
-
113
-
114
-
115
-
116
-
117
-
118
-
119
-
120
-
121
-
122
-
123
-
124
-
125
-
126
-
127
-
128
-
129
-
130
-
131
-
132
-
133
-
134
-
135
-
136
-
137
-
138
-
139
-
140
-
141
-
142
-
143
-
144
-
145
-
146
-
147
-
148
-
149
-
150
-
151
-
152
-
153
-
154
-
155
-
156
-
157
-
158
-
159
-
160
-
161
-
162
-
163
-
164
-
165
-
166
-
167
-
168
-
169
-
170
-
171
-
172
-
173
-
174
-
175
-
176
-
177
-
178
-
179
-
180
-
181
-
182
-
183
-
184
-
185
-
186
-
187
-
188
-
189
-
190
-
191
-
192
-
193
-
194
-
195
-
196
-
197
-
198
 |
 |
