Mackie D8B Owners Manual - Page 39
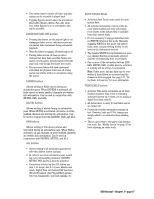
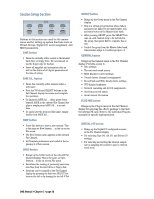
Studio/Solo MEMORY A and B buttons
 |
View all Mackie D8B manuals
Add to My Manuals
Save this manual to your list of manuals |
Page 39 highlights
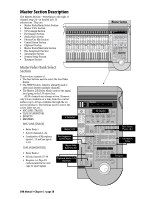
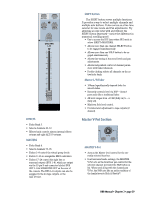
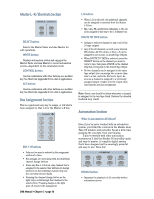
ON button Toggles the selected Fat Channel DSP control parameters on and off in bypass fashion. SETUP button When EQ is selected in the Fat channel, the Setup button lets you select the type of equalization and activate the "EQ to Dynamics" mode. MEMORY A and B buttons • Each channel has two memory locations for EQ, compressor, gate, plug-ins, and surround parameter comparisons. • Any changes to the above controls are temporarily stored in the selected Memory A or B buffers. • Simply press Memory A to instantly recall the settings you developed while Memory A was selected. Press Memory B to instantly switch to alternate settings. • Automation of the parameters will overwrite the buffers unless bypassed. EQ button Press this button to see EQ parameters for the selected channel in the onboard Fat Channel display. GATE button Press this button to see Gate parameters for the selected channel in the onboard Fat Channel display. COMPRESSOR button Press this button to see Compressor parameters for the selected channel in the Fat Channel display. Note: Fat Channel SELECT and page (PREVIOUS and NEXT) buttons are used as additional view tools. PLUG-INS button • Press this button and use the prompts from the VFD to select and navigate through the various plug-in specific parameters. • Use the "Next" and "Previous" buttons to page through all available parameters. Onboard control of plug-ins is intuitive for basic functionality. Refer to the individual Plug-ins Manual for details regarding the use of each plugin via the control surface or on screen. LOAD PATCH button Press this button to load an individual EQ, compressor, or gate patch (saved settings) into the currently selected channel. Plug-in settings previously stored in the onboard library can be loaded into an FX card. DSP type must be selected first. SAVE PATCH button Press this button to store an individual EQ, compressor, gate, or plug-in setting to the onboard library of user presets. You must choose EQ, Gate, Compressor, or a plug-in before trying to save a patch. HELP button Press this button to open the on-screen help window. Click a topic from the Table of Contents to jump to the selected topic. Studio/Solo Section This section contains a V-Pot to control Studio, Solo, and Talkback levels, along with buttons to select various solo functions and talkback to the studio monitor system. MIXDOWN SOLO button • This solo status interrupts the L-R Main outputs to front-of-house speakers or 2-track recorders. It is the destructive solo. • Use this mode whenever you want the soloed track(s) to be the complete mix-a rhythm breakdown is a good example of this. • Mixdown Solo is post-fader and DSP. Level to tape (e.g., 2-track mixdown recorders) is controlled by the Master L/R fader. STUDIO/SOLO MIXDOWN SOLO PFL SOLO RUDE SOLO LIGHT CLEAR SOLO SOLO LEVEL AFL SOLO STUDIO LEVEL TALKBACK TO STUDIO LEVEL TALKBACK LEVEL PFL SOLO button • Activates Pre-Fader Listen on the solo bus. • Accesses the signal before it gets to the fader, so the fader has no effect on the soloed signal. • This is a mono-centered solo feature. Pan has no control over this solo feature. AFL SOLO button • Activates After-Fader Listen on the solo bus. • Accesses the signal after the fader, so fader moves do affect the soloed signal. • This is a stereo bus (post-pan) so soloed chan- nels are heard in their correct pan position. Note: PFL/AFL only affects channel soloing and has no effect on aux send soloing. D8B Manual • Chapter 2 • page 33
-
 1
1 -
2
-
3
-
4
-
5
-
6
-
7
-
8
-
9
-
10
-
11
-
12
-
13
-
14
-
15
-
16
-
17
-
18
-
19
-
20
-
21
-
22
-
23
-
24
-
25
-
26
-
27
-
28
-
29
-
30
-
31
-
32
-
33
-
 34
34 -
 35
35 -
 36
36 -
 37
37 -
 38
38 -
 39
39 -
 40
40 -
 41
41 -
 42
42 -
 43
43 -
 44
44 -
45
-
46
-
47
-
48
-
49
-
50
-
51
-
52
-
53
-
54
-
55
-
56
-
57
-
58
-
59
-
60
-
61
-
62
-
63
-
64
-
65
-
66
-
67
-
68
-
69
-
70
-
71
-
72
-
73
-
74
-
75
-
76
-
77
-
78
-
79
-
80
-
81
-
82
-
83
-
84
-
85
-
86
-
87
-
88
-
89
-
90
-
91
-
92
-
93
-
94
-
95
-
96
-
97
-
98
-
99
-
100
-
101
-
102
-
103
-
104
-
105
-
106
-
107
-
108
-
109
-
110
-
111
-
112
-
113
-
114
-
115
-
116
-
117
-
118
-
119
-
120
-
121
-
122
-
123
-
124
-
125
-
126
-
127
-
128
-
129
-
130
-
131
-
132
-
133
-
134
-
135
-
136
-
137
-
138
-
139
-
140
-
141
-
142
-
143
-
144
-
145
-
146
-
147
-
148
-
149
-
150
-
151
-
152
-
153
-
154
-
155
-
156
-
157
-
158
-
159
-
160
-
161
-
162
-
163
-
164
-
165
-
166
-
167
-
168
-
169
-
170
-
171
-
172
-
173
-
174
-
175
-
176
-
177
-
178
-
179
-
180
-
181
-
182
-
183
-
184
-
185
-
186
-
187
-
188
-
189
-
190
-
191
-
192
-
193
-
194
-
195
-
196
-
197
-
198
 |
 |
