Mackie D8B Owners Manual - Page 96
The Faders Window (Ctrl+8), Event Automation Track (Ctrl+9), Speaker Select, Divergence
 |
View all Mackie D8B manuals
Add to My Manuals
Save this manual to your list of manuals |
Page 96 highlights
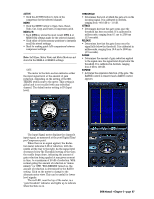
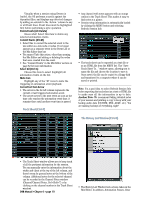
Speaker Select • Highlight the desired speaker number icon to send a specific channel to any or all speakers. • Speakers are always numbered according to function: Front L/R are speakers 1 and 2; Front Center is speaker 3; Rear L/R are speakers 5 and 6; L/R Center are speakers 7 and 8; Speaker 4 is the Subwoofer (or Mono Surround for LCRS). • To set speaker status across a 12 channel row (or a portion of a row), click on a speaker icon and drag parallel left or right-all channels in the row will adopt the speaker status of the originally selected icon. Divergence • This control continuously varies the center image from dead-center (speaker 3) to a phantom-center (equally split between speakers 1 and 2). • With a Divergence setting of "0" the centerpanned channel is routed to the center speaker only (speaker 3). • With a Divergence setting of "100" the centerpanned channel is routed equally to the left and right speakers (speakers 1 and 2). L.F.E. (Low Freq Effect) • This control varies the channel send level to the subwoofer (speaker 4). • This is the only control over individual channel levels to the subwoofer (speaker 4). • The pan grid has no effect on this adjustment. • With this control set to OFF there is no send level to the subwoofer. • Unity gain is achieved when this control is set to "0.0". Pan Ball • Click and drag the pan ball to change surround pan positioning. • Top of the pan grid is front; bottom of the pan grid is rear. • Hold the Control key to restrict the pan ball to vertical movement. • Hold the Alt key down to restrict the pan ball to horizontal movement. Right Click Right click in the desired window to reveal the Surround Menu. This menu provides opportunity to: • Reset the channel surround parameters • Undo previous action • Open previously saved surround channel status • Save existing surround channel parameters • Cut, Copy, or Paste all channel settings The Faders Window (Ctrl+8) TAPE Bank on top This mode places the tape return fader bank in the upper half of the screen display. Now all input faders are available at all times. This offers incredible value in many practical applications, even though the tape fader bank masks the Aux Sends, Bus Assignments, Tape Outs, Digital Trims, as well as EQ, phase, Compressor and Gate on/off buttons. • Record buttons are available on the tape fader bank. • Automation Write buttons are available on all 48 channels. Channel Numbers • Maintains previous channel layout. However, it's not possible to reconfigure channels, once the Faders option is selected. Event Automation Track (Ctrl+9) The Event Automation Track allows for time stamping snapshot recall and modular DSP recall. A list of events can be easily placed, moved, and edited from this handy window. Snapshots, Plugins, Channels, as well as EQ, Compressor, and Gate Patches can all be accessed from the disk and placed with frame-accurate precision. Use this list to trigger files to load at a given timestamp. This is a handy way to automate an EQ, because you can edit the Patch and all references change. One way of looking at the patch event is as a mini snapshot. D8B Manual • Chapter 3 • page 90
-
 1
1 -
2
-
3
-
4
-
5
-
6
-
7
-
8
-
9
-
10
-
11
-
12
-
13
-
14
-
15
-
16
-
17
-
18
-
19
-
20
-
21
-
22
-
23
-
24
-
25
-
26
-
27
-
28
-
29
-
30
-
31
-
32
-
33
-
34
-
35
-
36
-
37
-
38
-
39
-
40
-
41
-
42
-
43
-
44
-
45
-
46
-
47
-
48
-
49
-
50
-
51
-
52
-
53
-
54
-
55
-
56
-
57
-
58
-
59
-
60
-
61
-
62
-
63
-
64
-
65
-
66
-
67
-
68
-
69
-
70
-
71
-
72
-
73
-
74
-
75
-
76
-
77
-
78
-
79
-
80
-
81
-
82
-
83
-
84
-
85
-
86
-
87
-
88
-
89
-
90
-
 91
91 -
 92
92 -
 93
93 -
 94
94 -
 95
95 -
 96
96 -
 97
97 -
 98
98 -
 99
99 -
 100
100 -
 101
101 -
102
-
103
-
104
-
105
-
106
-
107
-
108
-
109
-
110
-
111
-
112
-
113
-
114
-
115
-
116
-
117
-
118
-
119
-
120
-
121
-
122
-
123
-
124
-
125
-
126
-
127
-
128
-
129
-
130
-
131
-
132
-
133
-
134
-
135
-
136
-
137
-
138
-
139
-
140
-
141
-
142
-
143
-
144
-
145
-
146
-
147
-
148
-
149
-
150
-
151
-
152
-
153
-
154
-
155
-
156
-
157
-
158
-
159
-
160
-
161
-
162
-
163
-
164
-
165
-
166
-
167
-
168
-
169
-
170
-
171
-
172
-
173
-
174
-
175
-
176
-
177
-
178
-
179
-
180
-
181
-
182
-
183
-
184
-
185
-
186
-
187
-
188
-
189
-
190
-
191
-
192
-
193
-
194
-
195
-
196
-
197
-
198
 |
 |
