Mackie D8B Owners Manual - Page 26
Summary, Note to Macintosh USB Floppy drive users - service manual
 |
View all Mackie D8B manuals
Add to My Manuals
Save this manual to your list of manuals |
Page 26 highlights
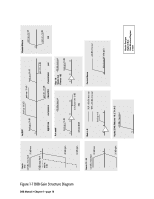
11. Place the 2nd floppy disk in the drive when prompted by the installation software. 12. Remove the 2nd floppy disk when prompted and place the 3rd floppy disk in the drive. 13. Remove the 3rd floppy disk when prompted and power down the console power supply, then power back on. 13. You now have the updated D8B operating system installed. 14. Make sure you read the release notes. They have important info about this upgrade. Note: Repeat the above procedure with the Plugin Service Pack2.sea file to install the plug-in update. After updating the plug-ins software on the D8B, you must perform the "Erase UFX Memory" and "Upgrade UFX Cards" procedures (under Windows in the upper menu bar) to upgrade the UFX cards that are installed in the D8B. Note to Macintosh USB Floppy drive users: Apple's Disk Copy program will not work using the above method with a USB floppy drive because the menu option "Make a Floppy..." will not be available. You must use Aladdin Systems' ShrinkWrap program available for purchase and trial download from http://www.aladdinsys.com/ shrinkwrap/index.html. Once you have ShrinkWrap installed, substitute these steps for steps 3-6 in the above directions. 3. Launch ShrinkWrap. 4. Select "Write Image back to Disk..." from the Image menu (command-B). 5. Locate the image file labeled d8b5xxxx Install 1.img that was extracted onto your hard drive. 6. ShrinkWrap will prompt you to insert a floppy disk into the floppy disk drive. Summary This chapter has been specifically designed to help you understand the basic concept of the Digital 8•Bus architecture. The following two chapters describe the physical surface controls and the software features and capabilities. The last chapter describes specific applications as they pertain to unique recording tasks and needs. Chapters 2 and 3 support what you'll encounter in Chapter 4. Feel free to jump ahead, but keep in mind that you'll probably need to use these second two chapters as a reference for the terms and controls that are new to you. D8B Manual • Chapter 1 • page 20
-
 1
1 -
2
-
3
-
4
-
5
-
6
-
7
-
8
-
9
-
10
-
11
-
12
-
13
-
14
-
15
-
16
-
17
-
18
-
19
-
20
-
 21
21 -
 22
22 -
 23
23 -
 24
24 -
 25
25 -
 26
26 -
 27
27 -
 28
28 -
 29
29 -
 30
30 -
 31
31 -
32
-
33
-
34
-
35
-
36
-
37
-
38
-
39
-
40
-
41
-
42
-
43
-
44
-
45
-
46
-
47
-
48
-
49
-
50
-
51
-
52
-
53
-
54
-
55
-
56
-
57
-
58
-
59
-
60
-
61
-
62
-
63
-
64
-
65
-
66
-
67
-
68
-
69
-
70
-
71
-
72
-
73
-
74
-
75
-
76
-
77
-
78
-
79
-
80
-
81
-
82
-
83
-
84
-
85
-
86
-
87
-
88
-
89
-
90
-
91
-
92
-
93
-
94
-
95
-
96
-
97
-
98
-
99
-
100
-
101
-
102
-
103
-
104
-
105
-
106
-
107
-
108
-
109
-
110
-
111
-
112
-
113
-
114
-
115
-
116
-
117
-
118
-
119
-
120
-
121
-
122
-
123
-
124
-
125
-
126
-
127
-
128
-
129
-
130
-
131
-
132
-
133
-
134
-
135
-
136
-
137
-
138
-
139
-
140
-
141
-
142
-
143
-
144
-
145
-
146
-
147
-
148
-
149
-
150
-
151
-
152
-
153
-
154
-
155
-
156
-
157
-
158
-
159
-
160
-
161
-
162
-
163
-
164
-
165
-
166
-
167
-
168
-
169
-
170
-
171
-
172
-
173
-
174
-
175
-
176
-
177
-
178
-
179
-
180
-
181
-
182
-
183
-
184
-
185
-
186
-
187
-
188
-
189
-
190
-
191
-
192
-
193
-
194
-
195
-
196
-
197
-
198
 |
 |