Mackie D8B Owners Manual - Page 144
Time Code From Playback Device, Auto Touch Mode, Verify MTC at D8B Transport SMPTE Window - repair
 |
View all Mackie D8B manuals
Add to My Manuals
Save this manual to your list of manuals |
Page 144 highlights
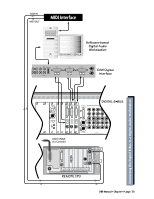
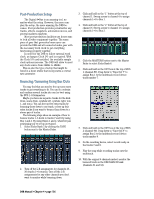
Save Snapshot For Safety As you build the mix, save snapshots as soon as the music begins to reveal itself. Label the snapshots for your own reference. Sometimes these basic mixes, which are derived from your initial "gut" reaction to the music, are the most powerful. Basic dynamic automation does not require these snapshot saves, but they're often useful as the mix comes together, even if only as a crossreference. If you develop a string of snapshots that are very powerful, they can be strung together during automation. However, the procedure we're outlining here highlights dynamic automation. Time Code From Playback Device Route MTC The D8B requires MIDI Time Code (MTC) at the MIDI input to operate automation along with the record/playback device. • Connect the MIDI output of your computer, sequencers, MIDI interface, or transport control to the MIDI input of the D8B. • Most sequencers or other record/playback devices that transmit MTC need to be configured to route to a specific MIDI channel, cable, or device. Consult your MTC source operator's manual to confirm accurate and verifiable routing to the D8B. Verify MTC at D8B Transport SMPTE Window • When your sequencer or other record/playback device is running and MTC is transmitted, the D8B control surface position readout window will scroll MTC. You will see a continuous increase of Hours, Minutes, Seconds, and Frames. If you see this scrolling time code in the D8B POSITION display, it's almost automation time! • MTC also displays in the on-screen Locator window. • If SMPTE VIEW is not selected, the readout will display Bars/Beats/Ticks (BBT). Press the SMPTE VIEW button at the left of the control surface readout to toggle between SMPTE and BBT. Set Default Levels... Once your ducks are in a row, you're ready to begin the automation process! The Set Default Levels..." command determines the starting point for the entire mix. Fader levels can be written from the beginning of time code (00:00:00:00) to the end (23:59:59:30). If you don't set default levels to your preference, levels will jump to any previously selected automation settings as soon as MTC begins. This can be very frustrating, but if you've religiously saved snapshots of your mix status, you won't be far from repair. • Determine that your mix is solid enough that you'd like to have all parameters written as defaults. Don't get too freaked out about this- you'll be tweaking the mix to perfection anyway. • Verify that all channels are selected by choosing each of the four fader banks and confirming that all SELECT buttons are highlighted. • Select Set Default Levels... from the Edit Menu. • Respond "Yes" to complete the task. • If you need to recall your static mix at any point, you can save or update snapshots at any time. Exit Bypass Mode Once the default levels have been set, it's time to exit BYPASS mode. From this point on, any parameter change can be written into automation. Select Parameters Choose the parameters you'd like to record as automation data on the first pass. This is typically a great time to ride basic fader, mute, and pan settings. However, there is no problem with selecting Faders, Mutes, Pan, and ALL so no matter what moves you make, they can be recorded and recalled by the automation processor. Any Combination of Faders, Mutes, and Pans on First Pass • Choose automation parameters by selecting them in the control surface AUTOMATION section, in the on-screen locator window, or the Options/Automation menu. • The D8B shows no favoritism to any or all parameter writing during automation. You'll discover the process that works best for you. Note: Faders, Mutes, and Pan all apply individually to the one parameter they name. ALL applies to all automation parameters other than Faders, Mutes, and Pan. Safety Net: You can undo any automation record pass or series of record passes using the History List. You can also redo your undo. Or undo your redo. Or undo your hairdo. Auto Touch Mode Auto Touch mode offers great flexibility and ease of use. When AUTO TOUCH is selected, automation data is recorded instantaneously for any parameter as soon as you change its setting. Select AUTO TOUCH by highlighting the control surface AUTO TOUCH button, clicking AUTO TOUCH in the on-screen Locator window, or selecting Auto Touch in the Options/Automation menu. You'll know you've succeeded in writing automation data when you see the yellow light illuminate the control surface WRITE button or the on-screen channel WRITE icon. Start playback device • Verify MTC in the Locator position readout. • Verify selection of desired automation parameters-for now select FADERS, MUTES, PAN, and ALL. D8B Manual • Chapter 4 • page 138
-
 1
1 -
2
-
3
-
4
-
5
-
6
-
7
-
8
-
9
-
10
-
11
-
12
-
13
-
14
-
15
-
16
-
17
-
18
-
19
-
20
-
21
-
22
-
23
-
24
-
25
-
26
-
27
-
28
-
29
-
30
-
31
-
32
-
33
-
34
-
35
-
36
-
37
-
38
-
39
-
40
-
41
-
42
-
43
-
44
-
45
-
46
-
47
-
48
-
49
-
50
-
51
-
52
-
53
-
54
-
55
-
56
-
57
-
58
-
59
-
60
-
61
-
62
-
63
-
64
-
65
-
66
-
67
-
68
-
69
-
70
-
71
-
72
-
73
-
74
-
75
-
76
-
77
-
78
-
79
-
80
-
81
-
82
-
83
-
84
-
85
-
86
-
87
-
88
-
89
-
90
-
91
-
92
-
93
-
94
-
95
-
96
-
97
-
98
-
99
-
100
-
101
-
102
-
103
-
104
-
105
-
106
-
107
-
108
-
109
-
110
-
111
-
112
-
113
-
114
-
115
-
116
-
117
-
118
-
119
-
120
-
121
-
122
-
123
-
124
-
125
-
126
-
127
-
128
-
129
-
130
-
131
-
132
-
133
-
134
-
135
-
136
-
137
-
138
-
 139
139 -
 140
140 -
 141
141 -
 142
142 -
 143
143 -
 144
144 -
 145
145 -
 146
146 -
 147
147 -
 148
148 -
 149
149 -
150
-
151
-
152
-
153
-
154
-
155
-
156
-
157
-
158
-
159
-
160
-
161
-
162
-
163
-
164
-
165
-
166
-
167
-
168
-
169
-
170
-
171
-
172
-
173
-
174
-
175
-
176
-
177
-
178
-
179
-
180
-
181
-
182
-
183
-
184
-
185
-
186
-
187
-
188
-
189
-
190
-
191
-
192
-
193
-
194
-
195
-
196
-
197
-
198
 |
 |
